How to Use mkem0022_WS2812B_module: Examples, Pinouts, and Specs
Introduction
The mkem0022_WS2812B module, manufactured by mkevn (Part ID: mkem00022), is a programmable RGB LED strip that allows for individual control of each LED. Each LED is equipped with a built-in driver IC, enabling seamless communication via a single data line. This module is widely used for creating vibrant and dynamic lighting effects in applications such as:
- Decorative lighting for homes, events, and holidays
- Interactive displays and signage
- DIY electronics and hobby projects
- Wearable technology
- Gaming setups and PC case lighting
Its ease of use and versatility make it a popular choice for both beginners and experienced developers.
Explore Projects Built with mkem0022_WS2812B_module


Explore Projects Built with mkem0022_WS2812B_module
Technical Specifications
Key Specifications
| Parameter | Value |
|---|---|
| Manufacturer | mkevn |
| Part ID | mkem00022 |
| LED Type | WS2812B (RGB, individually addressable) |
| Operating Voltage | 5V DC |
| Operating Current | ~60mA per LED (maximum, all colors at full brightness) |
| Communication Protocol | Single-wire (data line) |
| Data Transfer Rate | 800 Kbps |
| Viewing Angle | 120° |
| Operating Temperature | -25°C to +80°C |
| LED Lifespan | ~50,000 hours |
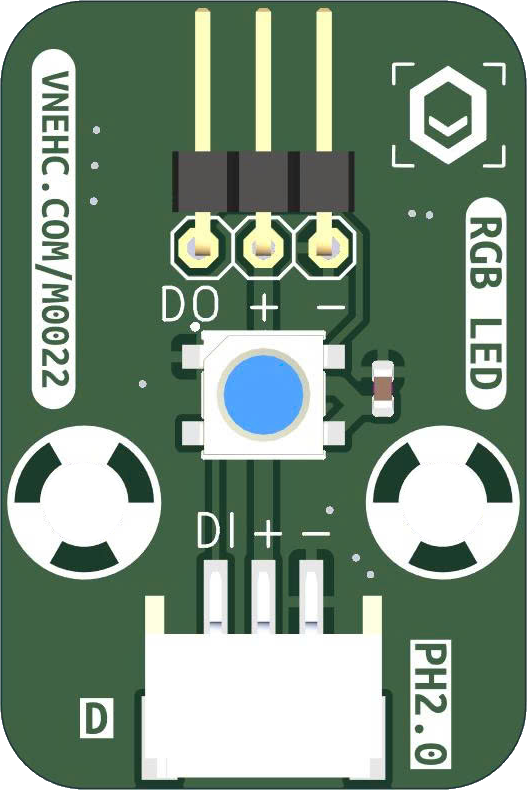
Pin Configuration
The mkem0022_WS2812B module typically has three pins for connection:
| Pin Name | Description | Notes |
|---|---|---|
| VCC | Power supply (5V DC) | Connect to a stable 5V source |
| GND | Ground | Common ground for the circuit |
| DIN | Data input | Connect to the microcontroller's data output pin |
Usage Instructions
How to Use the Component in a Circuit
- Power Supply: Ensure a stable 5V DC power source is available. If using a long LED strip, consider adding a capacitor (e.g., 1000 µF, 6.3V or higher) across the VCC and GND pins to stabilize the voltage.
- Data Line: Connect the DIN pin to the microcontroller's data output pin. A resistor (330–470 ohms) in series with the data line is recommended to protect the LEDs from voltage spikes.
- Grounding: Ensure all components in the circuit share a common ground to avoid communication issues.
- Programming: Use a compatible library (e.g., Adafruit NeoPixel for Arduino) to control the LEDs.
Example Arduino UNO Code
Below is an example of how to control the mkem0022_WS2812B module using an Arduino UNO:
#include <Adafruit_NeoPixel.h>

// Define the number of LEDs in the strip
#define NUM_LEDS 16

// Define the pin connected to the DIN pin of the module
#define DATA_PIN 6

// Create a NeoPixel object
Adafruit_NeoPixel strip = Adafruit_NeoPixel(NUM_LEDS, DATA_PIN, NEO_GRB + NEO_KHZ800);

void setup() {
  strip.begin(); // Initialize the LED strip
  strip.show();  // Turn off all LEDs initially
}

void loop() {
  // Example: Cycle through colors
  for (int i = 0; i < strip.numPixels(); i++) {
    strip.setPixelColor(i, strip.Color(255, 0, 0)); // Set LED to red
    strip.show(); // Update the strip to display the color
    delay(100);   // Wait 100ms before moving to the next LED
  }
}
Important Considerations and Best Practices
- Power Supply: For long LED strips, use a power supply capable of providing sufficient current. Each LED can draw up to 60mA at full brightness.
- Heat Management: Avoid running all LEDs at full brightness for extended periods to prevent overheating.
- Data Line Length: Keep the data line as short as possible to avoid signal degradation. For longer distances, consider using a level shifter to boost the signal.
- Capacitors and Resistors: Use a capacitor across the power lines and a resistor on the data line to improve stability and protect the LEDs.
Troubleshooting and FAQs
Common Issues and Solutions
| Issue | Possible Cause | Solution |
|---|---|---|
| LEDs not lighting up | Incorrect wiring or loose connections | Double-check all connections, especially VCC, GND, and DIN. |
| Flickering or erratic behavior | Signal degradation or noise | Add a resistor (330–470 ohms) to the data line and ensure a common ground. |
| LEDs stuck on one color | Incorrect data signal | Verify the microcontroller code and ensure the correct library is used. |
| Overheating | Excessive current draw | Reduce brightness or limit the number of LEDs powered simultaneously. |
| Dim or inconsistent brightness | Insufficient power supply | Use a power supply with higher current capacity and add a capacitor. |
FAQs
Can I cut the LED strip to a shorter length?
- Yes, the mkem0022_WS2812B module can be cut at designated points (usually marked with a scissor icon). Ensure proper reconnection of VCC, GND, and DIN if needed.
How many LEDs can I control with one microcontroller?
- The number depends on the microcontroller's memory and processing power. For example, an Arduino UNO can typically handle up to 500 LEDs.
Can I power the module with a battery?
- Yes, as long as the battery provides a stable 5V output and sufficient current for the number of LEDs used.
What happens if I reverse the power connections?
- Reversing VCC and GND can damage the LEDs permanently. Always double-check the wiring before powering the module.
By following this documentation, you can effectively integrate the mkem0022_WS2812B module into your projects and create stunning lighting effects with ease!