Cirkit Designer Logo
Cirkit Designer
Your all-in-one circuit design IDE
Home / 
Component Documentation

How to Use SOCKET 3 GANG: Examples, Pinouts, and Specs

Image of SOCKET 3 GANG
Cirkit Designer LogoDesign with SOCKET 3 GANG in Cirkit Designer

Introduction

The SOCKET 3 GANG (Manufacturer: MK, Part ID: 13 AMP DOUBLE POLE) is a versatile multi-socket connector designed to allow the simultaneous connection of up to three devices or components. It is commonly used in electronic circuits for power distribution or signal routing. This component is ideal for applications requiring multiple connections in a compact and organized manner, such as home appliances, industrial equipment, and laboratory setups.

Explore Projects Built with SOCKET 3 GANG

Use Cirkit Designer to design, explore, and prototype these projects online. Some projects support real-time simulation. Click "Open Project" to start designing instantly!
Heater Control Circuit with Power Socket Integration
Image of Simple Water Heater: A project utilizing SOCKET 3 GANG in a practical application
The circuit connects a heater to a power source via a socket. The heater is likely to be powered directly from the socket, with the positive and negative terminals of the socket providing the necessary voltage and ground connections to the heater. There are no control elements or sensors present in the circuit, indicating that the heater operates at a constant power level when connected.
Cirkit Designer LogoOpen Project in Cirkit Designer
Toggle Switch Controlled Lamp Circuit with Banana Sockets
Image of STAIRCASE: A project utilizing SOCKET 3 GANG in a practical application
This circuit consists of two toggle switches and a red lamp connected to panel mount banana sockets. The switches control the connection between the red and black banana sockets, allowing the lamp to be turned on or off depending on the switch positions.
Cirkit Designer LogoOpen Project in Cirkit Designer
ESP32-Controlled AC Lighting System with Current Sensing
Image of medidor-energia-1: A project utilizing SOCKET 3 GANG in a practical application
This circuit features an ESP32 microcontroller connected to a 4-channel relay module, which is used to control the power to three AC LED bulbs. The ESP32's GPIO pins are wired to the relay inputs, enabling it to switch the bulbs on and off. Additionally, a current sensor is connected to one of the relay's common terminals to monitor the current flow, and all LED bulbs share a common neutral connection to a socket.
Cirkit Designer LogoOpen Project in Cirkit Designer
ESP32 CAM Controlled Traffic Light System
Image of traffic light: A project utilizing SOCKET 3 GANG in a practical application
This circuit consists of multiple ESP32 CAM modules each connected to a corresponding traffic light module, controlling the red, yellow, and green LEDs through GPIO pins. A TP4056 charging module is connected to a 12V battery, providing power management and charging capabilities. A rocker switch (SPST) is used to control the power flow from the battery to the ESP32 CAM modules and traffic light modules.
Cirkit Designer LogoOpen Project in Cirkit Designer

Explore Projects Built with SOCKET 3 GANG

Use Cirkit Designer to design, explore, and prototype these projects online. Some projects support real-time simulation. Click "Open Project" to start designing instantly!
Image of Simple Water Heater: A project utilizing SOCKET 3 GANG in a practical application
Heater Control Circuit with Power Socket Integration
The circuit connects a heater to a power source via a socket. The heater is likely to be powered directly from the socket, with the positive and negative terminals of the socket providing the necessary voltage and ground connections to the heater. There are no control elements or sensors present in the circuit, indicating that the heater operates at a constant power level when connected.
Cirkit Designer LogoOpen Project in Cirkit Designer
Image of STAIRCASE: A project utilizing SOCKET 3 GANG in a practical application
Toggle Switch Controlled Lamp Circuit with Banana Sockets
This circuit consists of two toggle switches and a red lamp connected to panel mount banana sockets. The switches control the connection between the red and black banana sockets, allowing the lamp to be turned on or off depending on the switch positions.
Cirkit Designer LogoOpen Project in Cirkit Designer
Image of medidor-energia-1: A project utilizing SOCKET 3 GANG in a practical application
ESP32-Controlled AC Lighting System with Current Sensing
This circuit features an ESP32 microcontroller connected to a 4-channel relay module, which is used to control the power to three AC LED bulbs. The ESP32's GPIO pins are wired to the relay inputs, enabling it to switch the bulbs on and off. Additionally, a current sensor is connected to one of the relay's common terminals to monitor the current flow, and all LED bulbs share a common neutral connection to a socket.
Cirkit Designer LogoOpen Project in Cirkit Designer
Image of traffic light: A project utilizing SOCKET 3 GANG in a practical application
ESP32 CAM Controlled Traffic Light System
This circuit consists of multiple ESP32 CAM modules each connected to a corresponding traffic light module, controlling the red, yellow, and green LEDs through GPIO pins. A TP4056 charging module is connected to a 12V battery, providing power management and charging capabilities. A rocker switch (SPST) is used to control the power flow from the battery to the ESP32 CAM modules and traffic light modules.
Cirkit Designer LogoOpen Project in Cirkit Designer

Common Applications:

  • Power distribution for multiple devices
  • Signal routing in electronic circuits
  • Use in home, office, or industrial environments
  • Temporary or permanent setups requiring multiple connections

Technical Specifications

Key Technical Details:

Parameter Value
Manufacturer MK
Part ID 13 AMP DOUBLE POLE
Number of Sockets 3
Rated Voltage 250V AC
Rated Current 13A
Material High-quality thermoplastic
Mounting Type Surface-mounted
Safety Features Double pole switching
Compliance BS 1363 standards

Pin Configuration and Descriptions:

The SOCKET 3 GANG does not have traditional pins like an IC but instead features three individual sockets. Each socket is designed to accommodate a standard 3-pin plug. Below is a description of the key connections:

Socket Pin Description
Live (L) Supplies the live AC voltage
Neutral (N) Returns the current to the power source
Earth (E) Provides grounding for safety

Usage Instructions

How to Use the SOCKET 3 GANG:

  1. Mounting the Socket:

    • Secure the SOCKET 3 GANG to a flat surface using screws or adhesive, depending on the mounting type.
    • Ensure the socket is installed in a location free from moisture or excessive heat.
  2. Wiring the Socket:

    • Connect the live (L), neutral (N), and earth (E) wires to the corresponding terminals on the back of the socket.
    • Use a screwdriver to tighten the terminal screws securely.
    • Double-check all connections to ensure proper wiring.
  3. Connecting Devices:

    • Insert the 3-pin plugs of your devices into the sockets.
    • Ensure the plugs are fully inserted for a secure connection.
  4. Powering On:

    • Switch on the socket using the double pole switch.
    • Verify that the connected devices are receiving power.

Important Considerations:

  • Always ensure the total current drawn by connected devices does not exceed 13A.
  • Use only with devices rated for 250V AC.
  • Ensure proper grounding to avoid electrical hazards.
  • Do not use the socket in wet or damp environments unless it is specifically rated for such conditions.

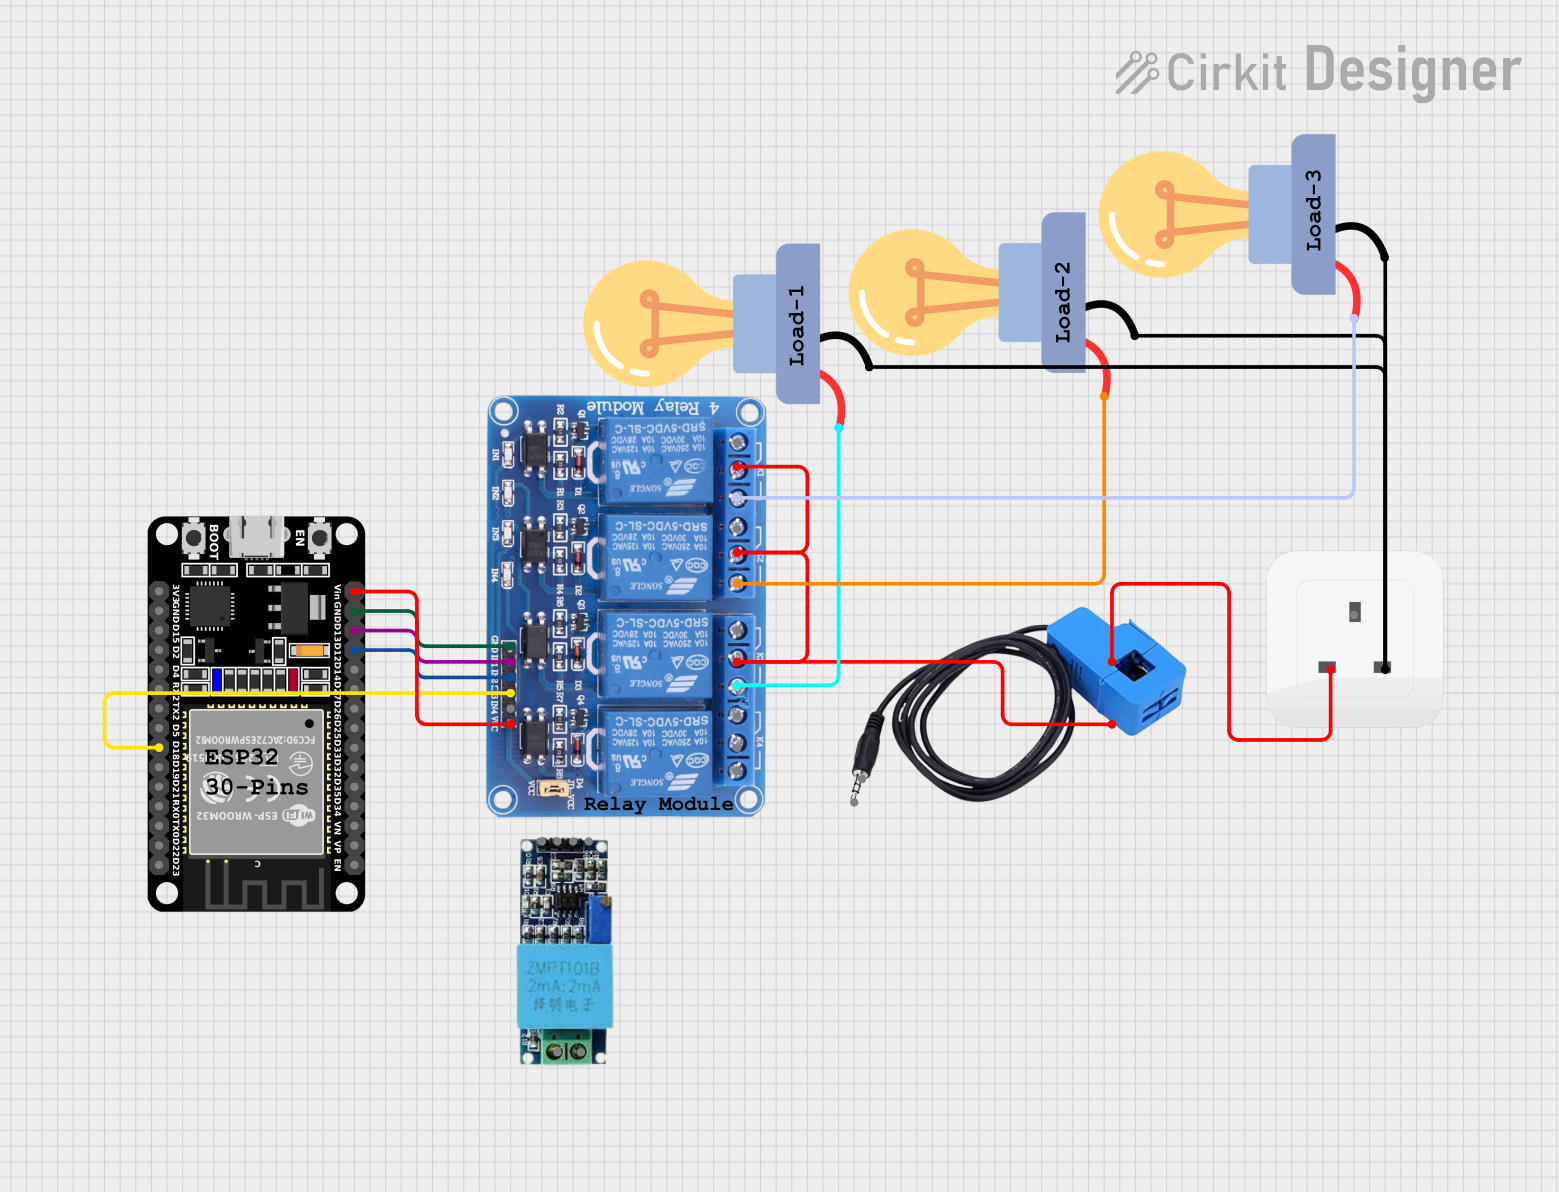
Example Use Case with Arduino UNO:

While the SOCKET 3 GANG is not directly connected to an Arduino UNO, it can be used to power external devices (e.g., motors, lights) that are controlled by the Arduino. Below is an example of how to use the socket in a setup:

// Example: Controlling a lamp powered via SOCKET 3 GANG using a relay module
// Ensure the relay module is connected to the Arduino and the lamp is plugged
// into the SOCKET 3 GANG. The relay acts as a switch for the lamp.

int relayPin = 7; // Pin connected to the relay module

void setup() {
  pinMode(relayPin, OUTPUT); // Set relay pin as output
}

void loop() {
  digitalWrite(relayPin, HIGH); // Turn on the lamp
  delay(5000);                 // Keep it on for 5 seconds
  digitalWrite(relayPin, LOW);  // Turn off the lamp
  delay(5000);                 // Keep it off for 5 seconds
}

Note: Ensure the relay module is rated for the voltage and current of the device connected to the SOCKET 3 GANG.

Troubleshooting and FAQs

Common Issues and Solutions:

  1. Issue: Devices do not power on when connected to the socket.

    • Solution: Check the wiring of the live, neutral, and earth connections. Ensure the double pole switch is turned on.
  2. Issue: Overheating of the socket.

    • Solution: Verify that the total current drawn by connected devices does not exceed 13A. Disconnect any high-power devices.
  3. Issue: Sparks or unusual noise when plugging in devices.

    • Solution: Inspect the socket for damage or loose connections. Replace the socket if necessary.
  4. Issue: The socket does not fit the plug.

    • Solution: Ensure the plug is a standard 3-pin plug compliant with BS 1363 standards.

FAQs:

  • Q: Can I use this socket outdoors?
    A: The SOCKET 3 GANG is not designed for outdoor use unless specifically rated for weather resistance.

  • Q: Can I connect high-power appliances like heaters?
    A: Yes, as long as the total current does not exceed 13A.

  • Q: Is the socket childproof?
    A: The SOCKET 3 GANG may include safety shutters, but additional childproofing measures are recommended for households with children.

By following this documentation, users can safely and effectively utilize the SOCKET 3 GANG for their power distribution needs.