Cirkit Designer Logo
Cirkit Designer
Your all-in-one circuit design IDE
Home / 
Component Documentation

How to Use OpenSegment Serial Display - 20mm (Blue): Examples, Pinouts, and Specs

Image of OpenSegment Serial Display - 20mm (Blue)
Cirkit Designer LogoDesign with OpenSegment Serial Display - 20mm (Blue) in Cirkit Designer

Introduction

The OpenSegment Serial Display is a versatile and bright single-digit 7-segment display module that is designed for easy integration into a wide range of electronic projects. This display operates via serial communication, allowing users to control it using simple serial commands. The blue 20mm display is highly visible and is commonly used in applications such as counters, timers, and numeric indicators.

Explore Projects Built with OpenSegment Serial Display - 20mm (Blue)

Use Cirkit Designer to design, explore, and prototype these projects online. Some projects support real-time simulation. Click "Open Project" to start designing instantly!
Arduino UNO Controlled LED and 7-Segment Display Circuit
Image of Beunen aan water: A project utilizing OpenSegment Serial Display - 20mm (Blue) in a practical application
This circuit features an Arduino UNO controlling multiple blue LEDs and a 4-digit 7-segment display. The LEDs are configured with current-limiting resistors, and the display is interfaced with the Arduino for potential numeric or character output. The provided code for the Arduino is a template without specific functionality.
Cirkit Designer LogoOpen Project in Cirkit Designer
ESP32-Powered OLED Display Interface
Image of Display: A project utilizing OpenSegment Serial Display - 20mm (Blue) in a practical application
This circuit connects an ESP32 microcontroller to a 0.96" OLED display via I2C communication protocol. The ESP32's pins D22 and D21 are used as the serial clock (SCK) and serial data (SDA) lines, respectively, to interface with the OLED's corresponding SCK and SDA pins. The OLED is powered by the 3.3V output from the ESP32, and both devices share a common ground. The embedded code initializes the display and prints 'Hello, ESP32!' on the screen.
Cirkit Designer LogoOpen Project in Cirkit Designer
Arduino Nano 33 BLE Battery-Powered Display Interface
Image of senior design 1: A project utilizing OpenSegment Serial Display - 20mm (Blue) in a practical application
This circuit features a Nano 33 BLE microcontroller interfaced with a TM1637 4-digit 7-segment display for information output, powered by a 3.7V battery managed by a TP4056 charging module. The microcontroller communicates with the display to present data, while the TP4056 ensures the battery is charged safely and provides power to the system.
Cirkit Designer LogoOpen Project in Cirkit Designer
Arduino UNO Based Ultrasonic Distance Measurement with TM1637 Display
Image of UNDERWATER SENSOR: A project utilizing OpenSegment Serial Display - 20mm (Blue) in a practical application
This circuit is designed to measure distance using the JSN-SR04T ultrasonic sensor and display the measured value on a TM1637 4-digit 7-segment display. The Arduino UNO serves as the central controller, running code to operate the sensor, calculate the distance, and update the display. The sensor's TRIG and ECHO pins are connected to digital pins D12 and D11 of the Arduino, respectively, while the display's CLK and DIO pins are connected to digital pins D3 and D4, with both the sensor and display sharing power and ground connections with the Arduino.
Cirkit Designer LogoOpen Project in Cirkit Designer

Explore Projects Built with OpenSegment Serial Display - 20mm (Blue)

Use Cirkit Designer to design, explore, and prototype these projects online. Some projects support real-time simulation. Click "Open Project" to start designing instantly!
Image of Beunen aan water: A project utilizing OpenSegment Serial Display - 20mm (Blue) in a practical application
Arduino UNO Controlled LED and 7-Segment Display Circuit
This circuit features an Arduino UNO controlling multiple blue LEDs and a 4-digit 7-segment display. The LEDs are configured with current-limiting resistors, and the display is interfaced with the Arduino for potential numeric or character output. The provided code for the Arduino is a template without specific functionality.
Cirkit Designer LogoOpen Project in Cirkit Designer
Image of Display: A project utilizing OpenSegment Serial Display - 20mm (Blue) in a practical application
ESP32-Powered OLED Display Interface
This circuit connects an ESP32 microcontroller to a 0.96" OLED display via I2C communication protocol. The ESP32's pins D22 and D21 are used as the serial clock (SCK) and serial data (SDA) lines, respectively, to interface with the OLED's corresponding SCK and SDA pins. The OLED is powered by the 3.3V output from the ESP32, and both devices share a common ground. The embedded code initializes the display and prints 'Hello, ESP32!' on the screen.
Cirkit Designer LogoOpen Project in Cirkit Designer
Image of senior design 1: A project utilizing OpenSegment Serial Display - 20mm (Blue) in a practical application
Arduino Nano 33 BLE Battery-Powered Display Interface
This circuit features a Nano 33 BLE microcontroller interfaced with a TM1637 4-digit 7-segment display for information output, powered by a 3.7V battery managed by a TP4056 charging module. The microcontroller communicates with the display to present data, while the TP4056 ensures the battery is charged safely and provides power to the system.
Cirkit Designer LogoOpen Project in Cirkit Designer
Image of UNDERWATER SENSOR: A project utilizing OpenSegment Serial Display - 20mm (Blue) in a practical application
Arduino UNO Based Ultrasonic Distance Measurement with TM1637 Display
This circuit is designed to measure distance using the JSN-SR04T ultrasonic sensor and display the measured value on a TM1637 4-digit 7-segment display. The Arduino UNO serves as the central controller, running code to operate the sensor, calculate the distance, and update the display. The sensor's TRIG and ECHO pins are connected to digital pins D12 and D11 of the Arduino, respectively, while the display's CLK and DIO pins are connected to digital pins D3 and D4, with both the sensor and display sharing power and ground connections with the Arduino.
Cirkit Designer LogoOpen Project in Cirkit Designer

Common Applications and Use Cases

  • Digital clocks and timers
  • Counter displays for events or devices
  • Temperature or other sensor value displays
  • User interfaces for electronic devices
  • Scoreboards for games or sports

Technical Specifications

Key Technical Details

  • Display Color: Blue
  • Digit Height: 20mm
  • Operating Voltage: 3.3V to 5V
  • Maximum Current: 80mA (typical usage)
  • Communication: Serial (TTL)
  • Baud Rate: Configurable (default 9600 bps)
  • Character Set: 0-9, A-F (Hexadecimal)

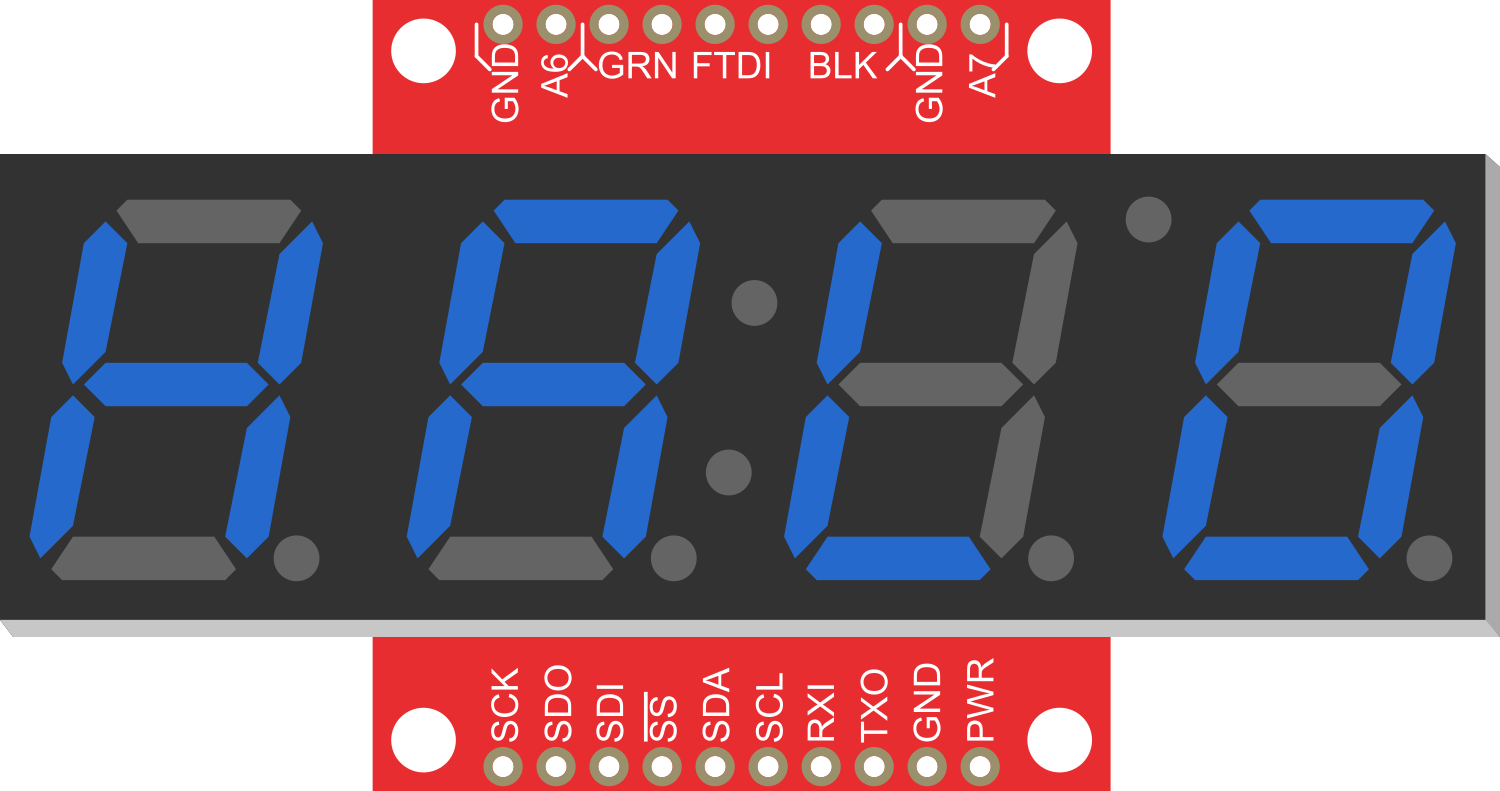
Pin Configuration and Descriptions

Pin Number Name Description
1 VCC Power supply (3.3V to 5V)
2 GND Ground connection
3 RX Serial receive pin
4 TX Serial transmit pin (not used)

Usage Instructions

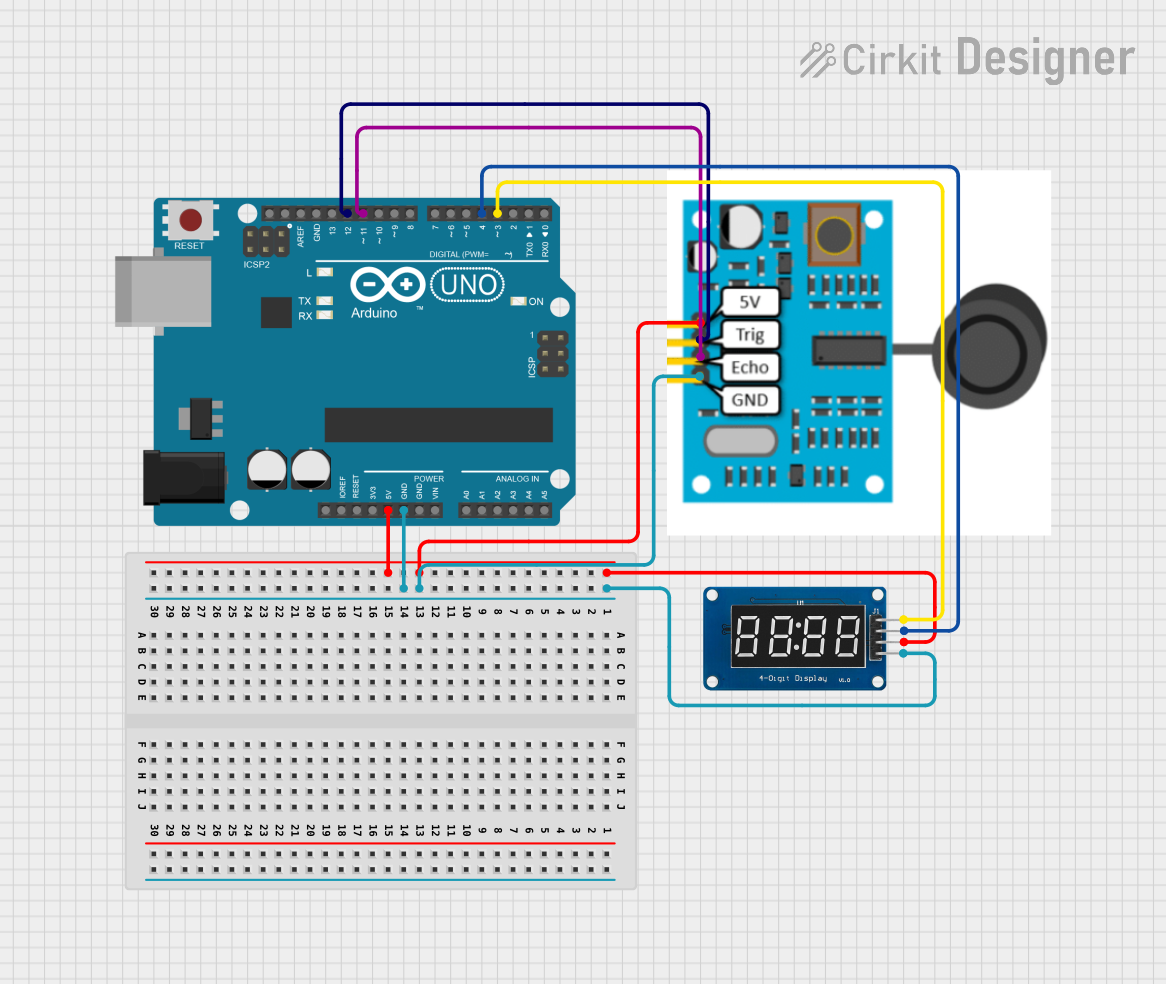
How to Use the Component in a Circuit

  1. Power Connection: Connect the VCC pin to a 3.3V or 5V power supply and the GND pin to the ground.
  2. Serial Connection: Connect the RX pin to the TX pin of your microcontroller (e.g., Arduino UNO).
  3. Programming: Send serial commands from your microcontroller to control the display.

Important Considerations and Best Practices

  • Ensure that the power supply voltage does not exceed the maximum rating of 5V.
  • Limit the length of the serial cable to reduce signal degradation.
  • Use a common ground between the OpenSegment display and the microcontroller.
  • Avoid exposing the display to moisture or extreme temperatures.

Example Code for Arduino UNO

#include <SoftwareSerial.h>

// RX pin is not used, set to -1. TX pin is connected to OpenSegment's RX pin.
SoftwareSerial openSegmentSerial(-1, 2); // RX, TX

void setup() {
  // Start serial communication with the OpenSegment display at 9600 bps
  openSegmentSerial.begin(9600);
}

void loop() {
  // Send a numeric value to the display
  openSegmentSerial.print(5);
  delay(1000); // Wait for 1 second

  // Send a hexadecimal character to the display
  openSegmentSerial.print("A");
  delay(1000); // Wait for 1 second
}

Troubleshooting and FAQs

Common Issues

  • Display Not Lighting Up: Check the power connections and ensure the supply voltage is within the specified range.
  • Garbled or No Display: Verify the baud rate settings and the serial connections.
  • Flickering Display: Ensure that the current draw is within the limits and that the power supply is stable.

Solutions and Tips for Troubleshooting

  • Double-check wiring, especially the VCC and GND connections.
  • Use a multimeter to verify the voltage at the display's power pins.
  • If using long cables, consider using a lower baud rate to improve communication reliability.
  • Reset the power to the display if it becomes unresponsive.

FAQs

Q: Can I daisy-chain multiple OpenSegment displays? A: Yes, multiple displays can be daisy-chained, but each must be individually addressed.

Q: How do I change the baud rate? A: The baud rate can be changed using a specific serial command as per the display's datasheet.

Q: Is it possible to control the brightness of the display? A: Yes, the brightness can typically be controlled via serial commands.

Q: Can I display letters as well as numbers? A: The display supports a limited character set, including numbers 0-9 and hexadecimal characters A-F.

For further assistance, consult the manufacturer's datasheet and technical support resources.