Cirkit Designer Logo
Cirkit Designer
Your all-in-one circuit design IDE
Home / 
Component Documentation

How to Use Adafruit 2.8 inch Captouch TFT: Examples, Pinouts, and Specs

Image of Adafruit 2.8 inch Captouch TFT
Cirkit Designer LogoDesign with Adafruit 2.8 inch Captouch TFT in Cirkit Designer

Introduction

The Adafruit 2.8 inch Captouch TFT is a vibrant, colorful touch screen display module that offers a compact and interactive interface for your projects. With a 2.8-inch diagonal, it features a 320x240 pixel resolution and capacitive touch sensing, which can detect finger presses with high accuracy. This module is ideal for building user interfaces for microcontroller-based projects, such as DIY electronics, home automation systems, and handheld instruments.

Explore Projects Built with Adafruit 2.8 inch Captouch TFT

Use Cirkit Designer to design, explore, and prototype these projects online. Some projects support real-time simulation. Click "Open Project" to start designing instantly!
Arduino Mega 2560 Controlled TFT Touchscreen Interface
Image of Tablero Moto: A project utilizing Adafruit 2.8 inch Captouch TFT in a practical application
This circuit connects an Arduino Mega 2560 microcontroller to a 3.5-inch 480x320 TFT LCD display. The Arduino provides power, ground, and digital signals to control the display, including data lines for pixel information and control lines for reset, write, and command/data selection. The embedded code initializes the display and configures the Arduino's pins for communication, likely to create a user interface or visual output for a project.
Cirkit Designer LogoOpen Project in Cirkit Designer
Arduino UNO Controlled Interface with TFT Display and Feedback Indicators
Image of Mission Control: A project utilizing Adafruit 2.8 inch Captouch TFT in a practical application
This circuit features an Arduino UNO microcontroller connected to a capacitive touch TFT display for user interface, three LEDs for visual feedback, a buzzer for audio alerts, and multiple pushbuttons for user input. It is designed to interact with users through the display and buttons, control visual and audio indicators, and can be customized via the provided code template.
Cirkit Designer LogoOpen Project in Cirkit Designer
Arduino Nano Controlled TFT Display with Multiple Pushbuttons
Image of rey: A project utilizing Adafruit 2.8 inch Captouch TFT in a practical application
This circuit features an Arduino Nano microcontroller connected to a ST7735 128x128 1.44 TFT I2C Color display and multiple pushbuttons. The display is interfaced with the Arduino via digital pins for control signals and SPI pins for data transfer. The pushbuttons are connected to various digital and analog input pins on the Arduino, likely intended for user input to control the display or other functions within the code.
Cirkit Designer LogoOpen Project in Cirkit Designer
ESP32-Powered 1.3 inch TFT Display Module for Visual Data Output
Image of ESP32+ST7789: A project utilizing Adafruit 2.8 inch Captouch TFT in a practical application
This circuit connects an ESP32 microcontroller to a 1.3 inch TFT display module (ST7789). The ESP32 provides power and control signals to the display, enabling it to show graphical data.
Cirkit Designer LogoOpen Project in Cirkit Designer

Explore Projects Built with Adafruit 2.8 inch Captouch TFT

Use Cirkit Designer to design, explore, and prototype these projects online. Some projects support real-time simulation. Click "Open Project" to start designing instantly!
Image of Tablero Moto: A project utilizing Adafruit 2.8 inch Captouch TFT in a practical application
Arduino Mega 2560 Controlled TFT Touchscreen Interface
This circuit connects an Arduino Mega 2560 microcontroller to a 3.5-inch 480x320 TFT LCD display. The Arduino provides power, ground, and digital signals to control the display, including data lines for pixel information and control lines for reset, write, and command/data selection. The embedded code initializes the display and configures the Arduino's pins for communication, likely to create a user interface or visual output for a project.
Cirkit Designer LogoOpen Project in Cirkit Designer
Image of Mission Control: A project utilizing Adafruit 2.8 inch Captouch TFT in a practical application
Arduino UNO Controlled Interface with TFT Display and Feedback Indicators
This circuit features an Arduino UNO microcontroller connected to a capacitive touch TFT display for user interface, three LEDs for visual feedback, a buzzer for audio alerts, and multiple pushbuttons for user input. It is designed to interact with users through the display and buttons, control visual and audio indicators, and can be customized via the provided code template.
Cirkit Designer LogoOpen Project in Cirkit Designer
Image of rey: A project utilizing Adafruit 2.8 inch Captouch TFT in a practical application
Arduino Nano Controlled TFT Display with Multiple Pushbuttons
This circuit features an Arduino Nano microcontroller connected to a ST7735 128x128 1.44 TFT I2C Color display and multiple pushbuttons. The display is interfaced with the Arduino via digital pins for control signals and SPI pins for data transfer. The pushbuttons are connected to various digital and analog input pins on the Arduino, likely intended for user input to control the display or other functions within the code.
Cirkit Designer LogoOpen Project in Cirkit Designer
Image of ESP32+ST7789: A project utilizing Adafruit 2.8 inch Captouch TFT in a practical application
ESP32-Powered 1.3 inch TFT Display Module for Visual Data Output
This circuit connects an ESP32 microcontroller to a 1.3 inch TFT display module (ST7789). The ESP32 provides power and control signals to the display, enabling it to show graphical data.
Cirkit Designer LogoOpen Project in Cirkit Designer

Common Applications and Use Cases

  • Interactive control panels
  • Portable gaming devices
  • Home automation interfaces
  • Educational electronics projects
  • Prototyping user interfaces for embedded systems

Technical Specifications

Key Technical Details

  • Display Size: 2.8 inches diagonal
  • Resolution: 320x240 pixels
  • Interface: SPI (Serial Peripheral Interface)
  • Touch Sensor: Capacitive touch panel
  • Operating Voltage: 3.3V to 5V

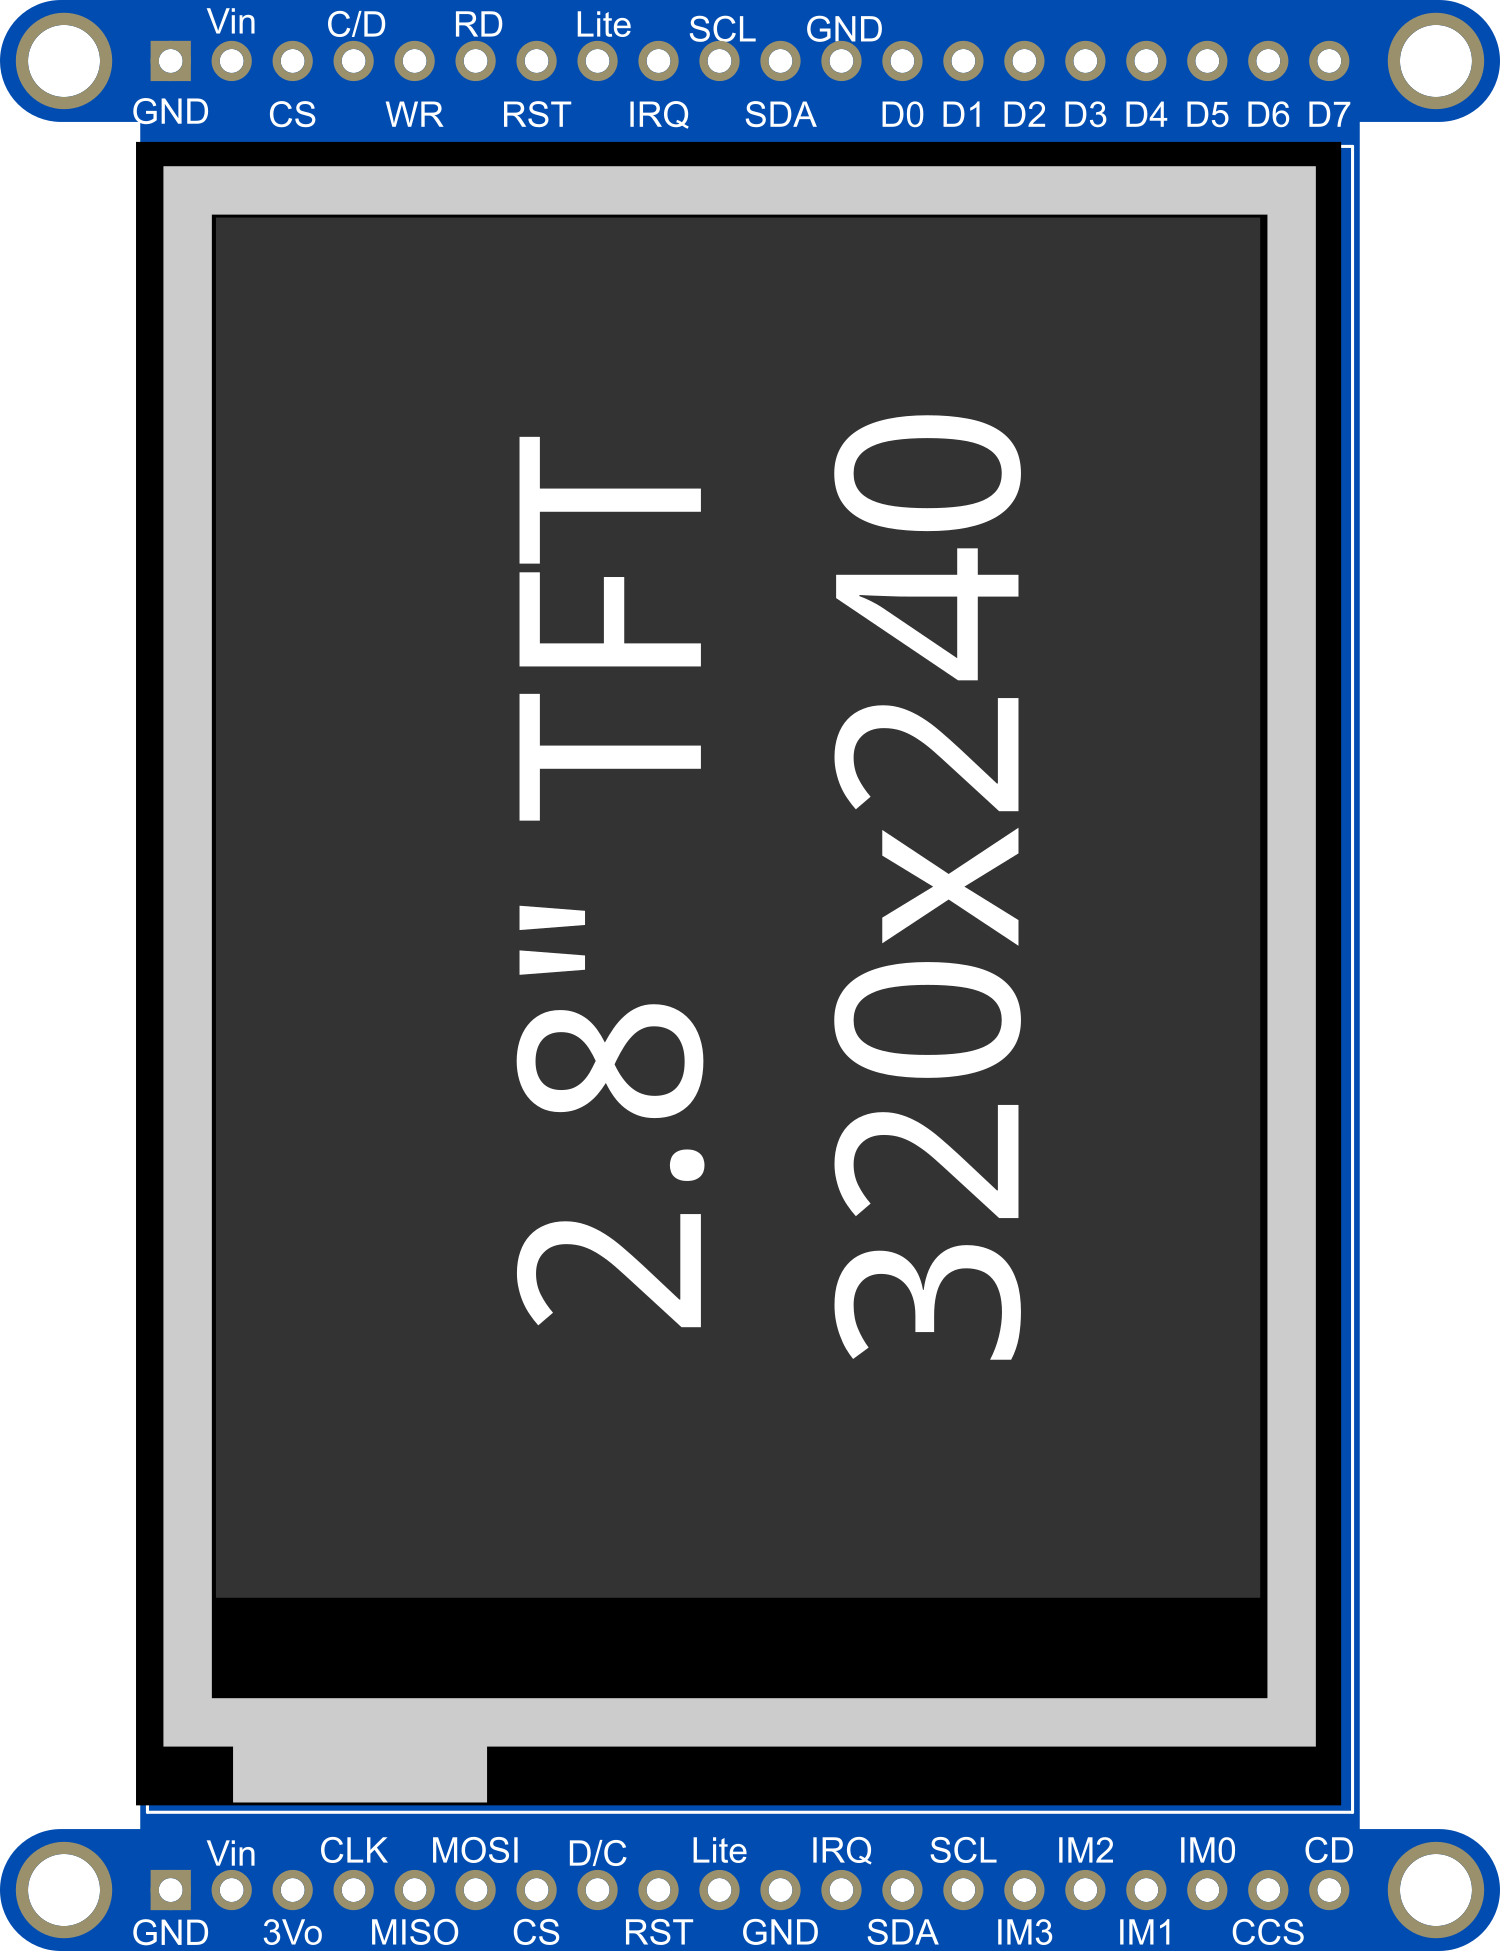
Pin Configuration and Descriptions

Pin Number Name Description
1 VIN Power supply (3.3V to 5V)
2 GND Ground connection
3 CS Chip Select for SPI
4 RESET Reset pin
5 D/C Data/Command control pin
6 MOSI SPI Master Out Slave In
7 SCLK SPI Clock
8 MISO SPI Master In Slave Out (not used)
9 STMPE_CS Chip Select for touch controller
10 LITE Backlight control pin

Usage Instructions

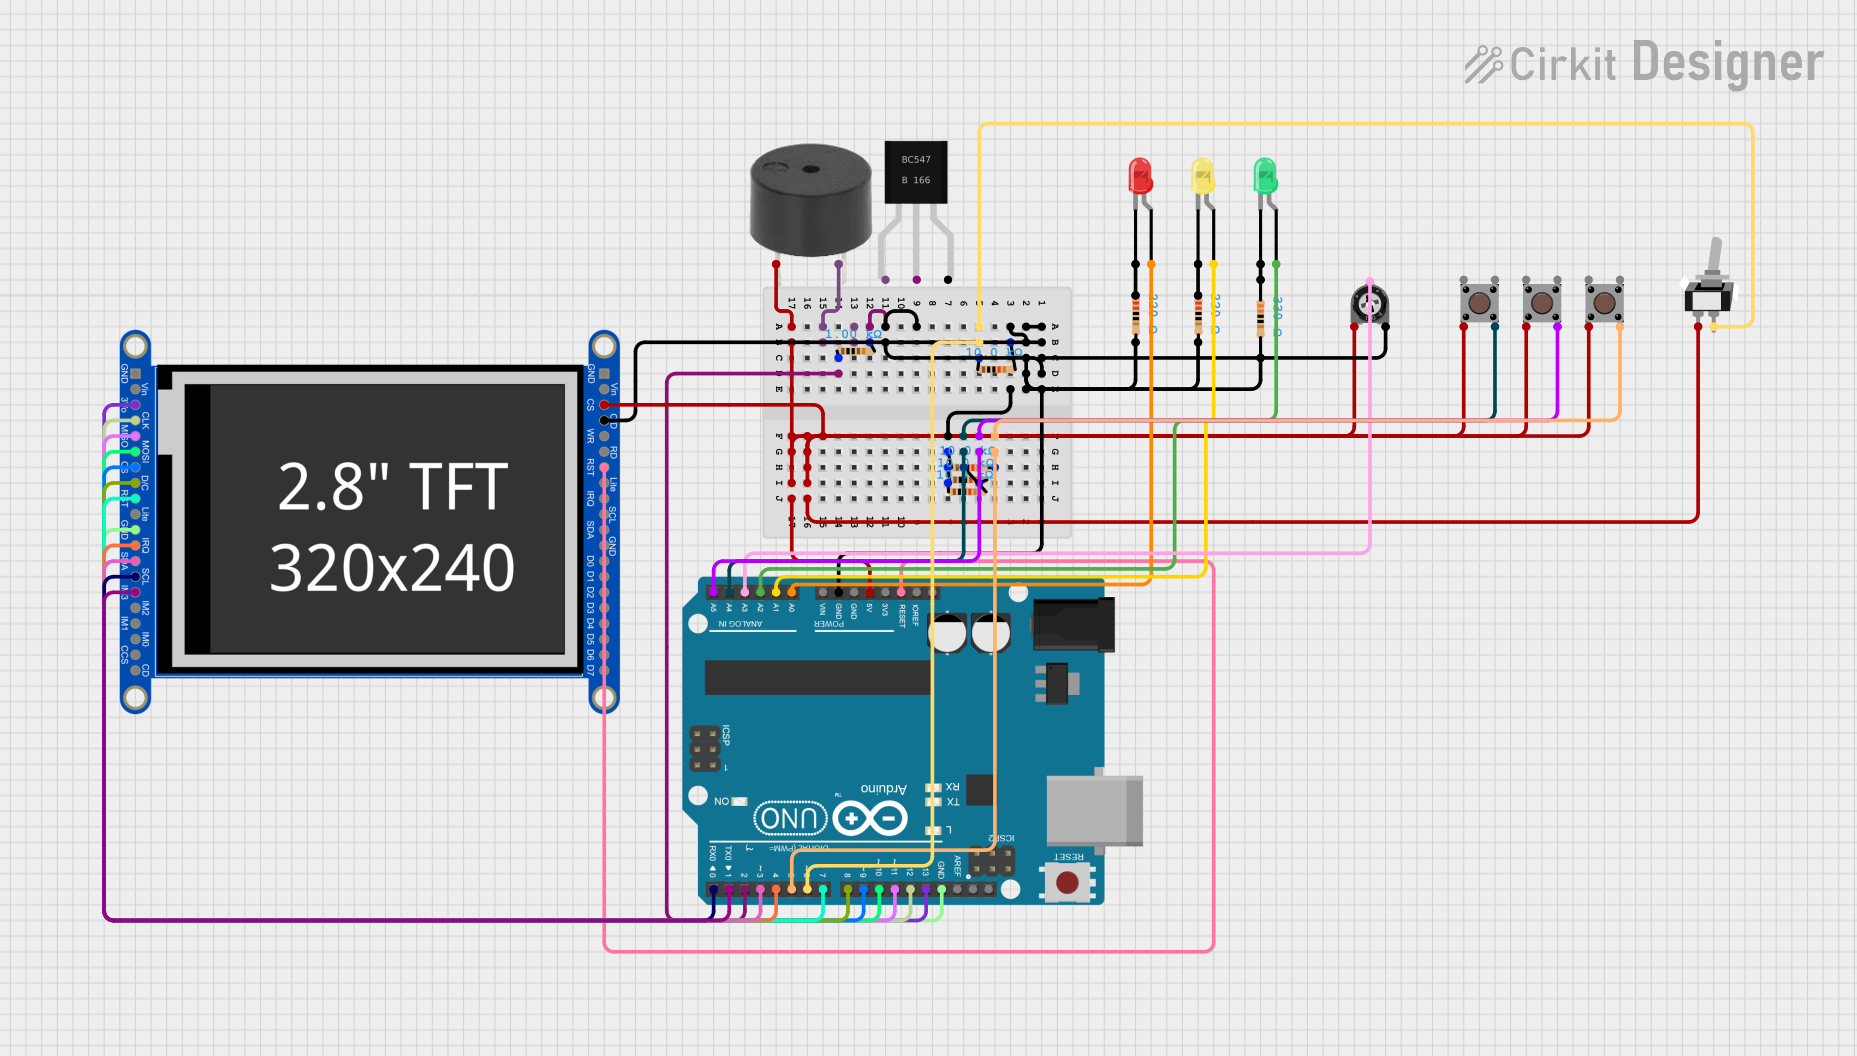
How to Use the Component in a Circuit

  1. Power Connections: Connect the VIN pin to a 3.3V or 5V power supply, and the GND pin to the ground.

  2. SPI Connections: Connect the SCLK, MOSI, and CS pins to the corresponding SPI pins on your microcontroller. The MISO pin is not used for this display.

  3. Control Pins: Connect the RESET and D/C pins to any available digital I/O pins on your microcontroller.

  4. Touch Controller: Connect the STMPE_CS pin to another digital I/O pin for the capacitive touch controller.

  5. Backlight Control: The LITE pin can be connected to a PWM-capable pin for backlight brightness control or to a digital I/O pin for on/off control.

Important Considerations and Best Practices

  • Use a level shifter if your microcontroller operates at a logic level higher than 3.3V to prevent damage to the display.
  • Always initialize the display and touch controller in your setup code.
  • When using PWM for backlight control, ensure that the frequency does not interfere with the touch sensing.
  • Avoid applying pressure to the screen as it may damage the capacitive touch sensor.

Example Code for Arduino UNO

#include <Adafruit_GFX.h>         // Core graphics library
#include <Adafruit_TFTLCD.h>      // Hardware-specific library
#include <TouchScreen.h>          // Touch library

#define LCD_CS A3 // Chip Select
#define LCD_CD A2 // Command/Data
#define LCD_WR A1 // LCD Write
#define LCD_RD A0 // LCD Read
#define LCD_RESET A4 // Can alternately just connect to Arduino's reset pin

// Initialize Adafruit TFTLCD library with the hardware-specific configuration:
Adafruit_TFTLCD tft(LCD_CS, LCD_CD, LCD_WR, LCD_RD, LCD_RESET);

void setup() {
  Serial.begin(9600);
  tft.reset();
  uint16_t identifier = tft.readID();
  tft.begin(identifier);
  tft.fillScreen(BLACK);
  tft.setCursor(0, 0);
  tft.setTextColor(WHITE);  
  tft.setTextSize(1);
  tft.println("Hello, world!");
}

void loop() {
  // Main loop - add your code here to interact with the display
}

Troubleshooting and FAQs

Common Issues Users Might Face

  • Display not powering on: Check the power connections and ensure the VIN pin is receiving the correct voltage.
  • Touch not responsive: Verify the STMPE_CS pin is correctly connected and initialized in your code.
  • Garbled or no display: Ensure that the SPI connections are secure and that the correct pins are used for CS, RESET, and D/C.

Solutions and Tips for Troubleshooting

  • Double-check wiring against the pin configuration table.
  • Make sure the library versions for Adafruit_GFX and Adafruit_TFTLCD are compatible and up to date.
  • If using an Arduino UNO, ensure that the pins defined in the code match the physical connections.

FAQs

Q: Can I use this display with a 5V microcontroller like an Arduino UNO? A: Yes, the display can be used with a 5V microcontroller, but ensure that the logic levels for the SPI and control pins are shifted down to 3.3V if necessary.

Q: How can I adjust the brightness of the display? A: You can adjust the brightness by applying a PWM signal to the LITE pin.

Q: What should I do if the display is not responding to touch? A: Check the connection to the STMPE_CS pin and ensure that the touch controller is properly initialized in your code. Also, make sure that the screen is clean and free of any debris that might interfere with touch detection.