
How to Use Adafruit Mini Relay FeatherWing: Examples, Pinouts, and Specs
 Design with Adafruit Mini Relay FeatherWing in Cirkit Designer
Introduction
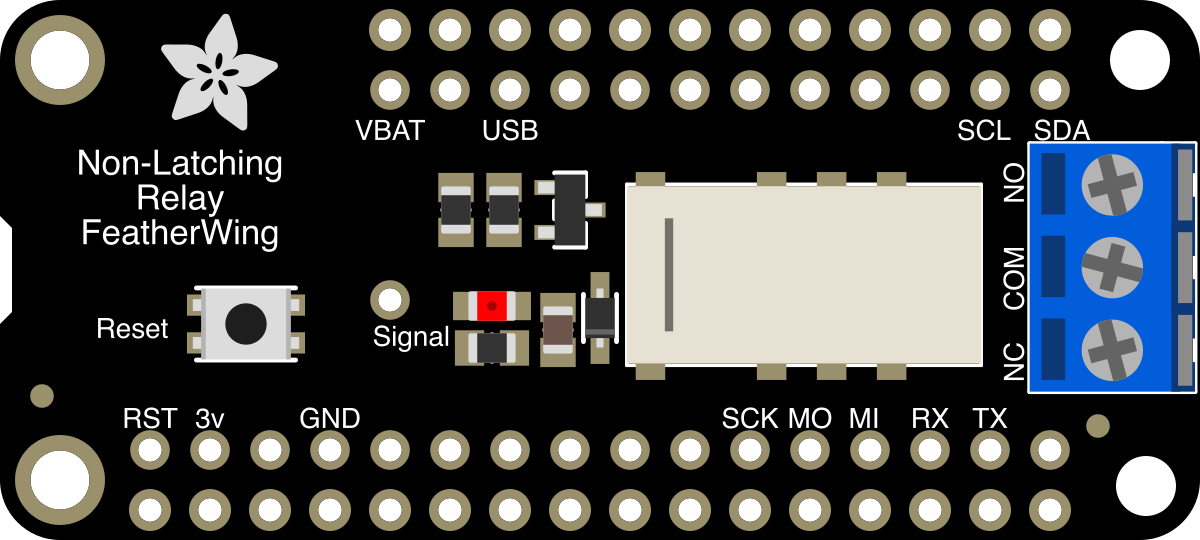
The Adafruit Mini Relay FeatherWing (Manufacturer Part ID: 2895) is a compact relay board designed to seamlessly integrate with Adafruit Feather microcontroller boards. It allows users to control high-voltage devices (up to 250V AC or 28V DC) using low-voltage signals from a Feather board. This makes it an ideal solution for projects requiring the control of motors, lights, or other high-power devices.
Explore Projects Built with Adafruit Mini Relay FeatherWing
 Open Project in Cirkit Designer
 Open Project in Cirkit Designer
 Open Project in Cirkit Designer
 Open Project in Cirkit Designer
Explore Projects Built with Adafruit Mini Relay FeatherWing
Open Project in Cirkit DesignerOpen Project in Cirkit DesignerOpen Project in Cirkit DesignerOpen Project in Cirkit DesignerCommon Applications and Use Cases
- Home automation systems (e.g., controlling lights or appliances)
- Robotics (e.g., motor control)
- Industrial control systems
- IoT projects requiring high-voltage switching
- Prototyping and educational projects
Technical Specifications
The Adafruit Mini Relay FeatherWing is built for reliability and ease of use. Below are its key technical details:
Key Specifications
| Parameter | Value |
|---|---|
| Operating Voltage | 3.3V or 5V (depending on Feather board) |
| Relay Type | SPDT (Single Pole Double Throw) |
| Max Switching Voltage | 250V AC / 28V DC |
| Max Switching Current | 10A |
| Dimensions | 50mm x 23mm x 8mm |
| Weight | 6g |
Pin Configuration and Descriptions
The Mini Relay FeatherWing connects directly to the Feather board via its headers. It also provides screw terminals for connecting external devices. Below is the pin configuration:
Feather Header Pins
| Pin Name | Description |
|---|---|
| VIN | Power input (3.3V or 5V from Feather board) |
| GND | Ground connection |
| RELAY | Control signal for the relay (logic HIGH to activate) |
Screw Terminal Pins
| Terminal Name | Description |
|---|---|
| COM | Common terminal for the relay |
| NO | Normally Open terminal (connected to COM when relay is active) |
| NC | Normally Closed terminal (connected to COM when relay is inactive) |
Usage Instructions
The Adafruit Mini Relay FeatherWing is straightforward to use with any Feather board. Follow the steps below to integrate it into your project:
Step 1: Hardware Setup
- Attach the FeatherWing: Plug the Mini Relay FeatherWing onto your Feather board using the provided headers.
- Connect External Devices:
- Use the screw terminals to connect the high-voltage device you want to control.
- Connect the device's power line to the
COMterminal. - Connect the device's load line to either the
NO(Normally Open) orNC(Normally Closed) terminal, depending on your desired behavior:- Use
NOif you want the device to turn on when the relay is activated. - Use
NCif you want the device to turn off when the relay is activated.
- Use
Step 2: Software Setup
To control the relay, you can use any Feather-compatible microcontroller. Below is an example of how to control the relay using an Arduino UNO (via Feather-compatible libraries):
// Example code to control the Adafruit Mini Relay FeatherWing
// This code toggles the relay on and off every second.

#define RELAY_PIN 13  // Define the pin connected to the relay control signal

void setup() {
  pinMode(RELAY_PIN, OUTPUT);  // Set the relay pin as an output
  digitalWrite(RELAY_PIN, LOW); // Ensure the relay starts in the OFF state
}

void loop() {
  digitalWrite(RELAY_PIN, HIGH); // Activate the relay
  delay(1000);                   // Wait for 1 second
  digitalWrite(RELAY_PIN, LOW);  // Deactivate the relay
  delay(1000);                   // Wait for 1 second
}
Important Considerations and Best Practices
- Power Supply: Ensure your Feather board can supply enough current for the relay. If not, consider using an external power source.
- High-Voltage Safety: When working with high-voltage devices, take proper precautions to avoid electric shock or damage to components.
- Flyback Diode: The FeatherWing includes a built-in flyback diode to protect the circuit from voltage spikes caused by the relay coil. No additional diode is needed.
Troubleshooting and FAQs
Common Issues and Solutions
Relay Not Activating:
- Cause: Insufficient power supply or incorrect wiring.
- Solution: Verify that the Feather board is supplying the correct voltage (3.3V or 5V) and that the
RELAYpin is properly connected.
Device Not Turning On/Off:
- Cause: Incorrect connection to the screw terminals.
- Solution: Double-check the wiring to the
COM,NO, andNCterminals. Ensure the device is connected to the correct terminal based on your desired behavior.
Feather Board Resets When Relay Activates:
- Cause: Relay draws too much current, causing a voltage drop.
- Solution: Use an external power supply for the Feather board or reduce the load on the relay.
Relay Clicking Rapidly:
- Cause: Software bug or unstable control signal.
- Solution: Check your code to ensure the
RELAYpin is not being toggled unintentionally.
FAQs
Q: Can I use the Mini Relay FeatherWing with non-Adafruit Feather boards?
A: Yes, as long as the board provides a compatible voltage (3.3V or 5V) and has a GPIO pin to control the relay.
Q: What is the maximum current the relay can handle?
A: The relay can handle up to 10A of current.
Q: Can I control multiple relays with one Feather board?
A: Yes, but you will need additional relay boards and enough GPIO pins to control each relay individually.
Q: Is the relay suitable for switching DC motors?
A: Yes, but ensure the motor's voltage and current are within the relay's specifications (28V DC, 10A max).
By following this documentation, you can effectively integrate the Adafruit Mini Relay FeatherWing into your projects and troubleshoot any issues that arise.