How to Use xicoolee BME280: Examples, Pinouts, and Specs
Introduction
The xicoolee BME280 is a high-precision digital sensor designed to measure temperature, humidity, and atmospheric pressure. Manufactured by xicoolee, this versatile sensor is widely used in applications such as weather stations, Internet of Things (IoT) devices, and environmental monitoring systems. Its compact design, low power consumption, and high accuracy make it an ideal choice for both hobbyists and professionals.
Explore Projects Built with xicoolee BME280
Explore Projects Built with xicoolee BME280
Common Applications and Use Cases
- Weather monitoring systems
- IoT-based environmental sensing
- Altitude measurement in drones and navigation systems
- HVAC (Heating, Ventilation, and Air Conditioning) control
- Indoor air quality monitoring
Technical Specifications
The xicoolee BME280 offers the following key technical specifications:
| Parameter | Value |
|---|---|
| Supply Voltage (VDD) | 1.8V to 3.6V |
| Interface | I2C (up to 3.4 MHz) / SPI (up to 10 MHz) |
| Operating Temperature | -40°C to +85°C |
| Humidity Measurement Range | 0% to 100% RH |
| Pressure Measurement Range | 300 hPa to 1100 hPa |
| Temperature Accuracy | ±1.0°C |
| Humidity Accuracy | ±3% RH |
| Pressure Accuracy | ±1 hPa |
| Power Consumption | 3.6 µA (in sleep mode) |
| Dimensions | 2.5 mm x 2.5 mm x 0.93 mm |
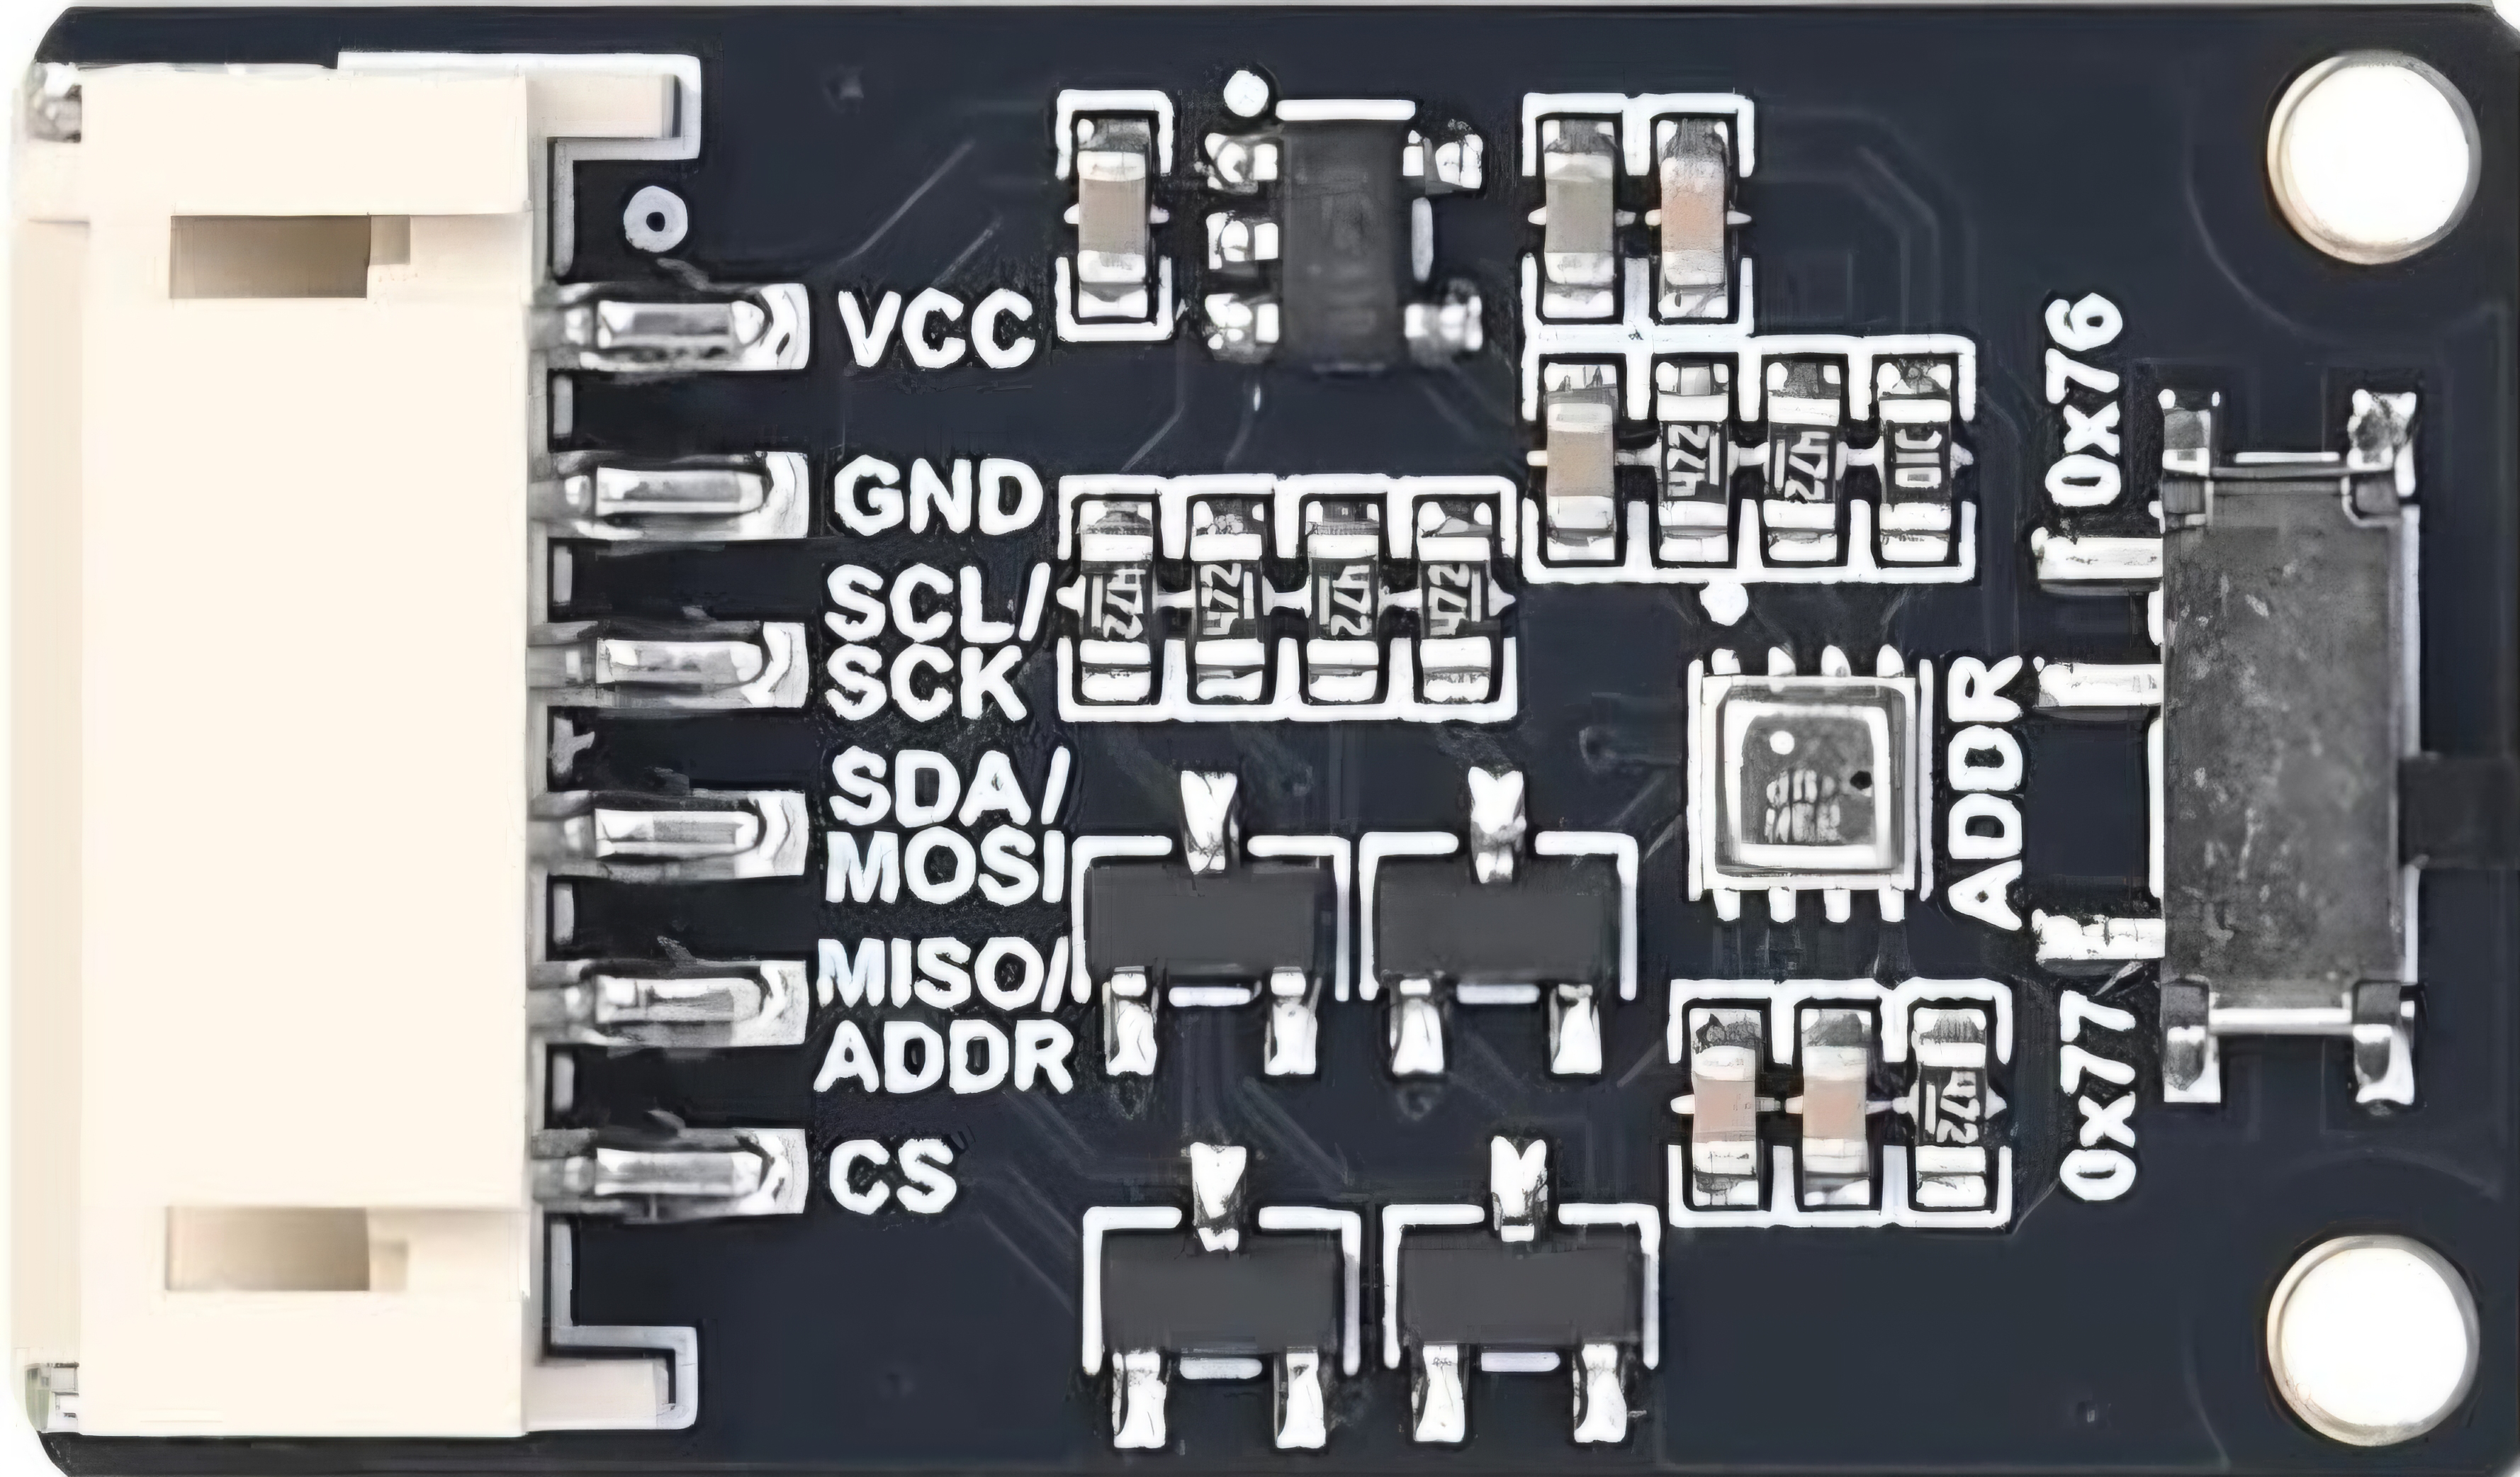
Pin Configuration and Descriptions
The xicoolee BME280 sensor typically comes in a breakout board format with the following pinout:
| Pin Name | Description |
|---|---|
| VCC | Power supply input (1.8V to 3.6V) |
| GND | Ground connection |
| SCL | Serial Clock Line for I2C / SPI Clock |
| SDA | Serial Data Line for I2C / SPI Data |
| CS | Chip Select (used in SPI mode) |
| SDI | Serial Data Input (used in SPI mode) |
| SDO | Serial Data Output (used in SPI mode) |
Usage Instructions
How to Use the xicoolee BME280 in a Circuit
- Power the Sensor: Connect the VCC pin to a 3.3V power source and the GND pin to ground.
- Choose Communication Protocol: Decide whether to use I2C or SPI. For I2C:
- Connect the SCL pin to the I2C clock line of your microcontroller.
- Connect the SDA pin to the I2C data line of your microcontroller.
- Leave the CS pin unconnected or pull it high. For SPI:
- Connect the SCL pin to the SPI clock line.
- Connect the SDA pin to the SPI data line.
- Use the CS pin to select the sensor.
- Pull-Up Resistors: If using I2C, ensure pull-up resistors (typically 4.7kΩ) are connected to the SCL and SDA lines.
- Install Libraries: If using an Arduino, install the "Adafruit BME280" library or a compatible library for easy integration.
- Write Code: Use the library functions to initialize the sensor and read data.
Important Considerations and Best Practices
- Voltage Levels: Ensure the sensor operates within its specified voltage range (1.8V to 3.6V). Use a level shifter if interfacing with a 5V microcontroller.
- Placement: Avoid placing the sensor near heat sources or in direct sunlight to ensure accurate readings.
- Calibration: The sensor is factory-calibrated, but additional calibration may be required for specific applications.
- I2C Address: The default I2C address is
0x76. If multiple sensors are used, the address can be changed to0x77by connecting the SDO pin to VCC.
Example Code for Arduino UNO
Below is an example of how to use the xicoolee BME280 with an Arduino UNO via I2C:
#include <Wire.h>
#include <Adafruit_Sensor.h>
#include <Adafruit_BME280.h>

// Create an instance of the BME280 sensor
Adafruit_BME280 bme;

// Define I2C address (default is 0x76)
#define BME280_I2C_ADDRESS 0x76

void setup() {
  Serial.begin(9600); // Initialize serial communication
  while (!Serial);    // Wait for serial port to connect (for native USB boards)

  // Initialize the BME280 sensor
  if (!bme.begin(BME280_I2C_ADDRESS)) {
    Serial.println("Could not find a valid BME280 sensor, check wiring!");
    while (1); // Halt execution if sensor is not found
  }

  Serial.println("BME280 sensor initialized successfully!");
}

void loop() {
  // Read and print temperature, humidity, and pressure
  Serial.print("Temperature: ");
  Serial.print(bme.readTemperature());
  Serial.println(" °C");

  Serial.print("Humidity: ");
  Serial.print(bme.readHumidity());
  Serial.println(" %");

  Serial.print("Pressure: ");
  Serial.print(bme.readPressure() / 100.0F); // Convert to hPa
  Serial.println(" hPa");

  delay(2000); // Wait 2 seconds before the next reading
}
Troubleshooting and FAQs
Common Issues and Solutions
Sensor Not Detected:
- Cause: Incorrect wiring or I2C address mismatch.
- Solution: Double-check the connections and ensure the correct I2C address is used in the code.
Inaccurate Readings:
- Cause: Sensor placement near heat sources or improper calibration.
- Solution: Relocate the sensor to a stable environment and verify calibration.
Communication Errors:
- Cause: Missing pull-up resistors on I2C lines or incorrect SPI configuration.
- Solution: Add pull-up resistors (4.7kΩ) for I2C or verify SPI connections.
High Power Consumption:
- Cause: Sensor not in sleep mode when idle.
- Solution: Use the library functions to put the sensor in sleep mode when not in use.
FAQs
Q: Can the BME280 measure altitude?
- A: Yes, altitude can be calculated using the pressure readings and a reference sea-level pressure.
Q: What is the maximum cable length for I2C communication?
- A: The maximum length depends on the pull-up resistor values and the I2C clock speed. Typically, lengths up to 1 meter are reliable.
Q: Can the BME280 operate at 5V?
- A: No, the BME280 operates at a maximum of 3.6V. Use a level shifter for 5V systems.
Q: Is the sensor waterproof?
- A: No, the BME280 is not waterproof and should be protected from moisture in outdoor applications.