How to Use Spring Lever Terminal Block: Examples, Pinouts, and Specs
Introduction
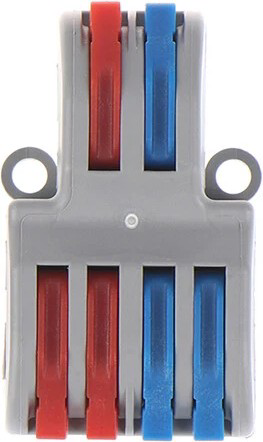
The Spring Lever Terminal Block is a type of electrical connector that uses a spring-loaded mechanism to secure wires. This design allows for quick, easy, and reliable connections without the need for screws or additional tools. It is widely used in electrical and electronic applications where frequent wire connections and disconnections are required. The spring mechanism ensures a firm grip on the wires, providing a secure and vibration-resistant connection.
Explore Projects Built with Spring Lever Terminal Block


Explore Projects Built with Spring Lever Terminal Block
Common Applications and Use Cases
- Industrial control panels and automation systems
- Home electrical wiring and lighting systems
- Prototyping and testing circuits
- Renewable energy systems (e.g., solar panel connections)
- Audio and speaker wiring
Technical Specifications
Key Technical Details
- Rated Voltage: 250V AC/DC (varies by model)
- Rated Current: 32A (varies by model)
- Wire Size Compatibility: 28 AWG to 12 AWG (0.08 mm² to 4 mm²)
- Material: Flame-retardant polycarbonate (housing), stainless steel (spring)
- Operating Temperature: -40°C to 105°C
- Connection Type: Push-in spring lever
- Durability: Rated for over 10,000 connection cycles
Pin Configuration and Descriptions
The Spring Lever Terminal Block does not have traditional pins but instead features wire slots and levers. Below is a description of its key components:
| Component | Description |
|---|---|
| Wire Slot | The opening where the stripped wire is inserted. |
| Spring Mechanism | A stainless steel spring that clamps down on the wire to ensure a secure grip. |
| Lever | A plastic lever that, when lifted, releases the spring tension for wire removal. |
| Housing | The outer casing made of flame-retardant material for insulation and safety. |
Usage Instructions
How to Use the Component in a Circuit
Prepare the Wires:
- Strip approximately 8-10 mm of insulation from the end of each wire.
- Ensure the wire ends are clean and free of frayed strands.
Insert the Wire:
- Lift the lever to open the spring mechanism.
- Insert the stripped wire into the wire slot until it reaches the stop point.
- Push the lever back down to secure the wire in place.
Connect to the Circuit:
- Repeat the process for all wires, ensuring proper polarity and connections.
- Verify that all wires are firmly secured by gently tugging on them.
Test the Connection:
- Power on the circuit and check for proper operation.
Important Considerations and Best Practices
- Always ensure the wire is stripped to the correct length to avoid poor connections.
- Do not exceed the rated voltage or current of the terminal block.
- Avoid using wires with damaged insulation or corroded conductors.
- For high-vibration environments, periodically inspect the connections to ensure they remain secure.
- When connecting to an Arduino UNO or other microcontrollers, use the terminal block to interface with external components like sensors, motors, or power supplies.
Example: Connecting to an Arduino UNO
Below is an example of using a Spring Lever Terminal Block to connect an LED to an Arduino UNO:
Circuit Diagram
- Arduino Pin 13 → Spring Lever Terminal Block → Resistor (220Ω) → LED (Anode)
- LED (Cathode) → Spring Lever Terminal Block → GND
Arduino Code
// Simple LED Blink Example
// Connect the LED to pin 13 via the Spring Lever Terminal Block

const int ledPin = 13; // Pin connected to the LED

void setup() {
  pinMode(ledPin, OUTPUT); // Set pin 13 as an output
}

void loop() {
  digitalWrite(ledPin, HIGH); // Turn the LED on
  delay(1000);               // Wait for 1 second
  digitalWrite(ledPin, LOW);  // Turn the LED off
  delay(1000);               // Wait for 1 second
}
Troubleshooting and FAQs
Common Issues Users Might Face
Loose Connections:
- Cause: Wire not fully inserted or lever not properly closed.
- Solution: Reinsert the wire and ensure the lever is fully pushed down.
Overheating:
- Cause: Exceeding the rated current or using incompatible wire sizes.
- Solution: Verify the current rating and use appropriate wire sizes.
Wire Slipping Out:
- Cause: Insufficient stripping of the wire or damaged spring mechanism.
- Solution: Strip the wire to the correct length and inspect the spring for damage.
Intermittent Connections:
- Cause: Corroded or damaged wires.
- Solution: Replace the wires and ensure clean, undamaged conductors.
FAQs
Q: Can I use stranded wires with the Spring Lever Terminal Block?
A: Yes, stranded wires are compatible. Ensure the strands are twisted tightly before insertion.
Q: Is the terminal block reusable?
A: Yes, the spring mechanism is designed for multiple connection cycles, making it reusable.
Q: Can I use this terminal block for high-frequency signals?
A: While it is primarily designed for power connections, it can handle low-frequency signals. For high-frequency applications, consider specialized connectors.
Q: How do I know if the connection is secure?
A: After closing the lever, gently tug on the wire. If it does not move, the connection is secure.
By following this documentation, you can effectively use the Spring Lever Terminal Block in your projects, ensuring reliable and efficient connections.