How to Use Adafruit CH334F Mini 4-Port USB Hub Breakout: Examples, Pinouts, and Specs
Introduction
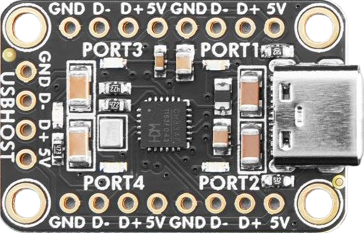
The Adafruit CH334F Mini 4-Port USB Hub Breakout (Part ID: 5997) is a compact and versatile USB hub designed to expand a single USB port into four functional USB ports. Powered by the CH334F chip, this breakout board ensures efficient data transfer and power management, making it ideal for a wide range of USB connectivity applications. Its small form factor and ease of integration make it a perfect choice for embedded systems, prototyping, and DIY projects.
Explore Projects Built with Adafruit CH334F Mini 4-Port USB Hub Breakout


Explore Projects Built with Adafruit CH334F Mini 4-Port USB Hub Breakout
Common Applications and Use Cases
- Expanding USB connectivity for microcontrollers, single-board computers (e.g., Raspberry Pi, Arduino).
- Prototyping USB-based devices and peripherals.
- Adding USB ports to custom enclosures or embedded systems.
- Connecting multiple USB devices such as keyboards, mice, flash drives, and sensors.
Technical Specifications
The Adafruit CH334F Mini 4-Port USB Hub Breakout is built around the CH334F USB hub controller chip. Below are the key technical details:
Key Specifications
| Parameter | Value |
|---|---|
| USB Standard | USB 2.0 (Backward compatible with USB 1.1) |
| Number of USB Ports | 4 |
| Input Voltage | 5V DC (via USB input) |
| Data Transfer Rate | Up to 480 Mbps (High-Speed USB 2.0) |
| Power Management | Built-in overcurrent protection |
| Dimensions | 50mm x 30mm x 10mm |
| Operating Temperature | -40°C to 85°C |
Pin Configuration and Descriptions
The breakout board features a USB input port and four USB output ports. Additionally, it includes solder pads for optional connections. Below is the pin configuration:
| Pin/Port Name | Description |
|---|---|
| USB IN | USB Type-A input port for connecting to the host. |
| USB OUT 1-4 | Four USB Type-A output ports for connecting devices. |
| VCC | 5V power input (optional solder pad). |
| GND | Ground connection (optional solder pad). |
| D+ / D- | USB differential data lines (optional solder pads). |
Usage Instructions
How to Use the Component in a Circuit
- Connect the USB Input Port: Plug the USB IN port into a host device, such as a computer, Raspberry Pi, or microcontroller with USB host capability.
- Connect USB Devices: Attach up to four USB devices to the USB OUT ports. These can include peripherals like keyboards, mice, or USB flash drives.
- Optional Power Input: If additional power is required for high-current USB devices, solder wires to the VCC and GND pads to supply external 5V power.
- Mounting: Use the mounting holes on the breakout board to secure it to your project enclosure or breadboard.
Important Considerations and Best Practices
- Power Supply: Ensure the host device can supply sufficient power for all connected USB devices. For high-power devices, use the optional VCC and GND pads to provide external power.
- Data Transfer: The CH334F supports USB 2.0 high-speed data transfer. Ensure your host device and connected peripherals are compatible with this standard.
- Overcurrent Protection: The hub includes built-in overcurrent protection. Avoid connecting devices that exceed the maximum current rating of the hub.
Example: Connecting to an Arduino UNO
The Adafruit CH334F Mini 4-Port USB Hub Breakout can be used with an Arduino UNO to expand its USB connectivity. Below is an example of how to connect and use the hub:
- Connect the USB IN port of the hub to the Arduino UNO's USB port.
- Attach USB devices (e.g., a USB keyboard or flash drive) to the USB OUT ports.
- Use the following Arduino sketch to detect connected USB devices (requires a USB host shield and library):
#include <USBHost.h> // Include USB Host library

USBHost usb; // Create USBHost object

void setup() {
  Serial.begin(9600); // Initialize serial communication
  while (!Serial);    // Wait for serial monitor to open
  Serial.println("USB Hub Test");

  if (usb.begin()) {
    Serial.println("USB Host initialized successfully.");
  } else {
    Serial.println("Failed to initialize USB Host.");
  }
}

void loop() {
  usb.Task(); // Process USB tasks
  // Add code here to interact with connected USB devices
}
Troubleshooting and FAQs
Common Issues and Solutions
USB Devices Not Detected:
- Ensure the USB IN port is securely connected to the host device.
- Verify that the connected USB devices are functional and compatible with USB 2.0.
- Check if the host device provides sufficient power. If not, use the optional VCC and GND pads for external power.
Overcurrent Protection Triggered:
- Disconnect high-power devices and check the total current draw of all connected devices.
- Use an external 5V power supply if necessary.
Slow Data Transfer Speeds:
- Ensure the host device and connected peripherals support USB 2.0 high-speed mode.
- Avoid using excessively long or poor-quality USB cables.
FAQs
Q: Can I use this hub with a Raspberry Pi?
A: Yes, the Adafruit CH334F Mini 4-Port USB Hub Breakout is fully compatible with Raspberry Pi devices. Simply connect the USB IN port to one of the Raspberry Pi's USB ports.
Q: Does the hub support USB 3.0 devices?
A: The hub is designed for USB 2.0 but is backward compatible with USB 1.1. USB 3.0 devices can be connected, but they will operate at USB 2.0 speeds.
Q: How do I provide external power to the hub?
A: Solder wires to the VCC and GND pads on the breakout board and connect them to a 5V power source. This is useful for powering high-current USB devices.
Q: Is the hub compatible with microcontrollers other than Arduino?
A: Yes, the hub can be used with any microcontroller or single-board computer that supports USB host functionality.