How to Use Waveshare Pico LoRa Module: Examples, Pinouts, and Specs
Introduction
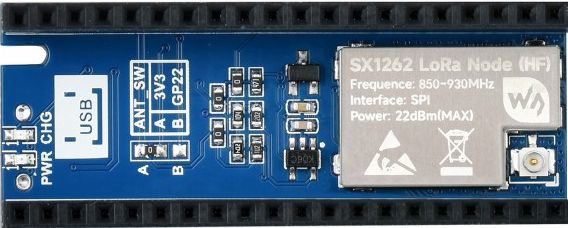
The Waveshare Pico LoRa Module (Pico LoRa SX1262) is a compact and versatile module designed for long-range wireless communication using LoRa (Long Range) technology. It is based on the Semtech SX1262 LoRa transceiver and integrates seamlessly with Raspberry Pi Pico or other microcontrollers. This module is ideal for Internet of Things (IoT) applications, offering low power consumption, extended communication range, and support for multiple frequency bands.
Explore Projects Built with Waveshare Pico LoRa Module


Explore Projects Built with Waveshare Pico LoRa Module
Common Applications and Use Cases
- Smart agriculture and environmental monitoring
- Industrial IoT and remote sensor networks
- Home automation and smart cities
- Asset tracking and geolocation services
- Long-range wireless data transmission in low-power applications
Technical Specifications
Below are the key technical details of the Waveshare Pico LoRa Module:
| Parameter | Specification |
|---|---|
| Manufacturer | Waveshare |
| Part Number | Pico LoRa SX1262 |
| LoRa Transceiver | Semtech SX1262 |
| Frequency Bands | 868 MHz (EU), 915 MHz (US), 433 MHz (Asia) |
| Communication Range | Up to 5 km (line of sight) |
| Modulation | LoRa, FSK, GFSK |
| Power Supply Voltage | 3.3V |
| Operating Current | 4.2 mA (transmit), 1.6 µA (sleep mode) |
| Interface | SPI |
| Dimensions | 21 mm × 52 mm |
| Antenna Connector | IPEX |
Pin Configuration and Descriptions
The module has a 20-pin header for interfacing with a Raspberry Pi Pico or other microcontrollers. Below is the pinout:
| Pin | Name | Description |
|---|---|---|
| 1 | GND | Ground |
| 2 | 3.3V | Power supply (3.3V) |
| 3 | SPI_CSN | SPI chip select |
| 4 | SPI_SCK | SPI clock |
| 5 | SPI_MOSI | SPI master out, slave in |
| 6 | SPI_MISO | SPI master in, slave out |
| 7 | RESET | Reset pin |
| 8 | DIO1 | Digital I/O 1 (interrupt) |
| 9 | DIO2 | Digital I/O 2 (optional) |
| 10 | BUSY | Busy status indicator |
| 11-20 | NC | Not connected |
Usage Instructions
How to Use the Component in a Circuit
- Power Supply: Connect the module to a 3.3V power source. Ensure the power supply is stable to avoid communication issues.
- SPI Interface: Connect the SPI pins (SPI_CSN, SPI_SCK, SPI_MOSI, SPI_MISO) to the corresponding SPI pins on your microcontroller.
- Antenna: Attach an appropriate antenna to the IPEX connector for optimal signal transmission and reception.
- Reset and Control Pins: Connect the RESET, DIO1, and BUSY pins to GPIO pins on your microcontroller for proper operation.
Important Considerations and Best Practices
- Frequency Band Selection: Ensure the module is configured for the correct frequency band (e.g., 868 MHz for Europe, 915 MHz for the US).
- Antenna Placement: Place the antenna away from metal objects and other sources of interference for maximum range.
- Power Management: Use the sleep mode to minimize power consumption in battery-powered applications.
- SPI Configuration: Set the SPI clock speed to a value supported by the module (typically up to 10 MHz).
Example Code for Arduino UNO
Below is an example of how to interface the Pico LoRa Module with an Arduino UNO using the SPI interface and the LoRa library:
#include <SPI.h>
#include <LoRa.h>

// Define LoRa module pins
#define LORA_CS 10    // Chip select pin
#define LORA_RST 9    // Reset pin
#define LORA_IRQ 2    // Interrupt pin (DIO1)

void setup() {
  // Initialize serial communication
  Serial.begin(9600);
  while (!Serial);

  Serial.println("Initializing LoRa module...");

  // Initialize LoRa module
  LoRa.setPins(LORA_CS, LORA_RST, LORA_IRQ);
  if (!LoRa.begin(915E6)) { // Set frequency to 915 MHz
    Serial.println("LoRa initialization failed!");
    while (1);
  }

  Serial.println("LoRa module initialized successfully.");
}

void loop() {
  // Send a test message
  Serial.println("Sending message...");
  LoRa.beginPacket();
  LoRa.print("Hello, LoRa!");
  LoRa.endPacket();

  delay(5000); // Wait 5 seconds before sending the next message
}
Note: Ensure the
LoRalibrary is installed in your Arduino IDE. You can install it via the Library Manager.
Troubleshooting and FAQs
Common Issues and Solutions
LoRa Module Not Initializing
- Cause: Incorrect wiring or SPI configuration.
- Solution: Double-check the connections and ensure the SPI pins are correctly assigned in the code.
Poor Communication Range
- Cause: Improper antenna placement or interference.
- Solution: Use a high-quality antenna and place it away from obstructions or interference sources.
High Power Consumption
- Cause: Module not entering sleep mode.
- Solution: Use the sleep mode feature in your code to reduce power consumption.
No Data Transmission
- Cause: Mismatched frequency bands or incorrect settings.
- Solution: Verify that both the transmitter and receiver are configured for the same frequency and settings.
FAQs
Q: Can I use this module with a 5V microcontroller?
A: No, the module operates at 3.3V. Use a level shifter if interfacing with a 5V microcontroller.Q: What is the maximum data rate supported?
A: The SX1262 supports data rates up to 62.5 kbps in LoRa mode and 300 kbps in FSK mode.Q: Is the module compatible with Raspberry Pi Pico?
A: Yes, the module is designed to work seamlessly with Raspberry Pi Pico.Q: Can I use this module for bidirectional communication?
A: Yes, the module supports both transmission and reception, making it suitable for bidirectional communication.
This concludes the documentation for the Waveshare Pico LoRa Module. For further assistance, refer to the official Waveshare documentation or contact their support team.