How to Use iCESugar-nano FPGA Development Board: Examples, Pinouts, and Specs
Introduction
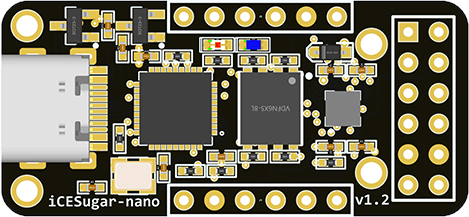
The iCESugar-nano FPGA Development Board, manufactured by Muse Lab (Part ID: B0BS19P523), is a compact and versatile platform designed for rapid prototyping and experimentation with digital circuits and systems. It features the iCE40 FPGA, a low-power, high-performance programmable logic device, making it ideal for a wide range of applications.
Explore Projects Built with iCESugar-nano FPGA Development Board


Explore Projects Built with iCESugar-nano FPGA Development Board
Common Applications and Use Cases
- Digital circuit design and prototyping
- Hardware acceleration for embedded systems
- Signal processing and data manipulation
- Learning and teaching FPGA programming
- IoT device development
- Custom peripheral design for microcontrollers
Technical Specifications
The iCESugar-nano FPGA Development Board is equipped with the following key features and specifications:
| Specification | Details |
|---|---|
| FPGA Chip | Lattice iCE40LP1K-CM36 (1K logic cells) |
| Clock Frequency | 12 MHz onboard oscillator |
| Flash Memory | 4 Mbit SPI Flash for configuration and user data |
| Power Supply | 5V via USB-C port |
| I/O Voltage | 3.3V (default) |
| GPIO Pins | 21 user-accessible GPIOs |
| Communication Interfaces | SPI, I2C, UART |
| Programming Interface | USB-C (supports open-source tools like icestorm and nextpnr) |
| Dimensions | 25mm x 25mm |
Pin Configuration and Descriptions
The iCESugar-nano provides a 24-pin header for GPIO and power connections. Below is the pinout:
| Pin Number | Pin Name | Description |
|---|---|---|
| 1 | GND | Ground |
| 2 | 3.3V | 3.3V Power Output |
| 3 | IO_0 | General Purpose I/O |
| 4 | IO_1 | General Purpose I/O |
| 5 | IO_2 | General Purpose I/O |
| 6 | IO_3 | General Purpose I/O |
| 7 | IO_4 | General Purpose I/O |
| 8 | IO_5 | General Purpose I/O |
| 9 | IO_6 | General Purpose I/O |
| 10 | IO_7 | General Purpose I/O |
| 11 | IO_8 | General Purpose I/O |
| 12 | IO_9 | General Purpose I/O |
| 13 | IO_10 | General Purpose I/O |
| 14 | IO_11 | General Purpose I/O |
| 15 | IO_12 | General Purpose I/O |
| 16 | IO_13 | General Purpose I/O |
| 17 | IO_14 | General Purpose I/O |
| 18 | IO_15 | General Purpose I/O |
| 19 | IO_16 | General Purpose I/O |
| 20 | IO_17 | General Purpose I/O |
| 21 | IO_18 | General Purpose I/O |
| 22 | IO_19 | General Purpose I/O |
| 23 | IO_20 | General Purpose I/O |
| 24 | IO_21 | General Purpose I/O |
Usage Instructions
How to Use the iCESugar-nano in a Circuit
- Powering the Board: Connect the board to a USB-C power source (5V). The onboard LED will indicate power status.
- Programming the FPGA:
- Install open-source FPGA tools such as
icestormandnextpnr. - Write your Verilog or VHDL code for the desired logic design.
- Use the
yosystoolchain to synthesize your design and generate a bitstream. - Flash the bitstream to the board using
iceprog.
- Install open-source FPGA tools such as
- Connecting GPIOs: Use the 24-pin header to connect external components. Ensure the voltage levels are compatible (3.3V logic).
Important Considerations and Best Practices
- Voltage Levels: The GPIO pins operate at 3.3V. Avoid connecting 5V logic directly to the pins to prevent damage.
- Static Protection: Handle the board in an ESD-safe environment to avoid damaging the FPGA.
- Clock Source: The onboard 12 MHz oscillator is sufficient for most applications. For custom clock requirements, external oscillators can be connected to specific GPIO pins.
- Programming Tools: Ensure you have the latest versions of
yosys,nextpnr, andicestormfor compatibility with the iCE40 FPGA.
Example Code for Arduino UNO Communication
The iCESugar-nano can communicate with an Arduino UNO via UART. Below is an example Arduino sketch to send data to the FPGA:
// Arduino UNO UART Communication with iCESugar-nano
// Sends a simple "Hello FPGA" message every second.

void setup() {
  Serial.begin(9600); // Initialize UART at 9600 baud rate
}

void loop() {
  Serial.println("Hello FPGA"); // Send message to FPGA
  delay(1000); // Wait for 1 second
}
On the FPGA side, you can implement a UART receiver in Verilog to process the incoming data.
Troubleshooting and FAQs
Common Issues and Solutions
FPGA Not Responding to Programming Commands:
- Ensure the USB-C cable is properly connected.
- Verify that the
icestormtoolchain is installed and configured correctly. - Check if the board is in programming mode (refer to the user manual for specific instructions).
GPIO Pins Not Functioning as Expected:
- Confirm that the pins are correctly configured in your FPGA design.
- Check for short circuits or incorrect connections on the external circuit.
Power Issues:
- Ensure the USB power source provides sufficient current (at least 500mA).
- Verify that the onboard power LED is lit.
UART Communication Problems:
- Double-check the baud rate settings on both the FPGA and the Arduino.
- Ensure proper wiring between the Arduino TX/RX pins and the FPGA GPIOs.
FAQs
Q: Can I use a 5V power source with the iCESugar-nano?
A: Yes, the board is powered via USB-C, which provides a regulated 5V input. However, the GPIO pins operate at 3.3V, so ensure external components are compatible.
Q: What software tools are compatible with the iCESugar-nano?
A: The board supports open-source tools like yosys, nextpnr, and icestorm for FPGA development. These tools are widely used for Lattice iCE40 FPGAs.
Q: Can I use the iCESugar-nano for learning FPGA programming?
A: Absolutely! The board is beginner-friendly and supports open-source tools, making it an excellent choice for learning and experimentation.
Q: Is the iCESugar-nano compatible with other microcontrollers?
A: Yes, the board can interface with microcontrollers like Arduino, Raspberry Pi, and others via standard communication protocols (SPI, I2C, UART).