Cirkit Designer Logo
Cirkit Designer
Your all-in-one circuit design IDE
Home / 
Component Documentation

How to Use Grove Base Shield (Seeed) : Examples, Pinouts, and Specs

Image of Grove Base Shield (Seeed)
Cirkit Designer LogoDesign with Grove Base Shield (Seeed) in Cirkit Designer

Introduction

The Grove Base Shield by Seeed Studio is a versatile expansion board designed for Arduino boards. It simplifies the process of connecting Grove modules, offering a plug-and-play interface for a wide range of sensors, actuators, and other modules. This shield eliminates the need for soldering or complex wiring, making it ideal for rapid prototyping and educational purposes.

Explore Projects Built with Grove Base Shield (Seeed)

Use Cirkit Designer to design, explore, and prototype these projects online. Some projects support real-time simulation. Click "Open Project" to start designing instantly!
Adafruit Datalogger Shield with Environmental Sensing and Relay Control
Image of TCC: A project utilizing Grove Base Shield (Seeed)  in a practical application
This circuit is designed for environmental data collection and actuation based on sensor inputs. It includes temperature, humidity, light, and soil moisture sensors interfaced with an Adafruit Datalogger Shield, which logs the data and controls a solenoid valve via a relay for potential irrigation purposes.
Cirkit Designer LogoOpen Project in Cirkit Designer
Arduino Sensor Shield with I2C LCD and Bluetooth Interface
Image of wallE: A project utilizing Grove Base Shield (Seeed)  in a practical application
This circuit features an Arduino Sensor Shield v5.0 interfaced with an I2C LCD Display and an HC-05 Bluetooth Module. The LCD Display is connected for power, ground, and I2C communication, allowing it to display data or messages. The HC-05 Bluetooth Module is wired for serial communication with the Arduino Sensor Shield, enabling wireless data exchange with other Bluetooth-enabled devices.
Cirkit Designer LogoOpen Project in Cirkit Designer
Arduino Sensor Shield-Based Smart Home Monitoring System with Bluetooth and I2C LCD
Image of Proyecto final: A project utilizing Grove Base Shield (Seeed)  in a practical application
This circuit is an environmental monitoring system using an Arduino Sensor Shield. It includes sensors for gas (MQ-2), light (LDR), and temperature (DS18B20), and features a 16x2 I2C LCD for display, an HC-05 Bluetooth module for wireless communication, and a fan motor, buzzer, and LEDs for alert mechanisms.
Cirkit Designer LogoOpen Project in Cirkit Designer
Solar-Powered Environmental Data Logger with Adafruit Feather M0 Express
Image of Lake Thoreau Monitoring Station: A project utilizing Grove Base Shield (Seeed)  in a practical application
This circuit is designed for environmental data collection and logging, utilizing an Adafruit Feather M0 Express microcontroller as the central processing unit. It interfaces with a BME280 sensor for atmospheric temperature, humidity, and pressure measurements, an SGP30 sensor for monitoring air quality (eCO2 and TVOC), and a STEMMA soil sensor for detecting soil moisture and temperature. The system is powered by a solar panel and a 3.7v LiPo battery, managed by an Adafruit BQ24074 Solar-DC-USB Lipo Charger, and provides easy access to the microcontroller's connections through an Adafruit Terminal Breakout FeatherWing.
Cirkit Designer LogoOpen Project in Cirkit Designer

Explore Projects Built with Grove Base Shield (Seeed)

Use Cirkit Designer to design, explore, and prototype these projects online. Some projects support real-time simulation. Click "Open Project" to start designing instantly!
Image of TCC: A project utilizing Grove Base Shield (Seeed)  in a practical application
Adafruit Datalogger Shield with Environmental Sensing and Relay Control
This circuit is designed for environmental data collection and actuation based on sensor inputs. It includes temperature, humidity, light, and soil moisture sensors interfaced with an Adafruit Datalogger Shield, which logs the data and controls a solenoid valve via a relay for potential irrigation purposes.
Cirkit Designer LogoOpen Project in Cirkit Designer
Image of wallE: A project utilizing Grove Base Shield (Seeed)  in a practical application
Arduino Sensor Shield with I2C LCD and Bluetooth Interface
This circuit features an Arduino Sensor Shield v5.0 interfaced with an I2C LCD Display and an HC-05 Bluetooth Module. The LCD Display is connected for power, ground, and I2C communication, allowing it to display data or messages. The HC-05 Bluetooth Module is wired for serial communication with the Arduino Sensor Shield, enabling wireless data exchange with other Bluetooth-enabled devices.
Cirkit Designer LogoOpen Project in Cirkit Designer
Image of Proyecto final: A project utilizing Grove Base Shield (Seeed)  in a practical application
Arduino Sensor Shield-Based Smart Home Monitoring System with Bluetooth and I2C LCD
This circuit is an environmental monitoring system using an Arduino Sensor Shield. It includes sensors for gas (MQ-2), light (LDR), and temperature (DS18B20), and features a 16x2 I2C LCD for display, an HC-05 Bluetooth module for wireless communication, and a fan motor, buzzer, and LEDs for alert mechanisms.
Cirkit Designer LogoOpen Project in Cirkit Designer
Image of Lake Thoreau Monitoring Station: A project utilizing Grove Base Shield (Seeed)  in a practical application
Solar-Powered Environmental Data Logger with Adafruit Feather M0 Express
This circuit is designed for environmental data collection and logging, utilizing an Adafruit Feather M0 Express microcontroller as the central processing unit. It interfaces with a BME280 sensor for atmospheric temperature, humidity, and pressure measurements, an SGP30 sensor for monitoring air quality (eCO2 and TVOC), and a STEMMA soil sensor for detecting soil moisture and temperature. The system is powered by a solar panel and a 3.7v LiPo battery, managed by an Adafruit BQ24074 Solar-DC-USB Lipo Charger, and provides easy access to the microcontroller's connections through an Adafruit Terminal Breakout FeatherWing.
Cirkit Designer LogoOpen Project in Cirkit Designer

Common Applications and Use Cases

  • Rapid prototyping of IoT and embedded systems
  • Educational projects for beginners and students
  • Simplifying sensor and actuator integration with Arduino
  • Building smart home, robotics, and environmental monitoring systems

Technical Specifications

The Grove Base Shield is compatible with most Arduino boards, including the Arduino UNO, Mega, and Leonardo. Below are its key technical details:

Key Technical Details

Parameter Specification
Operating Voltage 3.3V / 5V (selectable via jumper)
Compatible Boards Arduino UNO, Mega, Leonardo, etc.
Grove Ports 16 (Digital, Analog, UART, I2C)
Dimensions 68.6mm x 53.4mm
Weight 20g

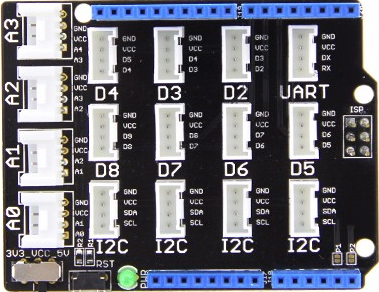
Pin Configuration and Descriptions

The Grove Base Shield provides multiple Grove connectors for easy interfacing. Below is a breakdown of the pin configuration:

Digital Ports

Port Label Arduino Pin Mapping Description
D2 Digital Pin 2 General-purpose digital I/O
D3 Digital Pin 3 PWM-capable digital I/O
D4 Digital Pin 4 General-purpose digital I/O
D5 Digital Pin 5 PWM-capable digital I/O
D6 Digital Pin 6 PWM-capable digital I/O
D7 Digital Pin 7 General-purpose digital I/O
D8 Digital Pin 8 General-purpose digital I/O

Analog Ports

Port Label Arduino Pin Mapping Description
A0 Analog Pin 0 Analog input
A1 Analog Pin 1 Analog input
A2 Analog Pin 2 Analog input
A3 Analog Pin 3 Analog input
A4 Analog Pin 4 Analog input / I2C SDA
A5 Analog Pin 5 Analog input / I2C SCL

UART and I2C Ports

Port Label Arduino Pin Mapping Description
UART Digital Pins 0 (RX) Serial communication (RX/TX)
Digital Pins 1 (TX)
I2C A4 (SDA), A5 (SCL) I2C communication interface

Usage Instructions

How to Use the Grove Base Shield in a Circuit

  1. Attach the Shield to an Arduino Board: Align the pins of the Grove Base Shield with the headers on your Arduino board and press gently to secure it.
  2. Select Voltage: Use the onboard jumper to select the operating voltage (3.3V or 5V) based on the requirements of your Grove modules.
  3. Connect Grove Modules: Plug Grove modules into the appropriate ports (Digital, Analog, UART, or I2C) using Grove cables.
  4. Upload Code: Write and upload the Arduino sketch to interact with the connected modules.

Important Considerations and Best Practices

  • Voltage Selection: Ensure the voltage jumper is set correctly to avoid damaging the connected modules.
  • Avoid Overloading: Do not exceed the current limits of the Arduino board when powering multiple modules.
  • Cable Orientation: Ensure the Grove cables are connected in the correct orientation (white wire for signal, black for ground).
  • I2C Address Conflicts: When using multiple I2C modules, ensure they have unique addresses to avoid communication conflicts.

Example Code for Arduino UNO

Below is an example of using the Grove Base Shield with a Grove LED module connected to port D3:

// Example: Blink an LED connected to Grove Base Shield (D3)

// Define the pin for the Grove LED module
const int ledPin = 3;

void setup() {
  // Set the LED pin as an output
  pinMode(ledPin, OUTPUT);
}

void loop() {
  // Turn the LED on
  digitalWrite(ledPin, HIGH);
  delay(1000); // Wait for 1 second

  // Turn the LED off
  digitalWrite(ledPin, LOW);
  delay(1000); // Wait for 1 second
}

Troubleshooting and FAQs

Common Issues and Solutions

  1. Modules Not Responding

    • Cause: Incorrect voltage selection.
    • Solution: Verify the voltage jumper is set to match the module's requirements (3.3V or 5V).
  2. I2C Communication Fails

    • Cause: Address conflict between I2C modules.
    • Solution: Check and configure unique I2C addresses for each module.
  3. Arduino Not Recognized by Computer

    • Cause: Loose connection or missing drivers.
    • Solution: Ensure the USB cable is securely connected and install the necessary Arduino drivers.
  4. Grove Module Not Working

    • Cause: Incorrect port connection or damaged module.
    • Solution: Double-check the module's connection and test it with another port or Arduino board.

FAQs

Q: Can I use the Grove Base Shield with non-Grove modules?
A: Yes, you can connect non-Grove modules to the Arduino pins directly, but you may need additional wiring or adapters.

Q: Is the Grove Base Shield compatible with Raspberry Pi?
A: No, the Grove Base Shield is specifically designed for Arduino boards. However, Seeed Studio offers Grove Pi shields for Raspberry Pi.

Q: How many Grove modules can I connect simultaneously?
A: You can connect up to 16 modules, but ensure the total current draw does not exceed the Arduino board's capacity.

Q: Can I stack other shields on top of the Grove Base Shield?
A: Yes, the Grove Base Shield supports stacking, but ensure there are no pin conflicts with the additional shield.