Cirkit Designer Logo
Cirkit Designer
Your all-in-one circuit design IDE
Home / 
Component Documentation

How to Use Light slot Sensor Module - 10mm: Examples, Pinouts, and Specs

Image of Light slot Sensor Module - 10mm
Cirkit Designer LogoDesign with Light slot Sensor Module - 10mm in Cirkit Designer

Introduction

The Light Slot Sensor Module - 10mm (Manufacturer: TinyTronics, Part ID: SKU: 001785) is a compact and efficient sensor designed to detect light levels. Its small 10mm form factor makes it ideal for applications where space is limited. This module is commonly used in automation, robotics, and control systems to detect the presence or absence of light, enabling tasks such as object detection, line following, and environmental monitoring.

Explore Projects Built with Light slot Sensor Module - 10mm

Use Cirkit Designer to design, explore, and prototype these projects online. Some projects support real-time simulation. Click "Open Project" to start designing instantly!
ESP32-Based Wi-Fi Controlled Laser Shooting Game with OLED Display
Image of 123: A project utilizing Light slot Sensor Module - 10mm in a practical application
This circuit is a laser shooting game controlled by a PS3 controller, featuring an ESP32 microcontroller, two photosensitive sensors for light detection, and a motor driver to control two DC motors. The game includes an OLED display for score visualization, and a MOSFET to control an LED bulb, with power supplied by a 12V battery and regulated by a DC-DC step-down converter.
Cirkit Designer LogoOpen Project in Cirkit Designer
PIR Motion-Activated LED Light
Image of 0: A project utilizing Light slot Sensor Module - 10mm in a practical application
This circuit is a simple motion-activated LED light system. The HC-SR505 Mini PIR Motion Sensing Module is powered by a 9V battery and detects motion, upon which it sends an output signal to turn on the red LED. The LED and the PIR sensor share a common ground with the battery, completing the circuit.
Cirkit Designer LogoOpen Project in Cirkit Designer
Arduino Pro Mini-Based Battery-Powered Laser Emitter with Temperature Sensing and OLED Display
Image of temp gun: A project utilizing Light slot Sensor Module - 10mm in a practical application
This circuit is a sensor and display system powered by a 9V battery, featuring an Arduino Pro Mini microcontroller. It includes a momentary switch to control power, a KY-008 laser emitter, an MLX90614 temperature sensor, and an OLED display for output. The system is designed to read temperature data and display it on the OLED screen, with the laser emitter potentially used for targeting or indication purposes.
Cirkit Designer LogoOpen Project in Cirkit Designer
Arduino Mega 2560-Based Reverse Vending Machine with Servomotors and Sensors
Image of Diagram: A project utilizing Light slot Sensor Module - 10mm in a practical application
This circuit is designed for a reverse vending machine controlled by an Arduino Mega 2560. It features a KY-008 Laser Emitter, an IR Receiver, multiple HC-SR04 Ultrasonic Distance Sensors, a metal detection sensor, and several servomotors (MG90S and MG996R) for sorting items. The machine uses the sensors to detect and sort items based on material type (metal or plastic) and size (small, medium, large), with the servomotors facilitating the physical sorting process.
Cirkit Designer LogoOpen Project in Cirkit Designer

Explore Projects Built with Light slot Sensor Module - 10mm

Use Cirkit Designer to design, explore, and prototype these projects online. Some projects support real-time simulation. Click "Open Project" to start designing instantly!
Image of 123: A project utilizing Light slot Sensor Module - 10mm in a practical application
ESP32-Based Wi-Fi Controlled Laser Shooting Game with OLED Display
This circuit is a laser shooting game controlled by a PS3 controller, featuring an ESP32 microcontroller, two photosensitive sensors for light detection, and a motor driver to control two DC motors. The game includes an OLED display for score visualization, and a MOSFET to control an LED bulb, with power supplied by a 12V battery and regulated by a DC-DC step-down converter.
Cirkit Designer LogoOpen Project in Cirkit Designer
Image of 0: A project utilizing Light slot Sensor Module - 10mm in a practical application
PIR Motion-Activated LED Light
This circuit is a simple motion-activated LED light system. The HC-SR505 Mini PIR Motion Sensing Module is powered by a 9V battery and detects motion, upon which it sends an output signal to turn on the red LED. The LED and the PIR sensor share a common ground with the battery, completing the circuit.
Cirkit Designer LogoOpen Project in Cirkit Designer
Image of temp gun: A project utilizing Light slot Sensor Module - 10mm in a practical application
Arduino Pro Mini-Based Battery-Powered Laser Emitter with Temperature Sensing and OLED Display
This circuit is a sensor and display system powered by a 9V battery, featuring an Arduino Pro Mini microcontroller. It includes a momentary switch to control power, a KY-008 laser emitter, an MLX90614 temperature sensor, and an OLED display for output. The system is designed to read temperature data and display it on the OLED screen, with the laser emitter potentially used for targeting or indication purposes.
Cirkit Designer LogoOpen Project in Cirkit Designer
Image of Diagram: A project utilizing Light slot Sensor Module - 10mm in a practical application
Arduino Mega 2560-Based Reverse Vending Machine with Servomotors and Sensors
This circuit is designed for a reverse vending machine controlled by an Arduino Mega 2560. It features a KY-008 Laser Emitter, an IR Receiver, multiple HC-SR04 Ultrasonic Distance Sensors, a metal detection sensor, and several servomotors (MG90S and MG996R) for sorting items. The machine uses the sensors to detect and sort items based on material type (metal or plastic) and size (small, medium, large), with the servomotors facilitating the physical sorting process.
Cirkit Designer LogoOpen Project in Cirkit Designer

Common Applications

  • Object detection in conveyor systems
  • Line-following robots
  • Light-sensitive automation systems
  • Environmental light monitoring
  • Optical encoders for motion tracking

Technical Specifications

Below are the key technical details of the Light Slot Sensor Module - 10mm:

Parameter Value
Operating Voltage 3.3V - 5V
Operating Current ≤ 20mA
Detection Range 0mm - 10mm
Output Type Digital (High/Low)
Response Time ≤ 1ms
Dimensions 10mm x 10mm x 5mm
Operating Temperature -20°C to 70°C
Connector Type 3-pin header (VCC, GND, OUT)

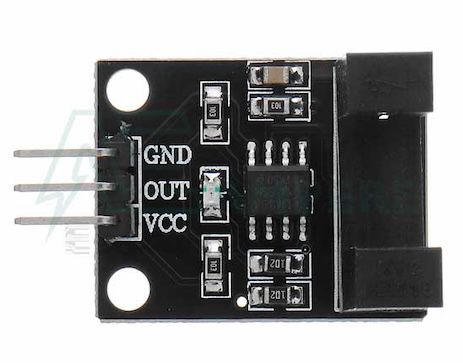
Pin Configuration and Descriptions

The module has a 3-pin header for easy interfacing. Below is the pinout:

Pin Name Description
1 VCC Power supply input (3.3V - 5V)
2 GND Ground connection
3 OUT Digital output pin (High when light is detected)

Usage Instructions

How to Use the Component in a Circuit

  1. Power the Module: Connect the VCC pin to a 3.3V or 5V power source and the GND pin to the ground of your circuit.
  2. Connect the Output: Attach the OUT pin to a digital input pin of your microcontroller or logic circuit.
  3. Position the Sensor: Place the module in the desired location where it can detect light or objects passing through its slot.
  4. Read the Output: Monitor the OUT pin. It outputs a HIGH signal when light is detected and LOW when no light is present.

Important Considerations and Best Practices

  • Power Supply: Ensure the module is powered within its operating voltage range (3.3V - 5V). Exceeding this range may damage the sensor.
  • Ambient Light: Avoid placing the module in areas with excessive ambient light, as it may affect detection accuracy.
  • Mounting: Secure the module firmly to prevent misalignment or movement during operation.
  • Debouncing: If the module is used in a high-speed application, consider implementing software debouncing to filter out noise in the output signal.

Example: Connecting to an Arduino UNO

Below is an example of how to connect and use the Light Slot Sensor Module with an Arduino UNO:

Circuit Connections

  • Connect the VCC pin of the module to the 5V pin on the Arduino.
  • Connect the GND pin of the module to the GND pin on the Arduino.
  • Connect the OUT pin of the module to digital pin 2 on the Arduino.

Arduino Code

// Light Slot Sensor Module Example Code
// This code reads the output of the sensor and prints the status to the Serial Monitor.

const int sensorPin = 2; // Pin connected to the OUT pin of the sensor
int sensorState = 0;     // Variable to store the sensor state

void setup() {
  pinMode(sensorPin, INPUT); // Set the sensor pin as input
  Serial.begin(9600);        // Initialize serial communication at 9600 baud
}

void loop() {
  sensorState = digitalRead(sensorPin); // Read the sensor output
  
  if (sensorState == HIGH) {
    // If the sensor detects light, print "Light Detected"
    Serial.println("Light Detected");
  } else {
    // If no light is detected, print "No Light Detected"
    Serial.println("No Light Detected");
  }
  
  delay(500); // Wait for 500ms before reading again
}

Troubleshooting and FAQs

Common Issues and Solutions

  1. No Output Signal

    • Cause: Incorrect wiring or loose connections.
    • Solution: Double-check all connections, ensuring the VCC, GND, and OUT pins are properly connected.
  2. False Triggering

    • Cause: Excessive ambient light or electrical noise.
    • Solution: Shield the sensor from ambient light or use a pull-down resistor on the OUT pin to stabilize the signal.
  3. Sensor Not Detecting Light

    • Cause: Misalignment or obstruction in the sensor slot.
    • Solution: Ensure the sensor is properly aligned and free from obstructions.
  4. Overheating

    • Cause: Operating the module beyond its voltage or current limits.
    • Solution: Verify the power supply voltage and current are within the specified range.

FAQs

Q1: Can this module detect infrared light?
A1: No, this module is designed to detect visible light. For infrared detection, use a dedicated IR sensor.

Q2: Can I use this module with a 3.3V microcontroller?
A2: Yes, the module operates within a voltage range of 3.3V to 5V, making it compatible with 3.3V systems.

Q3: What is the maximum detection range of the sensor?
A3: The sensor can detect light or objects within a range of 0mm to 10mm.

Q4: Is the module waterproof?
A4: No, the module is not waterproof. Avoid exposing it to moisture or water.

By following this documentation, you can effectively integrate the Light Slot Sensor Module - 10mm into your projects and troubleshoot any issues that arise.