How to Use tft: Examples, Pinouts, and Specs
Introduction
A Thin Film Transistor (TFT) module is an active-matrix LCD (liquid crystal display) that uses an array of thin-film transistors to control individual pixels on the screen. Each pixel has its own dedicated transistor, allowing for rapid and precise control of the display. This results in improved image quality, with higher resolutions, better color reproduction, and faster refresh rates compared to passive-matrix displays. TFT modules are commonly used in smartphones, computer monitors, TVs, and other devices where high-quality displays are essential.
Explore Projects Built with tft


Explore Projects Built with tft
Common Applications and Use Cases
- Mobile phones and tablets
- Computer monitors and laptops
- Television screens
- Digital signage and advertising displays
- Instrumentation panels
- Automotive displays
Technical Specifications
Key Technical Details
- Resolution: Varies (e.g., 320x240, 800x600, 1920x1080)
- Display Colors: 16-bit, 18-bit, 24-bit, or higher
- Operating Voltage: Typically 3.3V or 5V
- Logic Level Voltage: 3.3V (5V tolerant with level shifting)
- Interface: SPI, I2C, Parallel, or others depending on the model
- Backlight: LED
Pin Configuration and Descriptions
| Pin Number | Pin Name | Description |
|---|---|---|
| 1 | VCC | Power supply (3.3V or 5V depending on the module) |
| 2 | GND | Ground connection |
| 3 | CS | Chip Select for SPI |
| 4 | RESET | Reset pin |
| 5 | D/C | Data/Command control pin |
| 6 | MOSI | Master Out Slave In for SPI |
| 7 | SCLK | Serial Clock for SPI |
| 8 | LED | Backlight control (PWM capable for brightness control) |
| 9 | MISO | Master In Slave Out for SPI (optional, not used in all modules) |
Note: The pin configuration may vary depending on the specific TFT module and manufacturer. Always refer to the datasheet of the specific module you are using.
Usage Instructions
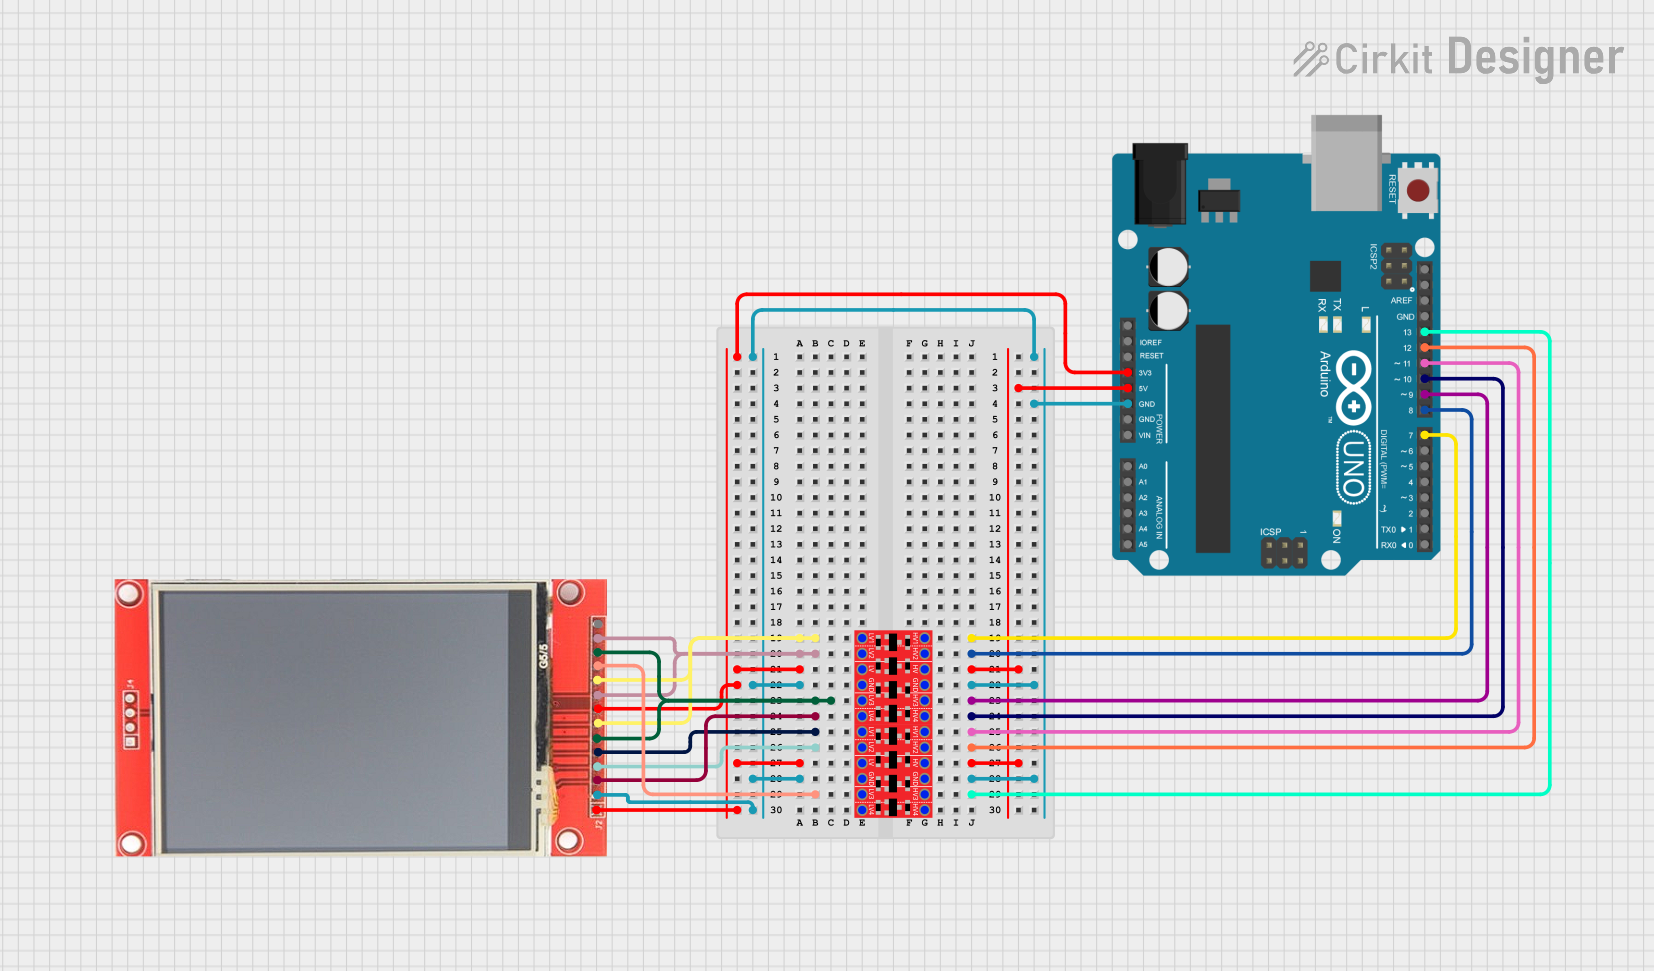
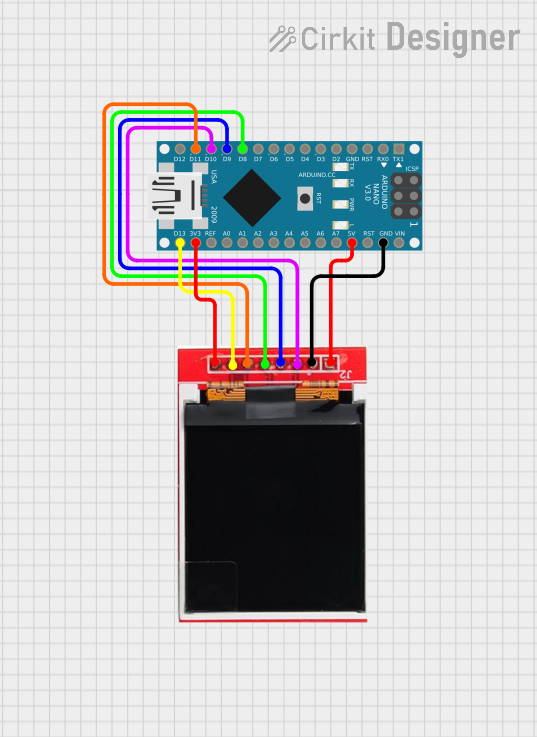
How to Use the Component in a Circuit
- Power Connections: Connect the VCC pin to a 3.3V or 5V power supply, depending on your module's requirements. Connect the GND pin to the ground of your power supply.
- Data Connections: Connect the MOSI, SCLK, CS, and D/C pins to the corresponding pins on your microcontroller or Arduino UNO. If your module has a MISO pin, connect it as well if bidirectional communication is needed.
- Backlight: Connect the LED pin to a PWM-capable pin on your microcontroller if you wish to control the backlight brightness.
- Reset: Connect the RESET pin to a digital pin on your microcontroller to enable software reset functionality.
Important Considerations and Best Practices
- Logic Level Voltage: Ensure that the logic levels of your microcontroller match the TFT module. Use level shifters if necessary.
- Power Supply: Provide a stable power supply to avoid flickering or unstable display performance.
- Backlight Control: Use a current-limiting resistor or a constant current source if your module does not have built-in backlight control.
- Refresh Rate: Keep in mind that higher refresh rates will require faster data transfer speeds.
- Library Support: Use libraries that are compatible with your TFT module for easier programming and functionality.
Example Code for Arduino UNO
#include <Adafruit_GFX.h>    // Core graphics library
#include <Adafruit_TFTLCD.h> // Hardware-specific library

#define LCD_CS A3 // Chip Select pin for TFT
#define LCD_CD A2 // Command/Data pin for TFT
#define LCD_WR A1 // LCD write pin for TFT
#define LCD_RD A0 // LCD read pin for TFT
#define LCD_RESET A4 // Reset pin for TFT

Adafruit_TFTLCD tft(LCD_CS, LCD_CD, LCD_WR, LCD_RD, LCD_RESET);

void setup() {
  tft.begin(identifier); // Replace 'identifier' with the specific identifier for your screen
  tft.setRotation(1); // Set rotation depending on your setup
  tft.fillScreen(BLACK); // Clear the screen to black
}

void loop() {
  // Your display logic here
}
Note: The above code is a basic setup for using a TFT module with an Arduino UNO. You will need to replace 'identifier' with the specific identifier code for your TFT module, which can be found in the documentation or by using a library's built-in functions to detect the display.
Troubleshooting and FAQs
Common Issues Users Might Face
- Display Not Turning On: Check power supply connections and ensure the backlight is connected properly.
- Garbled Images: Verify that all data connections are secure and correct. Also, check for correct initialization of the display in your code.
- No Backlight: Ensure the LED pin is connected and receiving the correct PWM signal if applicable.
Solutions and Tips for Troubleshooting
- Check Connections: Double-check all wiring against the module's datasheet.
- Use Example Code: Start with example code provided by the library to ensure basic functionality before customizing the code.
- Library Compatibility: Make sure you are using a library that supports your specific TFT module.
- Update Libraries: Keep your libraries up to date to benefit from bug fixes and improvements.
FAQs
Q: Can I use a 5V Arduino with a 3.3V TFT module? A: Yes, but you may need to use level shifters to protect the TFT module from higher voltage levels.
Q: How can I increase the refresh rate of my display? A: Use a microcontroller with a faster clock speed and optimize your code to minimize the time spent on non-display-related tasks.
Q: Can I use the TFT module with a Raspberry Pi or other single-board computers? A: Yes, but you will need to ensure the GPIO pins are configured correctly and use a compatible library or driver for the operating system.