Cirkit Designer Logo
Cirkit Designer
Your all-in-one circuit design IDE
Home / 
Component Documentation

How to Use Adafruit Metro M4 AirLift Lite: Examples, Pinouts, and Specs

Image of Adafruit Metro M4 AirLift Lite
Cirkit Designer LogoDesign with Adafruit Metro M4 AirLift Lite in Cirkit Designer

Introduction

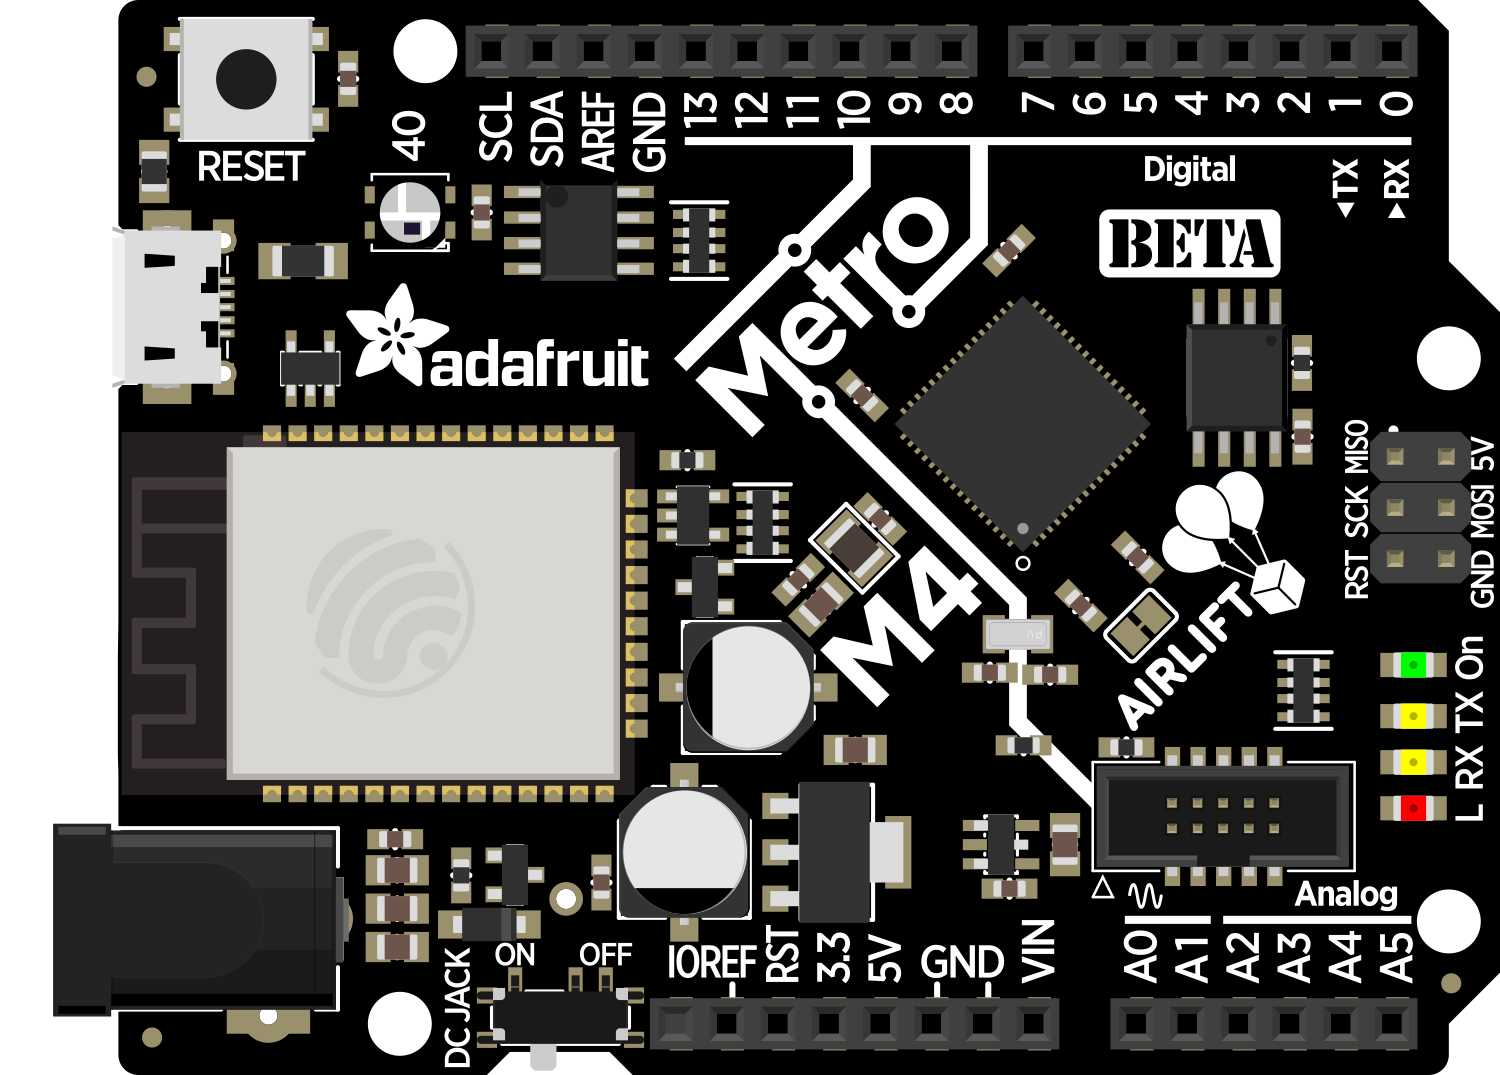
The Adafruit Metro M4 AirLift Lite is a feature-rich microcontroller board designed for the modern maker, hobbyist, or engineer looking to delve into wireless Internet of Things (IoT) projects. At the heart of the board is the ATSAMD51 microcontroller, an ARM Cortex-M4 processor with floating-point support. The board's standout feature is its integrated Wi-Fi module, the ESP32, which provides Wi-Fi connectivity and enables users to easily connect their projects to the internet.

Explore Projects Built with Adafruit Metro M4 AirLift Lite

Use Cirkit Designer to design, explore, and prototype these projects online. Some projects support real-time simulation. Click "Open Project" to start designing instantly!
NodeMCU ESP8266-Based Smart Lift System with IR Sensors and Voice Commands
Image of IoT Ass: A project utilizing Adafruit Metro M4 AirLift Lite in a practical application
This circuit is an IoT-based smart lift system designed for blind and disabled individuals. It uses IR sensors, pushbuttons, an LCD screen, a DFPlayer module, and a VC-02 module to detect floor selection via finger presence or voice commands, and announces the selected floor through a speaker while displaying it on the LCD.
Cirkit Designer LogoOpen Project in Cirkit Designer
Solar-Powered Environmental Data Logger with Adafruit Feather M0 Express
Image of Lake Thoreau Monitoring Station: A project utilizing Adafruit Metro M4 AirLift Lite in a practical application
This circuit is designed for environmental data collection and logging, utilizing an Adafruit Feather M0 Express microcontroller as the central processing unit. It interfaces with a BME280 sensor for atmospheric temperature, humidity, and pressure measurements, an SGP30 sensor for monitoring air quality (eCO2 and TVOC), and a STEMMA soil sensor for detecting soil moisture and temperature. The system is powered by a solar panel and a 3.7v LiPo battery, managed by an Adafruit BQ24074 Solar-DC-USB Lipo Charger, and provides easy access to the microcontroller's connections through an Adafruit Terminal Breakout FeatherWing.
Cirkit Designer LogoOpen Project in Cirkit Designer
Battery-Powered Gas Sensor and Servo Control with Adafruit Trinket M0
Image of Canary: A project utilizing Adafruit Metro M4 AirLift Lite in a practical application
This circuit is a sensor-based system that uses an Adafruit Trinket M0 microcontroller to read data from a MiCS-5524 gas sensor and control a Tower Pro SG90 servo motor. Additionally, it includes an Adafruit Audio FX Mini Sound Board connected to a STEMMA speaker for audio output, all powered by a 4xAA battery pack.
Cirkit Designer LogoOpen Project in Cirkit Designer
ATmega328P-Based Sensor Hub with OLED Display and LIDAR
Image of TILTPCB: A project utilizing Adafruit Metro M4 AirLift Lite in a practical application
This circuit features an Mtiny Uno ATmega328P microcontroller as its central processing unit, interfacing with a variety of sensors and peripherals. It includes a 0.96" OLED display and an MPU6050 accelerometer/gyroscope for user interface and motion sensing, respectively. The circuit also integrates a TF LUNA LIDAR for distance measurement, a DHT11 sensor for temperature and humidity readings, and uses a 9V battery with a 7805 voltage regulator for power management. Communication with a computer for programming and data exchange is facilitated by an Adafruit FTDI Friend module.
Cirkit Designer LogoOpen Project in Cirkit Designer

Explore Projects Built with Adafruit Metro M4 AirLift Lite

Use Cirkit Designer to design, explore, and prototype these projects online. Some projects support real-time simulation. Click "Open Project" to start designing instantly!
Image of IoT Ass: A project utilizing Adafruit Metro M4 AirLift Lite in a practical application
NodeMCU ESP8266-Based Smart Lift System with IR Sensors and Voice Commands
This circuit is an IoT-based smart lift system designed for blind and disabled individuals. It uses IR sensors, pushbuttons, an LCD screen, a DFPlayer module, and a VC-02 module to detect floor selection via finger presence or voice commands, and announces the selected floor through a speaker while displaying it on the LCD.
Cirkit Designer LogoOpen Project in Cirkit Designer
Image of Lake Thoreau Monitoring Station: A project utilizing Adafruit Metro M4 AirLift Lite in a practical application
Solar-Powered Environmental Data Logger with Adafruit Feather M0 Express
This circuit is designed for environmental data collection and logging, utilizing an Adafruit Feather M0 Express microcontroller as the central processing unit. It interfaces with a BME280 sensor for atmospheric temperature, humidity, and pressure measurements, an SGP30 sensor for monitoring air quality (eCO2 and TVOC), and a STEMMA soil sensor for detecting soil moisture and temperature. The system is powered by a solar panel and a 3.7v LiPo battery, managed by an Adafruit BQ24074 Solar-DC-USB Lipo Charger, and provides easy access to the microcontroller's connections through an Adafruit Terminal Breakout FeatherWing.
Cirkit Designer LogoOpen Project in Cirkit Designer
Image of Canary: A project utilizing Adafruit Metro M4 AirLift Lite in a practical application
Battery-Powered Gas Sensor and Servo Control with Adafruit Trinket M0
This circuit is a sensor-based system that uses an Adafruit Trinket M0 microcontroller to read data from a MiCS-5524 gas sensor and control a Tower Pro SG90 servo motor. Additionally, it includes an Adafruit Audio FX Mini Sound Board connected to a STEMMA speaker for audio output, all powered by a 4xAA battery pack.
Cirkit Designer LogoOpen Project in Cirkit Designer
Image of TILTPCB: A project utilizing Adafruit Metro M4 AirLift Lite in a practical application
ATmega328P-Based Sensor Hub with OLED Display and LIDAR
This circuit features an Mtiny Uno ATmega328P microcontroller as its central processing unit, interfacing with a variety of sensors and peripherals. It includes a 0.96" OLED display and an MPU6050 accelerometer/gyroscope for user interface and motion sensing, respectively. The circuit also integrates a TF LUNA LIDAR for distance measurement, a DHT11 sensor for temperature and humidity readings, and uses a 9V battery with a 7805 voltage regulator for power management. Communication with a computer for programming and data exchange is facilitated by an Adafruit FTDI Friend module.
Cirkit Designer LogoOpen Project in Cirkit Designer

Common Applications and Use Cases

  • IoT devices
  • Wireless sensor networks
  • Home automation systems
  • Remote data logging
  • Educational projects and prototyping
  • Cloud-connected applications

Technical Specifications

Key Technical Details

  • Microcontroller: ATSAMD51J19
  • Clock Speed: 120 MHz
  • Flash Memory: 512 KB
  • SRAM: 192 KB
  • Wi-Fi Module: ESP32 (for Wi-Fi connectivity)
  • Operating Voltage: 3.3V
  • Input Voltage (recommended): 7-9V
  • Digital I/O Pins: 25
  • PWM Channels: 12
  • Analog Input Channels: 6
  • Analog Output Channels (DAC): 1
  • UARTs: 2
  • I2C Ports: 1
  • SPI Ports: 1
  • QSPI: 1 (for external flash memory)

Pin Configuration and Descriptions

Pin Number Function Description
1 VIN Input voltage to the board
2-13 Digital I/O Digital input/output pins
14-19 Analog Inputs Analog input pins
20 DAC Digital-to-Analog Converter output
21-22 I2C (SDA, SCL) I2C data and clock lines
23-25 SPI (MISO, MOSI, SCK) SPI communication lines
26 Reset Reset pin
27-28 UART (RX, TX) UART communication lines
29 3V3 3.3V power output
30 GND Ground

Usage Instructions

How to Use the Component in a Circuit

  1. Powering the Board: Connect a 7-9V power supply to the VIN and GND pins, or plug in a USB cable to the board's USB port.
  2. Connecting to Wi-Fi: Utilize the onboard ESP32 module for Wi-Fi connectivity. Ensure that the ESP32 is properly configured with the necessary SSID and password.
  3. Programming the Board: Use the Arduino IDE to write and upload sketches to the board. Select "Adafruit Metro M4 (AirLift)" as the board type in the IDE.
  4. Using I/O Pins: Connect sensors, actuators, or other peripherals to the digital and analog pins as required by your project.

Important Considerations and Best Practices

  • Always ensure that the power supply is within the recommended voltage range to prevent damage to the board.
  • When connecting external components, verify that they are compatible with the board's operating voltage (3.3V logic).
  • To avoid damage to the Wi-Fi module, do not transmit at full power continuously.
  • Use proper decoupling capacitors close to the board's power pins when working in an environment with power fluctuations.

Troubleshooting and FAQs

Common Issues Users Might Face

  • Wi-Fi Connectivity Problems: Ensure that the Wi-Fi credentials are correctly entered and that the ESP32 module is correctly initialized in your sketch.
  • Board Not Recognized by Computer: Check the USB cable and drivers; make sure the board is selected correctly in the Arduino IDE.
  • Sketch Upload Failures: Verify that the correct board and port are selected, and the bootloader is not corrupted.

Solutions and Tips for Troubleshooting

  • Resetting the Board: If the board is unresponsive, try pressing the reset button to reboot the microcontroller.
  • Updating Firmware: Keep the ESP32 Wi-Fi module's firmware up to date for optimal performance and compatibility.
  • Serial Debugging: Use the serial monitor in the Arduino IDE to debug and monitor the output from the board.

FAQs

  • Q: Can I power the board using a battery?

    • A: Yes, you can power the board with a battery connected to the VIN and GND pins, provided it is within the recommended voltage range.
  • Q: How do I connect to a secured Wi-Fi network?

    • A: Use the Wi-Fi library provided by Adafruit to configure the ESP32 module with the network's SSID and password.
  • Q: What libraries do I need to use the Wi-Fi functionality?

    • A: You will need the Adafruit AirLift library and its dependencies, which can be installed through the Arduino Library Manager.

Example Code for Arduino UNO

#include <WiFi.h>
#include <SPI.h>

const char* ssid = "yourSSID"; // Replace with your Wi-Fi network name
const char* password = "yourPASSWORD"; // Replace with your Wi-Fi password

void setup() {
  Serial.begin(115200);
  // Attempt to connect to Wi-Fi network:
  Serial.print("Connecting to ");
  Serial.println(ssid);
  WiFi.begin(ssid, password);

  while (WiFi.status() != WL_CONNECTED) {
    delay(500);
    Serial.print(".");
  }
  Serial.println("");
  Serial.println("Wi-Fi connected.");
}

void loop() {
  // Put your main code here, to run repeatedly:
}

Remember to replace yourSSID and yourPASSWORD with your actual Wi-Fi credentials. This example demonstrates how to connect the Adafruit Metro M4 AirLift Lite to a Wi-Fi network. The serial monitor will display the connection status.