Cirkit Designer Logo
Cirkit Designer
Your all-in-one circuit design IDE
Home / 
Component Documentation

How to Use MPU6050 Accelerometer + Gyroscope (Wokwi Compatible): Examples, Pinouts, and Specs

Image of MPU6050 Accelerometer + Gyroscope (Wokwi Compatible)
Cirkit Designer LogoDesign with MPU6050 Accelerometer + Gyroscope (Wokwi Compatible) in Cirkit Designer

Introduction

The MPU6050 is a 6-axis motion tracking device that integrates a 3-axis accelerometer and a 3-axis gyroscope into a single compact package. It is widely used for measuring orientation, acceleration, and angular velocity in various applications such as robotics, drones, gaming devices, and motion tracking systems. Its compatibility with the Wokwi simulation platform makes it an excellent choice for prototyping and learning.

The MPU6050 communicates via the I2C protocol, making it easy to interface with microcontrollers like the Arduino UNO. It also features a Digital Motion Processor (DMP) for advanced motion processing.

Explore Projects Built with MPU6050 Accelerometer + Gyroscope (Wokwi Compatible)

Use Cirkit Designer to design, explore, and prototype these projects online. Some projects support real-time simulation. Click "Open Project" to start designing instantly!
Arduino UNO and MPU6050 Accelerometer-Gyroscope Sensor for Motion Tracking
Image of MPU-6050 sensor: A project utilizing MPU6050 Accelerometer + Gyroscope (Wokwi Compatible) in a practical application
This circuit consists of an Arduino UNO microcontroller connected to an MPU6050 accelerometer and gyroscope sensor. The Arduino reads acceleration and gyroscopic data from the MPU6050 via the I2C interface and outputs the sensor readings to the serial monitor.
Cirkit Designer LogoOpen Project in Cirkit Designer
Arduino Nano and MPU6050 Based Gesture-Controlled Robotic Arm with Bluetooth Connectivity
Image of Copy of GLOVE ONLY FOR TOGGLE (1): A project utilizing MPU6050 Accelerometer + Gyroscope (Wokwi Compatible) in a practical application
This circuit features multiple MPU6050 accelerometer and gyroscope sensors interfaced with Arduino Nano microcontrollers, likely for capturing motion data. The Arduinos are programmed to read sensor data, calibrate input from potentiometers, and control LEDs. Communication with a Bluetooth module suggests wireless data transmission, possibly to a robotic arm or remote system, based on the motion and flex sensor inputs.
Cirkit Designer LogoOpen Project in Cirkit Designer
Arduino UNO and MPU6050 Accelerometer + Gyroscope Sensor for Motion Tracking
Image of MPU6050 Sim Test (Adafruit): A project utilizing MPU6050 Accelerometer + Gyroscope (Wokwi Compatible) in a practical application
This circuit interfaces an MPU6050 accelerometer and gyroscope sensor with an Arduino UNO via I2C communication. The Arduino UNO reads acceleration, gyroscope, and temperature data from the MPU6050 and outputs the readings to the serial monitor.
Cirkit Designer LogoOpen Project in Cirkit Designer
Arduino UNO and MPU6050-Based Motion Sensing System
Image of SENSORS LAB: A project utilizing MPU6050 Accelerometer + Gyroscope (Wokwi Compatible) in a practical application
This circuit interfaces an MPU6050 Accelerometer and Gyroscope with an Arduino UNO. The MPU6050 is powered by the Arduino's 3.3V and GND pins, and communicates with the Arduino via the I2C protocol using the SDA and SCL lines connected to the Arduino's A4 and A5 pins, respectively.
Cirkit Designer LogoOpen Project in Cirkit Designer

Explore Projects Built with MPU6050 Accelerometer + Gyroscope (Wokwi Compatible)

Use Cirkit Designer to design, explore, and prototype these projects online. Some projects support real-time simulation. Click "Open Project" to start designing instantly!
Image of MPU-6050 sensor: A project utilizing MPU6050 Accelerometer + Gyroscope (Wokwi Compatible) in a practical application
Arduino UNO and MPU6050 Accelerometer-Gyroscope Sensor for Motion Tracking
This circuit consists of an Arduino UNO microcontroller connected to an MPU6050 accelerometer and gyroscope sensor. The Arduino reads acceleration and gyroscopic data from the MPU6050 via the I2C interface and outputs the sensor readings to the serial monitor.
Cirkit Designer LogoOpen Project in Cirkit Designer
Image of Copy of GLOVE ONLY FOR TOGGLE (1): A project utilizing MPU6050 Accelerometer + Gyroscope (Wokwi Compatible) in a practical application
Arduino Nano and MPU6050 Based Gesture-Controlled Robotic Arm with Bluetooth Connectivity
This circuit features multiple MPU6050 accelerometer and gyroscope sensors interfaced with Arduino Nano microcontrollers, likely for capturing motion data. The Arduinos are programmed to read sensor data, calibrate input from potentiometers, and control LEDs. Communication with a Bluetooth module suggests wireless data transmission, possibly to a robotic arm or remote system, based on the motion and flex sensor inputs.
Cirkit Designer LogoOpen Project in Cirkit Designer
Image of MPU6050 Sim Test (Adafruit): A project utilizing MPU6050 Accelerometer + Gyroscope (Wokwi Compatible) in a practical application
Arduino UNO and MPU6050 Accelerometer + Gyroscope Sensor for Motion Tracking
This circuit interfaces an MPU6050 accelerometer and gyroscope sensor with an Arduino UNO via I2C communication. The Arduino UNO reads acceleration, gyroscope, and temperature data from the MPU6050 and outputs the readings to the serial monitor.
Cirkit Designer LogoOpen Project in Cirkit Designer
Image of SENSORS LAB: A project utilizing MPU6050 Accelerometer + Gyroscope (Wokwi Compatible) in a practical application
Arduino UNO and MPU6050-Based Motion Sensing System
This circuit interfaces an MPU6050 Accelerometer and Gyroscope with an Arduino UNO. The MPU6050 is powered by the Arduino's 3.3V and GND pins, and communicates with the Arduino via the I2C protocol using the SDA and SCL lines connected to the Arduino's A4 and A5 pins, respectively.
Cirkit Designer LogoOpen Project in Cirkit Designer

Technical Specifications

  • Supply Voltage: 3.3V to 5V
  • Communication Protocol: I2C
  • I2C Address: 0x68 (default), 0x69 (if AD0 pin is high)
  • Accelerometer Range: ±2g, ±4g, ±8g, ±16g
  • Gyroscope Range: ±250°/s, ±500°/s, ±1000°/s, ±2000°/s
  • Operating Temperature: -40°C to +85°C
  • Power Consumption: 3.9mA (typical)

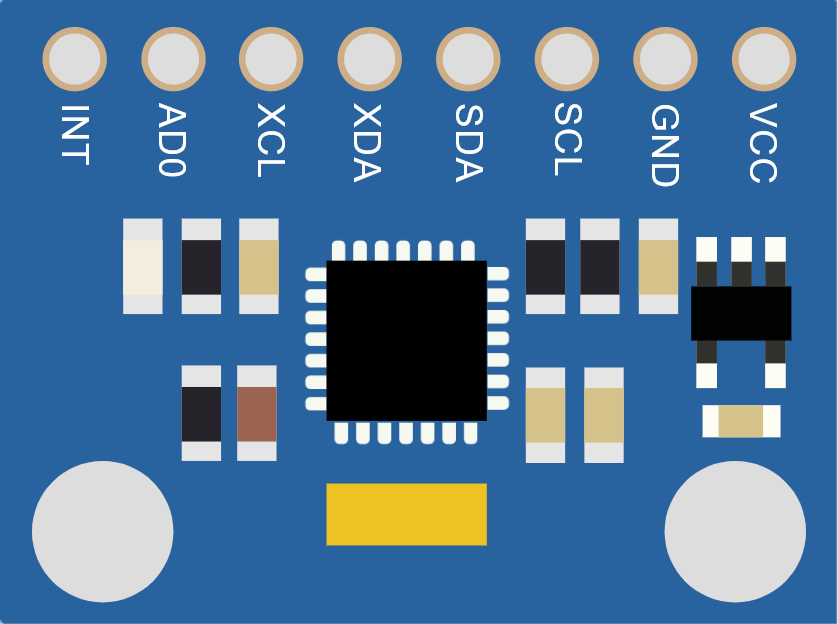
Pin Configuration and Descriptions

Pin Name Description
VCC Power supply (3.3V to 5V)
GND Ground
SCL I2C clock line
SDA I2C data line
AD0 I2C address select (low: 0x68, high: 0x69)
INT Interrupt pin (optional, for DMP)

Usage Instructions

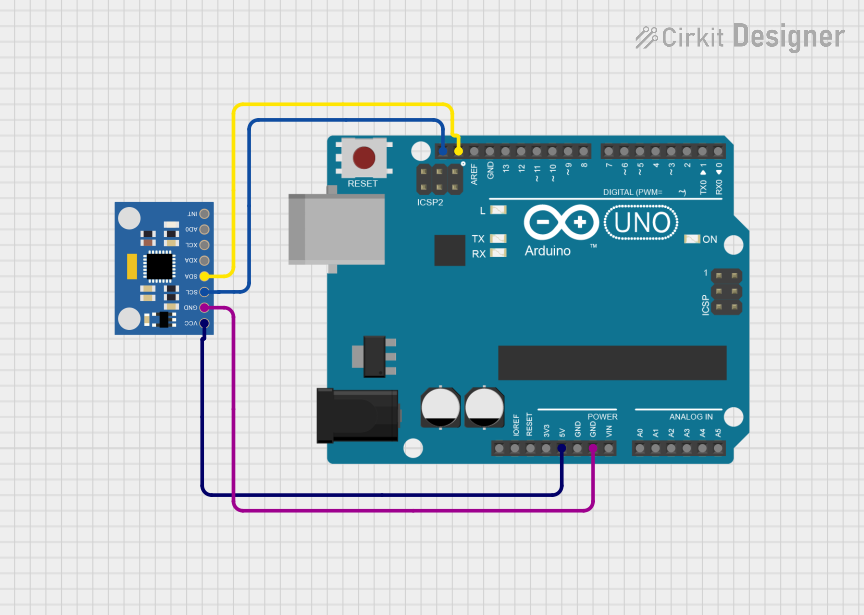
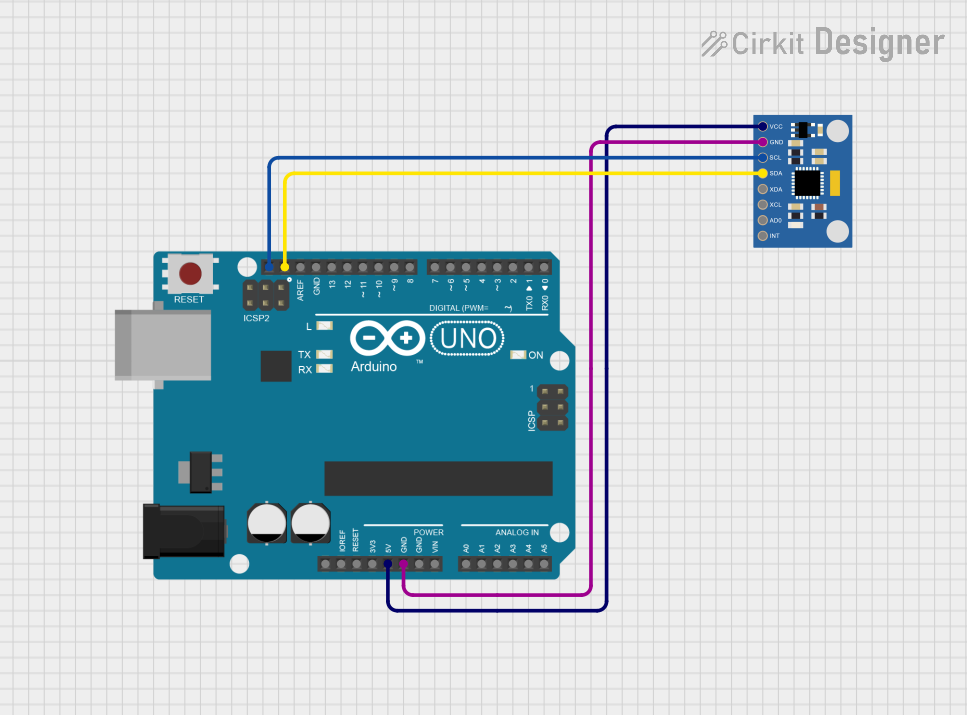
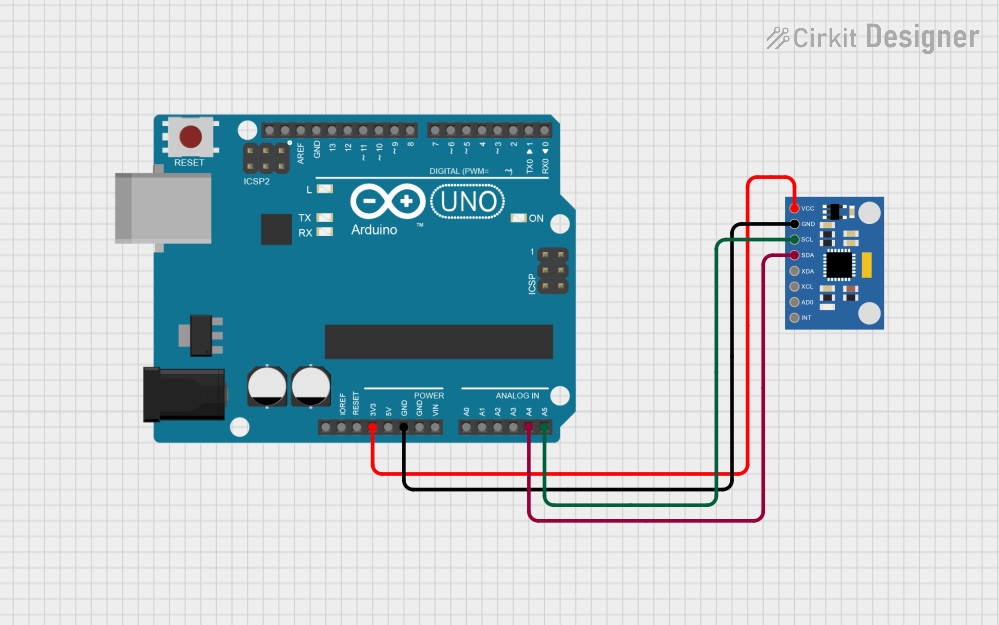
Connecting the MPU6050 to an Arduino UNO

To use the MPU6050 with an Arduino UNO, follow these steps:

  1. Connect the VCC pin of the MPU6050 to the 5V pin of the Arduino.
  2. Connect the GND pin of the MPU6050 to the GND pin of the Arduino.
  3. Connect the SCL pin of the MPU6050 to the A5 pin of the Arduino (I2C clock line).
  4. Connect the SDA pin of the MPU6050 to the A4 pin of the Arduino (I2C data line).
  5. Optionally, connect the INT pin to a digital pin on the Arduino if you plan to use interrupts.

Arduino Code Example

Below is an example code to read accelerometer and gyroscope data from the MPU6050 using the Arduino IDE. This code uses the Wire library for I2C communication.

#include <Wire.h>

// MPU6050 I2C address
const int MPU6050_ADDR = 0x68;

// Registers for accelerometer and gyroscope data
const int ACCEL_XOUT_H = 0x3B;
const int GYRO_XOUT_H = 0x43;

void setup() {
  Wire.begin(); // Initialize I2C communication
  Serial.begin(9600); // Start serial communication

  // Wake up the MPU6050 (set power management register to 0)
  Wire.beginTransmission(MPU6050_ADDR);
  Wire.write(0x6B); // Power management register
  Wire.write(0);    // Set to 0 to wake up the sensor
  Wire.endTransmission();
}

void loop() {
  int16_t accelX, accelY, accelZ;
  int16_t gyroX, gyroY, gyroZ;

  // Read accelerometer data
  accelX = readMPU6050(ACCEL_XOUT_H);
  accelY = readMPU6050(ACCEL_XOUT_H + 2);
  accelZ = readMPU6050(ACCEL_XOUT_H + 4);

  // Read gyroscope data
  gyroX = readMPU6050(GYRO_XOUT_H);
  gyroY = readMPU6050(GYRO_XOUT_H + 2);
  gyroZ = readMPU6050(GYRO_XOUT_H + 4);

  // Print data to the Serial Monitor
  Serial.print("Accel: ");
  Serial.print(accelX); Serial.print(", ");
  Serial.print(accelY); Serial.print(", ");
  Serial.print(accelZ); Serial.print(" | ");

  Serial.print("Gyro: ");
  Serial.print(gyroX); Serial.print(", ");
  Serial.print(gyroY); Serial.print(", ");
  Serial.println(gyroZ);

  delay(500); // Delay for readability
}

// Function to read 16-bit data from MPU6050
int16_t readMPU6050(int reg) {
  Wire.beginTransmission(MPU6050_ADDR);
  Wire.write(reg); // Specify the register to read from
  Wire.endTransmission(false);
  Wire.requestFrom(MPU6050_ADDR, 2, true); // Request 2 bytes of data

  int16_t data = Wire.read() << 8 | Wire.read(); // Combine high and low bytes
  return data;
}

Important Considerations

  • Ensure proper pull-up resistors (4.7kΩ to 10kΩ) are connected to the SCL and SDA lines if not already present on the module.
  • The MPU6050 operates at 3.3V logic levels, but it is 5V tolerant, making it compatible with 5V systems like the Arduino UNO.
  • Use libraries like MPU6050 or MPU6050_DMP6 for advanced features like DMP processing.

Troubleshooting and FAQs

Common Issues

  1. No data or incorrect readings:

    • Ensure the wiring is correct and matches the pin configuration.
    • Verify that the I2C address (default: 0x68) is correct in the code.
    • Check for loose connections or damaged wires.
  2. Device not detected:

    • Use an I2C scanner sketch to confirm the MPU6050 is detected on the I2C bus.
    • Ensure the AD0 pin is set correctly for the desired I2C address.
  3. Unstable or noisy readings:

    • Use proper decoupling capacitors near the power pins.
    • Implement software filtering or use the DMP for more stable data.

FAQs

Q: Can I use the MPU6050 with a 3.3V microcontroller?
A: Yes, the MPU6050 operates at 3.3V logic levels and can be powered with 3.3V.

Q: How do I change the accelerometer or gyroscope range?
A: Modify the appropriate configuration registers (0x1C for accelerometer, 0x1B for gyroscope) in your code.

Q: Is the MPU6050 compatible with Wokwi?
A: Yes, the MPU6050 is fully compatible with the Wokwi simulation platform, allowing for easy prototyping and testing.