How to Use TMC2209: Examples, Pinouts, and Specs
Introduction
The TMC2209 is a highly advanced stepper motor driver IC designed to provide smooth and quiet operation for stepper motors. It features technologies such as stealthChop for silent operation, spreadCycle for high precision, and stallGuard for sensorless homing. These features make the TMC2209 an ideal choice for applications requiring precise and quiet motor control, such as 3D printers, CNC machines, and other automated machinery.
Explore Projects Built with TMC2209

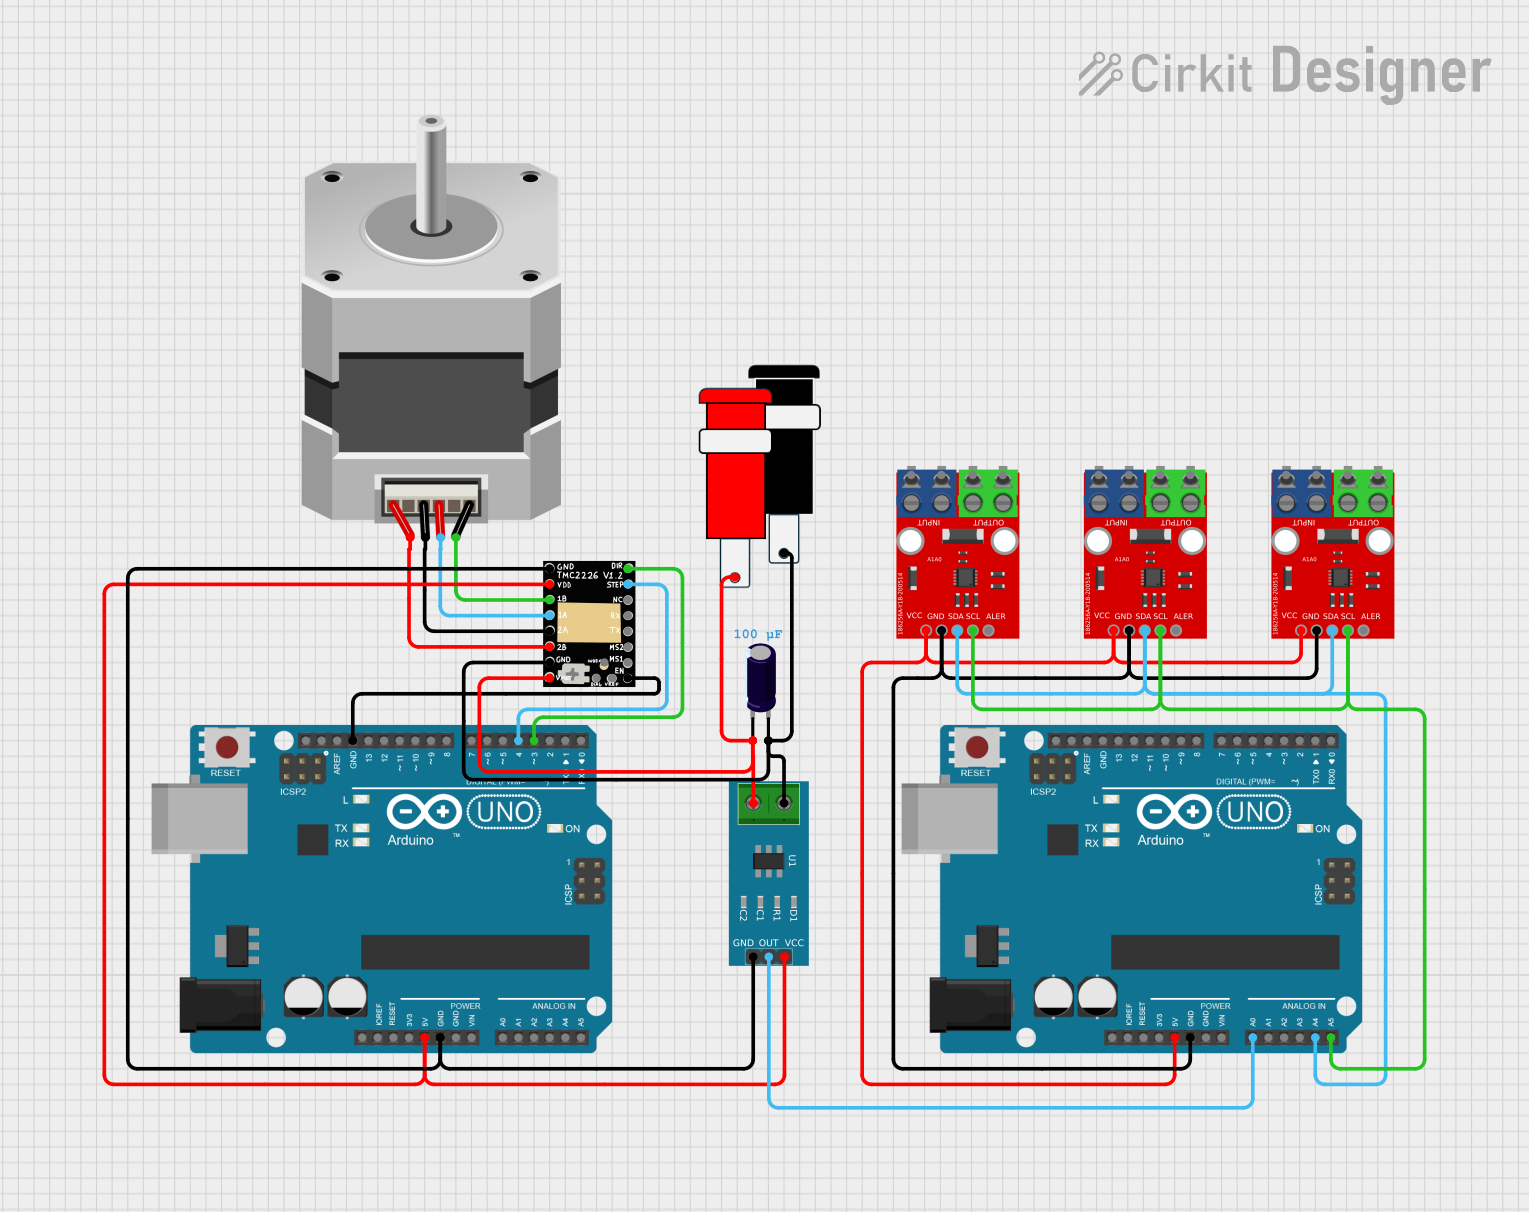
Explore Projects Built with TMC2209
Technical Specifications
Key Technical Details
| Parameter | Value |
|---|---|
| Operating Voltage | 4.75V to 29V |
| Motor Current | Up to 2.0A RMS |
| Microstepping | Up to 1/256 |
| Interface | UART, Step/Dir |
| Features | stealthChop, spreadCycle, |
| stallGuard, coolStep |
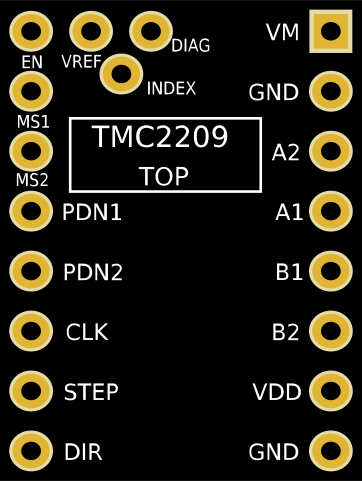
Pin Configuration and Descriptions
| Pin Number | Pin Name | Description |
|---|---|---|
| 1 | GND | Ground |
| 2 | VCC_IO | Logic Voltage Supply |
| 3 | VCC | Motor Voltage Supply |
| 4 | ENN | Enable Input (Active Low) |
| 5 | MS1 | Microstep Resolution Select 1 |
| 6 | MS2 | Microstep Resolution Select 2 |
| 7 | DIAG | Diagnostic Output |
| 8 | INDEX | Index Output |
| 9 | STEP | Step Input |
| 10 | DIR | Direction Input |
| 11 | UART | UART Interface |
| 12 | CLK | External Clock Input |
| 13 | A1 | Motor Coil A1 |
| 14 | A2 | Motor Coil A2 |
| 15 | B1 | Motor Coil B1 |
| 16 | B2 | Motor Coil B2 |
Usage Instructions
How to Use the TMC2209 in a Circuit
Power Supply:
- Connect the VCC pin to a motor power supply (4.75V to 29V).
- Connect the VCC_IO pin to the logic voltage supply (typically 3.3V or 5V).
- Connect the GND pin to the ground of the power supply.
Motor Connections:
- Connect the motor coils to pins A1, A2, B1, and B2.
Control Signals:
- Connect the STEP and DIR pins to the corresponding control signals from a microcontroller or other control device.
- Optionally, connect the UART pin for advanced configuration and diagnostics.
Microstepping Configuration:
- Use the MS1 and MS2 pins to set the desired microstepping resolution.
Enable and Diagnostics:
- Use the ENN pin to enable or disable the driver.
- Monitor the DIAG pin for diagnostic information.
Important Considerations and Best Practices
- Heat Dissipation: Ensure adequate cooling for the TMC2209, as it can generate significant heat during operation. Use a heatsink or active cooling if necessary.
- Power Supply: Use a stable and adequately rated power supply to avoid voltage drops and ensure reliable operation.
- Wiring: Keep motor and power supply wiring short and thick to minimize resistance and inductance.
- Configuration: Use the UART interface for advanced configuration and tuning of the driver parameters.
Troubleshooting and FAQs
Common Issues and Solutions
Motor Not Moving:
- Solution: Check the power supply connections and ensure the ENN pin is properly connected and active low.
Motor Vibrating or Making Noise:
- Solution: Verify the microstepping configuration and ensure the STEP and DIR signals are correctly connected.
Overheating:
- Solution: Improve cooling with a heatsink or active cooling. Ensure the driver is not exceeding its current rating.
StallGuard Not Working:
- Solution: Ensure the UART interface is properly connected and configured. Verify the stallGuard parameters.
FAQs
Q1: Can the TMC2209 be used with an Arduino UNO? A1: Yes, the TMC2209 can be used with an Arduino UNO. Below is an example code to control a stepper motor using the TMC2209 with an Arduino UNO.
#include <TMCStepper.h>

// Define pins
#define EN_PIN 8
#define DIR_PIN 5
#define STEP_PIN 2
#define SERIAL_PORT Serial

// Create TMC2209 driver instance
TMC2209Stepper driver(&SERIAL_PORT, R_SENSE, DRIVER_ADDRESS);

void setup() {
  // Initialize serial communication
  SERIAL_PORT.begin(115200);

  // Set pin modes
  pinMode(EN_PIN, OUTPUT);
  pinMode(DIR_PIN, OUTPUT);
  pinMode(STEP_PIN, OUTPUT);

  // Enable the driver
  digitalWrite(EN_PIN, LOW);

  // Initialize the driver
  driver.begin();
  driver.toff(5);
  driver.rms_current(600); // Set motor current
  driver.microsteps(16);   // Set microstepping
}

void loop() {
  // Set direction
  digitalWrite(DIR_PIN, HIGH);

  // Step the motor
  for (int i = 0; i < 200; i++) {
    digitalWrite(STEP_PIN, HIGH);
    delayMicroseconds(1000);
    digitalWrite(STEP_PIN, LOW);
    delayMicroseconds(1000);
  }

  // Change direction
  digitalWrite(DIR_PIN, LOW);

  // Step the motor
  for (int i = 0; i < 200; i++) {
    digitalWrite(STEP_PIN, HIGH);
    delayMicroseconds(1000);
    digitalWrite(STEP_PIN, LOW);
    delayMicroseconds(1000);
  }
}
Q2: How do I configure the TMC2209 for sensorless homing? A2: Sensorless homing can be configured using the UART interface. Refer to the TMC2209 datasheet for detailed instructions on configuring stallGuard and other parameters.
Q3: What is the maximum current the TMC2209 can handle? A3: The TMC2209 can handle up to 2.0A RMS motor current. Ensure proper cooling to avoid overheating.
By following this documentation, users can effectively integrate and utilize the TMC2209 stepper motor driver IC in their projects, ensuring smooth, quiet, and precise motor control.