How to Use Water Level Sensor: Examples, Pinouts, and Specs
Introduction
The Water Level Sensor (Manufacturer Part ID: Gabe_Custom) is a device designed to detect and monitor the level of water in tanks, reservoirs, or other liquid storage systems. It provides an analog or digital output signal that can be used in automation systems to control pumps, alarms, or other devices. This sensor is ideal for applications such as water tank management, irrigation systems, and industrial liquid level monitoring.
Explore Projects Built with Water Level Sensor


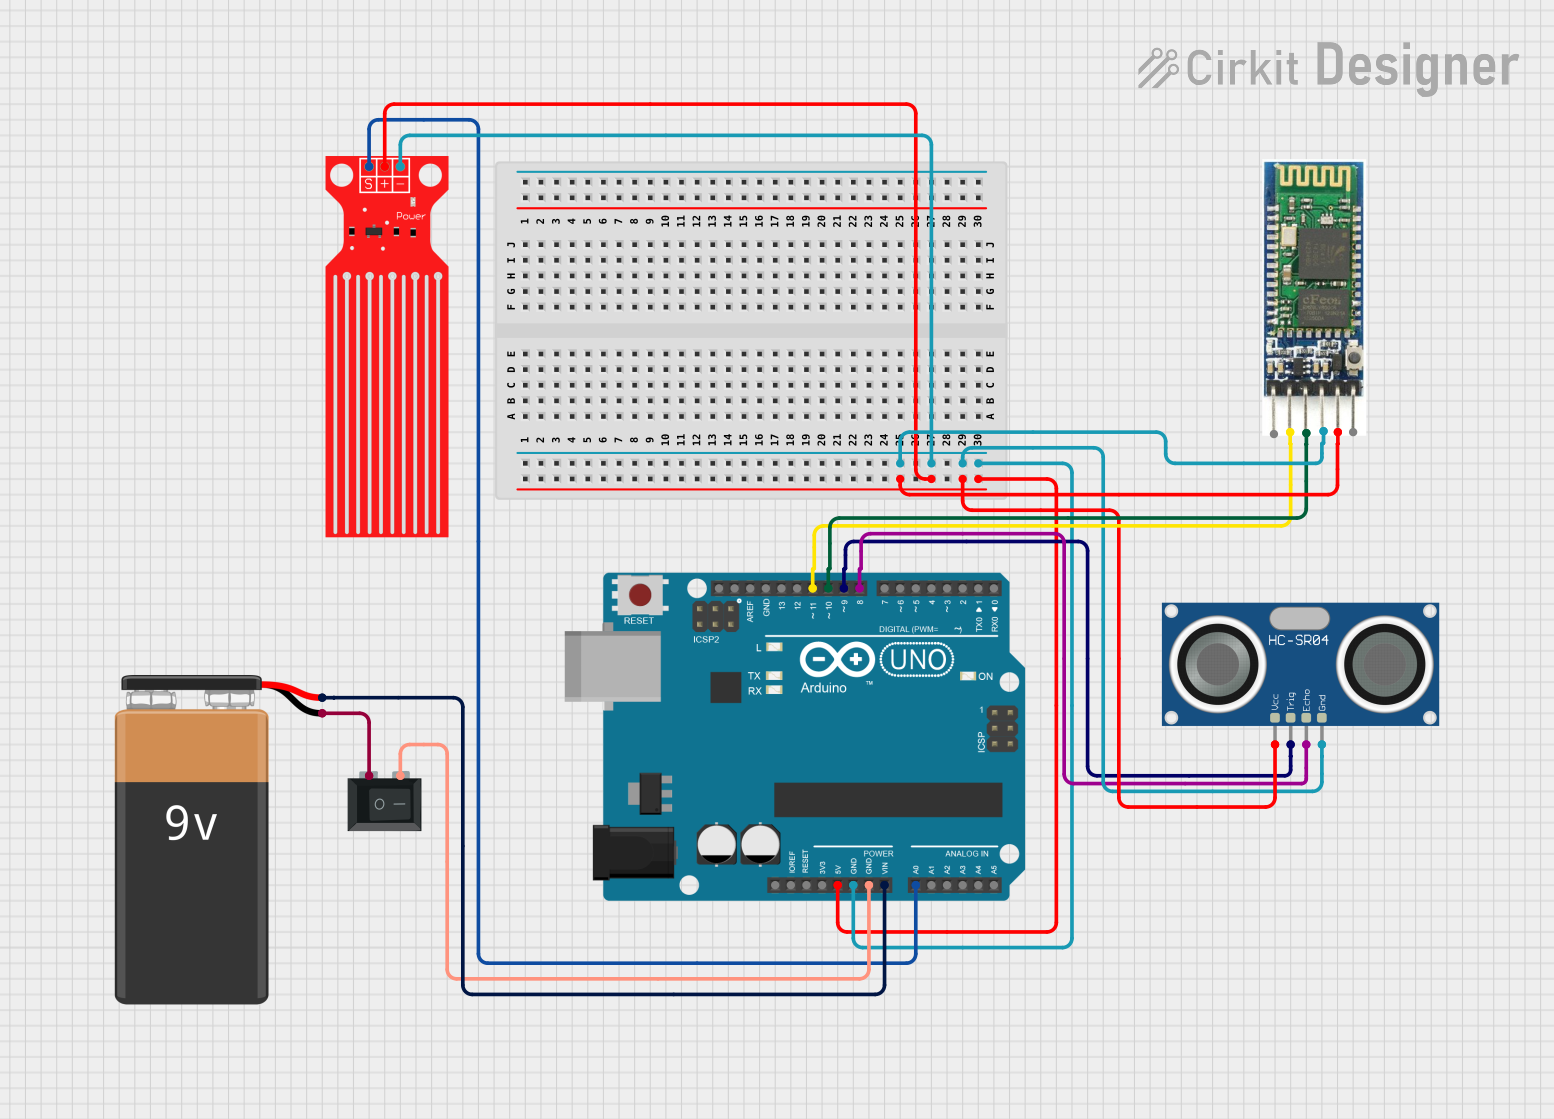
Explore Projects Built with Water Level Sensor
Common Applications and Use Cases
- Water Tank Automation: Automatically control water pumps to maintain desired water levels.
- Irrigation Systems: Monitor water levels in reservoirs for efficient irrigation.
- Leak Detection: Detect water presence in areas prone to leaks.
- Industrial Applications: Monitor liquid levels in industrial tanks and containers.
Technical Specifications
Below are the key technical details for the Gabe_Custom Water Level Sensor:
| Parameter | Value |
|---|---|
| Operating Voltage | 3.3V - 5V |
| Output Type | Analog (0-1023) and Digital (High/Low) |
| Current Consumption | < 20mA |
| Detection Range | 0 - 100% water level (linear output) |
| Operating Temperature | -10°C to 50°C |
| Dimensions | 62mm x 20mm x 8mm |
| Connector Type | 3-pin header (VCC, GND, Signal) |
Pin Configuration and Descriptions
The sensor has a 3-pin interface for easy integration into circuits. The pinout is as follows:
| Pin | Name | Description |
|---|---|---|
| 1 | VCC | Power supply input (3.3V - 5V) |
| 2 | GND | Ground connection |
| 3 | Signal | Output signal (analog voltage or digital HIGH/LOW) |
Usage Instructions
How to Use the Water Level Sensor in a Circuit
- Power the Sensor: Connect the VCC pin to a 3.3V or 5V power source and the GND pin to the ground of your circuit.
- Read the Output:
- For analog output, connect the Signal pin to an analog input pin of your microcontroller (e.g., Arduino).
- For digital output, connect the Signal pin to a digital input pin. The sensor will output HIGH when water is detected and LOW when no water is present.
- Calibrate if Necessary: For precise applications, you may need to calibrate the sensor by mapping the analog output to the actual water level.
Important Considerations and Best Practices
- Avoid Submerging the Entire Sensor: Only the sensing area should come into contact with water. Submerging the entire sensor may damage it.
- Use in Clean Water: The sensor is designed for clean or slightly impure water. Avoid using it in highly corrosive or dirty liquids.
- Protect Against Electrical Noise: Use proper grounding and shielding to prevent noise from affecting the sensor's output.
- Check Voltage Compatibility: Ensure the sensor's operating voltage matches your microcontroller or power source.
Example: Connecting to an Arduino UNO
Below is an example of how to connect and use the Water Level Sensor with an Arduino UNO:
Circuit Diagram
- VCC: Connect to the 5V pin on the Arduino.
- GND: Connect to the GND pin on the Arduino.
- Signal: Connect to the A0 pin on the Arduino for analog readings.
Arduino Code
// Water Level Sensor Example Code
// Manufacturer: Me
// Part ID: Gabe_Custom

const int sensorPin = A0;  // Analog pin connected to the sensor's Signal pin
int sensorValue = 0;       // Variable to store the sensor reading

void setup() {
  Serial.begin(9600);  // Initialize serial communication at 9600 baud
  pinMode(sensorPin, INPUT);  // Set the sensor pin as an input
}

void loop() {
  // Read the analog value from the sensor
  sensorValue = analogRead(sensorPin);

  // Map the sensor value to a percentage (0-100%)
  int waterLevel = map(sensorValue, 0, 1023, 0, 100);

  // Print the water level to the Serial Monitor
  Serial.print("Water Level: ");
  Serial.print(waterLevel);
  Serial.println("%");

  delay(1000);  // Wait for 1 second before the next reading
}
Troubleshooting and FAQs
Common Issues and Solutions
No Output Signal:
- Cause: Incorrect wiring or insufficient power supply.
- Solution: Double-check the connections and ensure the power supply is within the specified range (3.3V - 5V).
Inconsistent Readings:
- Cause: Electrical noise or unstable power supply.
- Solution: Use a decoupling capacitor (e.g., 0.1µF) between VCC and GND to stabilize the power supply.
Sensor Not Detecting Water:
- Cause: Sensor not properly submerged or water is too impure.
- Solution: Ensure the sensing area is in contact with water and clean the sensor if necessary.
Analog Output Not Linear:
- Cause: Calibration issue.
- Solution: Use the
map()function in your code to adjust the output to match the actual water level.
FAQs
Q1: Can this sensor be used with liquids other than water?
A1: The sensor is optimized for clean or slightly impure water. Using it with other liquids may affect accuracy or damage the sensor.
Q2: What is the maximum cable length I can use with this sensor?
A2: For best performance, keep the cable length under 1 meter. For longer distances, use shielded cables to reduce noise.
Q3: Can I use this sensor outdoors?
A3: The sensor is not waterproof and should be used in controlled environments. If outdoor use is required, ensure proper waterproofing and protection.
Q4: How do I clean the sensor?
A4: Gently wipe the sensing area with a damp cloth. Avoid using abrasive materials or harsh chemicals.