How to Use Seeed Studio XIAO nRF52840(Sense): Examples, Pinouts, and Specs
Introduction
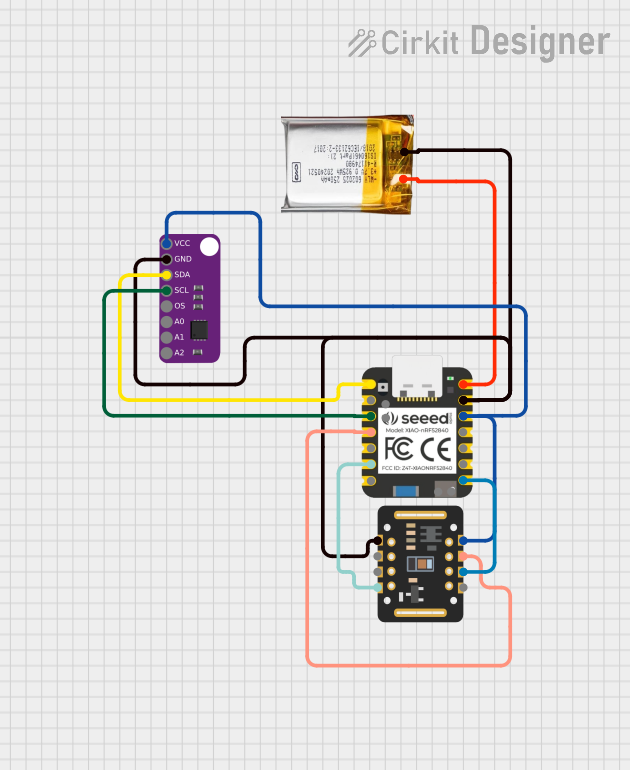
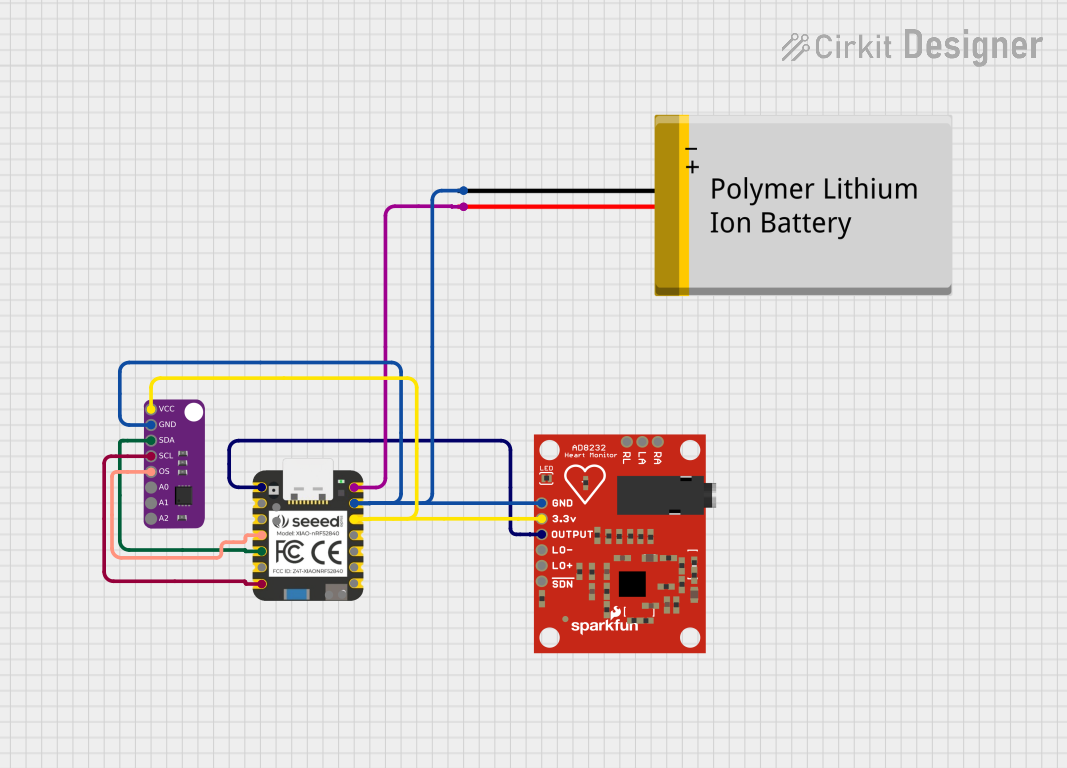
The Seeed Studio XIAO nRF52840(Sense) is a compact and powerful microcontroller board based on the Nordic nRF52840 chip. It is designed for low-power Bluetooth applications and IoT projects, making it an excellent choice for developers working on wireless communication, wearable devices, and environmental monitoring. This board features built-in sensors, including a microphone and a 6-axis IMU, enabling advanced sensing capabilities in a small form factor.
Explore Projects Built with Seeed Studio XIAO nRF52840(Sense)


Explore Projects Built with Seeed Studio XIAO nRF52840(Sense)
Common Applications and Use Cases
- Bluetooth Low Energy (BLE) applications
- IoT devices and smart home projects
- Wearable technology
- Environmental monitoring and data logging
- Prototyping for AI and machine learning on edge devices
Technical Specifications
The following table outlines the key technical specifications of the Seeed Studio XIAO nRF52840(Sense):
| Specification | Details |
|---|---|
| Microcontroller | Nordic nRF52840 (ARM Cortex-M4F @ 64 MHz) |
| Flash Memory | 1 MB |
| RAM | 256 KB |
| Bluetooth | Bluetooth 5.0 Low Energy (BLE) |
| Operating Voltage | 3.3V |
| Input Voltage | 3.3V - 5V (via USB-C) |
| Digital I/O Pins | 11 |
| Analog Input Pins | 3 |
| Communication Interfaces | I2C, SPI, UART |
| Built-in Sensors | PDM Microphone, 6-axis IMU (LSM6DS3) |
| Dimensions | 21 x 17.5 mm |
| Weight | 3g |
Pin Configuration and Descriptions
The Seeed Studio XIAO nRF52840(Sense) has a total of 14 pins. The table below describes the pin configuration:
| Pin | Name | Type | Description |
|---|---|---|---|
| 1 | 3V3 | Power | 3.3V power output |
| 2 | GND | Power | Ground |
| 3 | D0/RX | Digital I/O | UART RX, GPIO |
| 4 | D1/TX | Digital I/O | UART TX, GPIO |
| 5 | D2 | Digital I/O | GPIO, PWM |
| 6 | D3 | Digital I/O | GPIO, PWM |
| 7 | D4 | Digital I/O | GPIO, PWM |
| 8 | D5 | Digital I/O | GPIO, PWM |
| 9 | A0/D6 | Analog/Digital | Analog input, GPIO, PWM |
| 10 | A1/D7 | Analog/Digital | Analog input, GPIO, PWM |
| 11 | A2/D8 | Analog/Digital | Analog input, GPIO, PWM |
| 12 | SDA | Digital I/O | I2C Data Line |
| 13 | SCL | Digital I/O | I2C Clock Line |
| 14 | USB-C | Power/Comm | USB-C port for power, programming, and serial communication |
Usage Instructions
How to Use the Component in a Circuit
- Powering the Board: Connect the board to a power source using the USB-C port. It supports 3.3V to 5V input.
- Programming the Board: Use Arduino IDE, CircuitPython, or other supported environments to program the board. Install the necessary board definitions and libraries for the nRF52840 chip.
- Connecting Sensors and Peripherals: Use the GPIO, I2C, or SPI pins to connect external sensors or peripherals. The built-in sensors can be accessed directly via software libraries.
Important Considerations and Best Practices
- Ensure the input voltage does not exceed 5V to avoid damaging the board.
- Use appropriate pull-up resistors for I2C communication if required.
- When using the built-in sensors, ensure the board is placed in a stable environment to avoid inaccurate readings.
- For BLE applications, ensure the device is within the recommended range for reliable communication.
Example Code for Arduino UNO
Below is an example of how to read data from the built-in 6-axis IMU (LSM6DS3) using the Arduino IDE:
#include <Wire.h>
#include <SparkFunLSM6DS3.h> // Include the library for the LSM6DS3 sensor

LSM6DS3 myIMU(I2C_MODE, 0x6A); // Initialize the IMU with I2C address 0x6A

void setup() {
  Serial.begin(115200); // Start serial communication at 115200 baud
  delay(1000); // Wait for serial monitor to initialize

  if (myIMU.begin() != 0) {
    Serial.println("IMU initialization failed!");
    while (1); // Halt the program if initialization fails
  }
  Serial.println("IMU initialized successfully!");
}

void loop() {
  // Read accelerometer data
  float accelX = myIMU.readFloatAccelX();
  float accelY = myIMU.readFloatAccelY();
  float accelZ = myIMU.readFloatAccelZ();

  // Print accelerometer data to the serial monitor
  Serial.print("Accel X: ");
  Serial.print(accelX);
  Serial.print(" | Accel Y: ");
  Serial.print(accelY);
  Serial.print(" | Accel Z: ");
  Serial.println(accelZ);

  delay(500); // Wait 500ms before the next reading
}
Troubleshooting and FAQs
Common Issues Users Might Face
Board Not Detected by the Computer:
- Ensure the USB-C cable is properly connected and supports data transfer.
- Check if the correct board and port are selected in the Arduino IDE.
IMU or Microphone Not Responding:
- Verify that the required libraries are installed and included in the code.
- Ensure the board is powered and the sensors are not physically damaged.
BLE Connection Issues:
- Check if the BLE device is within range.
- Ensure the BLE firmware is correctly configured and updated.
Solutions and Tips for Troubleshooting
- Reset the Board: Press the reset button on the board to restart it.
- Reinstall Drivers: If the board is not recognized, reinstall the USB drivers for the nRF52840.
- Check Power Supply: Ensure the board is receiving sufficient power (3.3V to 5V).
- Consult Documentation: Refer to the official Seeed Studio documentation for additional guidance.
By following this documentation, you can effectively utilize the Seeed Studio XIAO nRF52840(Sense) for your projects.