Cirkit Designer Logo
Cirkit Designer
Your all-in-one circuit design IDE
Home / 
Component Documentation

How to Use 5V Bluetooth Audio Receiver: Examples, Pinouts, and Specs

Image of 5V Bluetooth Audio Receiver
Cirkit Designer LogoDesign with 5V Bluetooth Audio Receiver in Cirkit Designer

Introduction

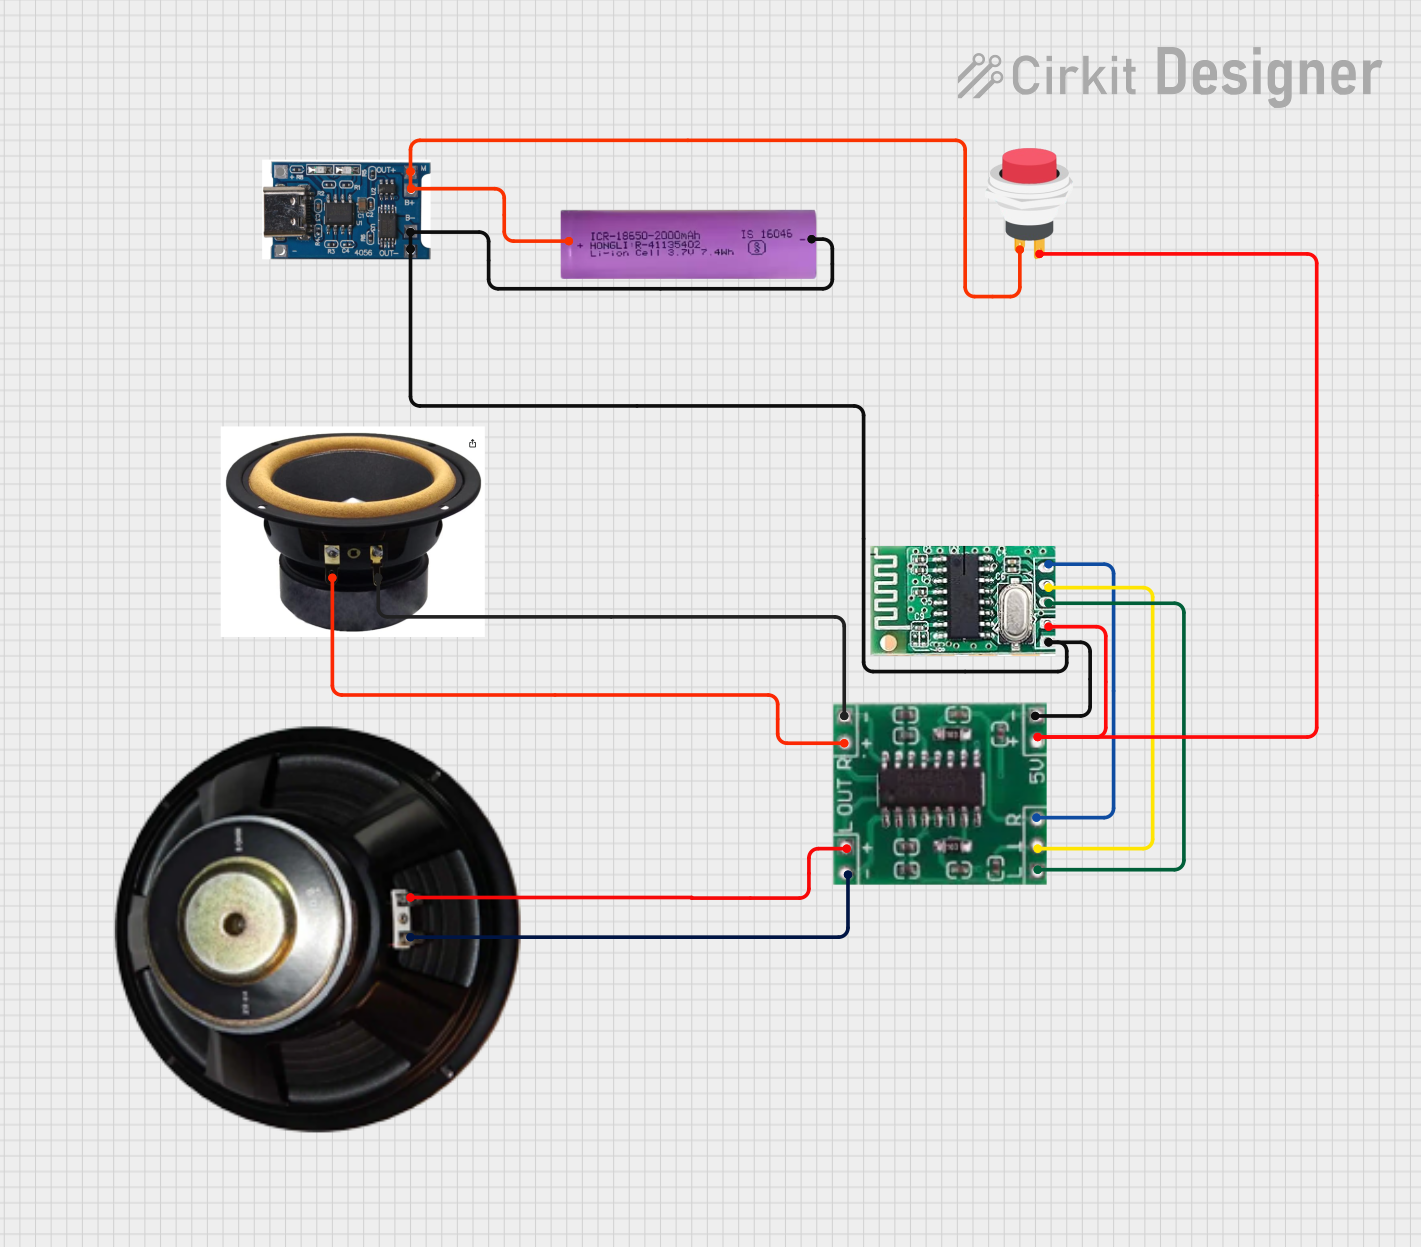
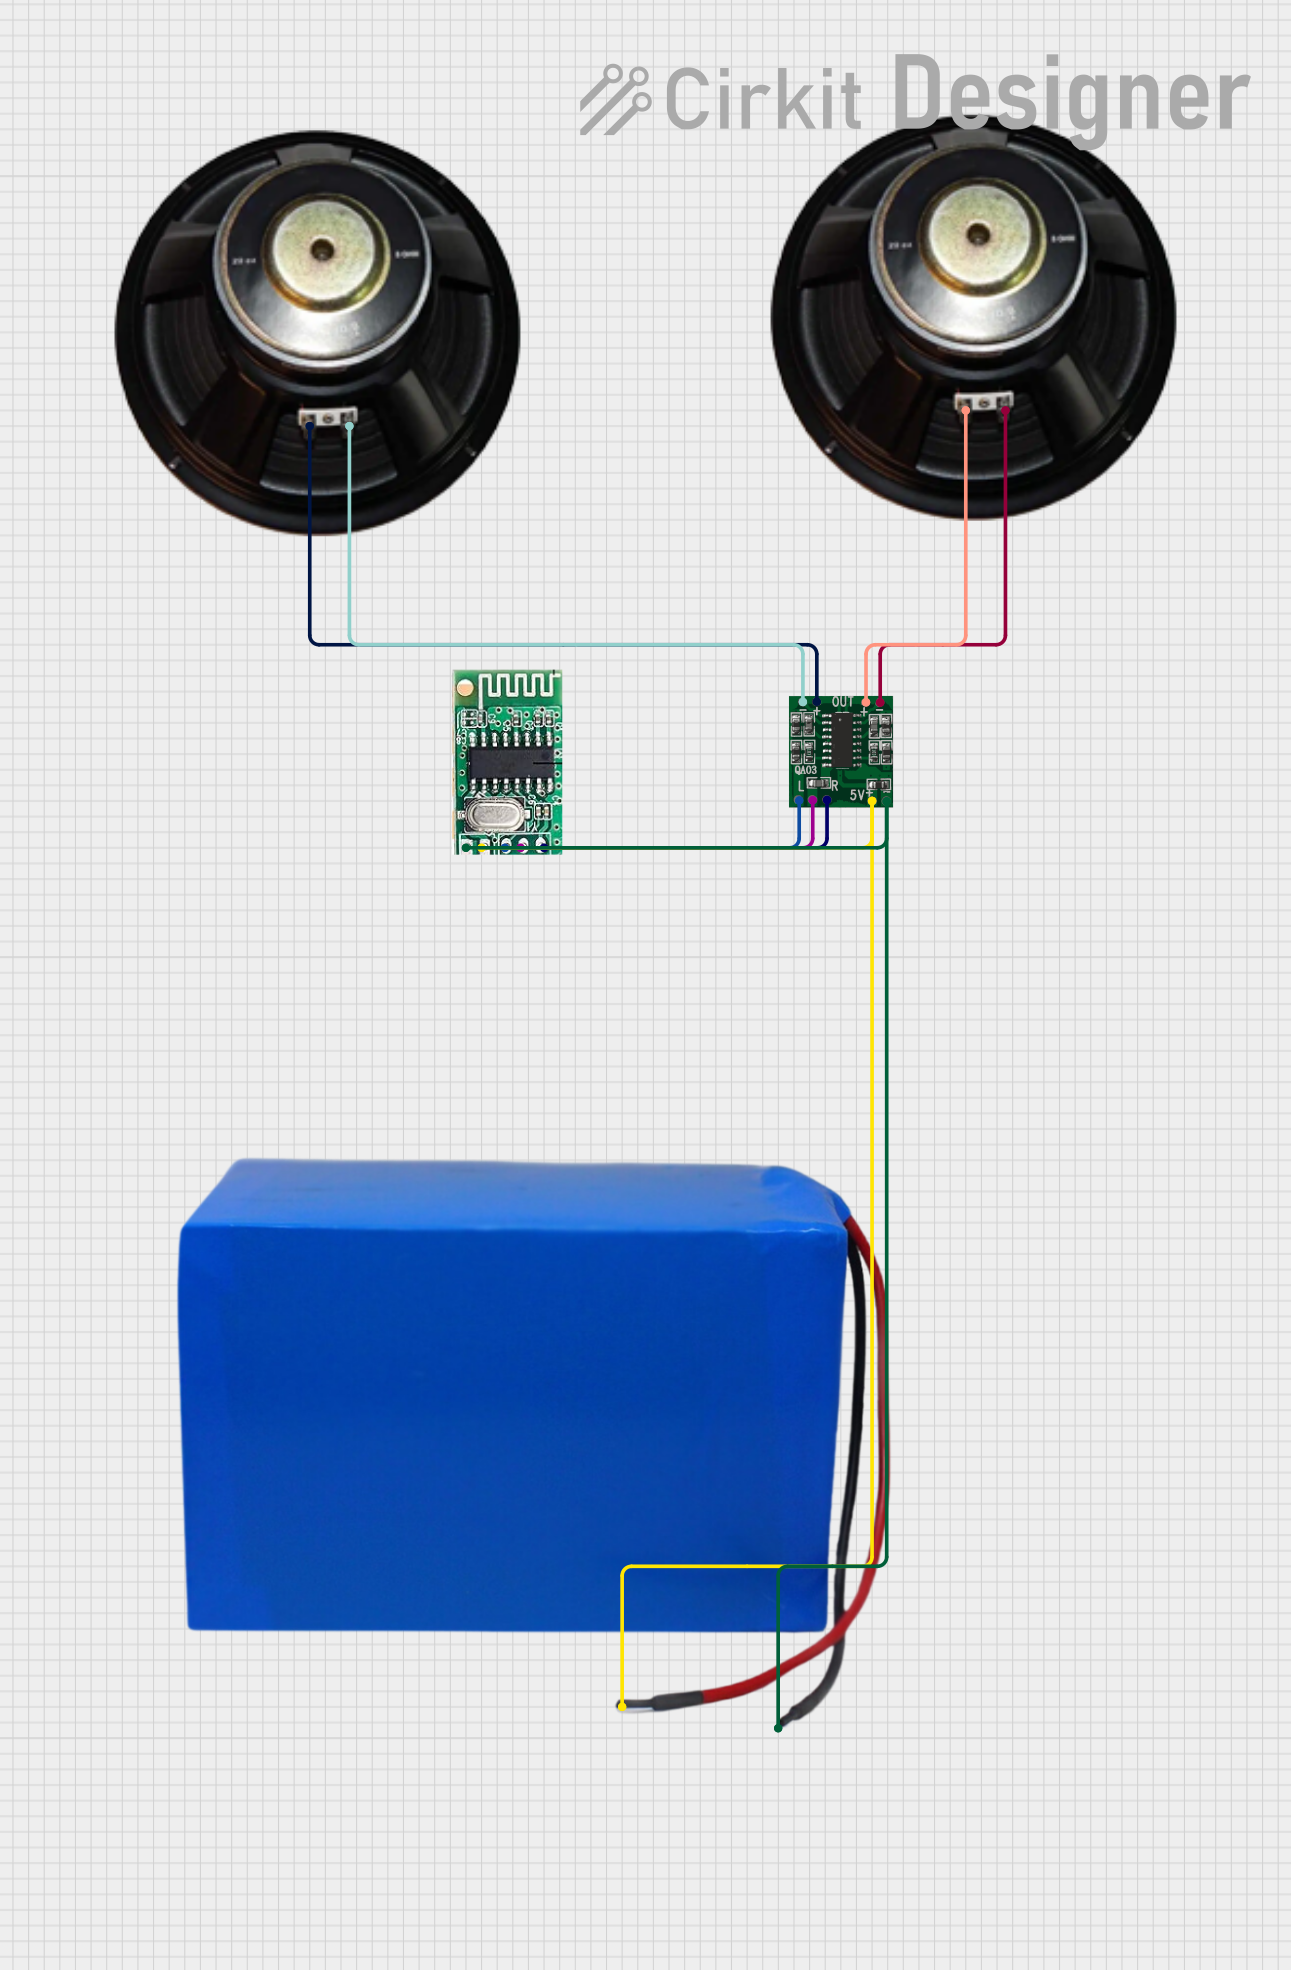
The 5V Bluetooth Audio Receiver is an electronic component designed to wirelessly receive audio signals via Bluetooth technology. It is commonly used in a variety of applications such as wireless speakers, car audio systems, headphones, and home entertainment systems. This receiver operates on a 5V power supply, making it compatible with many consumer electronics and DIY projects, including integration with microcontrollers like the Arduino UNO.

Explore Projects Built with 5V Bluetooth Audio Receiver

Use Cirkit Designer to design, explore, and prototype these projects online. Some projects support real-time simulation. Click "Open Project" to start designing instantly!
Battery-Powered Bluetooth Audio System with Amplifier and Speaker
Image of bluetooth speaker: A project utilizing 5V Bluetooth Audio Receiver in a practical application
This circuit is a portable Bluetooth audio system powered by a Li-ion battery. It includes a Bluetooth audio receiver that sends audio signals to a 5V amplifier, which then drives a speaker and a tweeter. The system is powered through a battery charger and controlled by a push switch.
Cirkit Designer LogoOpen Project in Cirkit Designer
Battery-Powered Bluetooth Audio Amplifier with PAM8403
Image of trip: A project utilizing 5V Bluetooth Audio Receiver in a practical application
This circuit is a Bluetooth audio amplifier system powered by a 38.5V battery. It uses a 5V Bluetooth audio receiver to receive audio signals, which are then amplified by a PAM8403 amplifier and output to two speakers for stereo sound.
Cirkit Designer LogoOpen Project in Cirkit Designer
Bluetooth Audio Receiver with Battery-Powered Amplifier and Loudspeakers
Image of speaker bluetooh portable: A project utilizing 5V Bluetooth Audio Receiver in a practical application
This circuit is a Bluetooth-enabled audio system powered by a rechargeable 18650 Li-ion battery. It includes a TP4056 module for battery charging and protection, a PAM8403 amplifier with volume control to drive two loudspeakers, and a Bluetooth audio receiver to wirelessly receive audio signals.
Cirkit Designer LogoOpen Project in Cirkit Designer
Bluetooth-Controlled Arduino Speaker with Integrated Microphone
Image of sp circuit: A project utilizing 5V Bluetooth Audio Receiver in a practical application
This circuit is a Bluetooth-enabled audio system with a microphone input. It uses a 5V Bluetooth Audio Receiver to receive audio signals wirelessly, which are then amplified by a PAM8403 amplifier before being output to a loudspeaker. Additionally, a condenser microphone is connected to the amplifier, allowing for audio input, and an Arduino UNO is present for potential control or further expansion, although it currently has no active code for operation.
Cirkit Designer LogoOpen Project in Cirkit Designer

Explore Projects Built with 5V Bluetooth Audio Receiver

Use Cirkit Designer to design, explore, and prototype these projects online. Some projects support real-time simulation. Click "Open Project" to start designing instantly!
Image of bluetooth speaker: A project utilizing 5V Bluetooth Audio Receiver in a practical application
Battery-Powered Bluetooth Audio System with Amplifier and Speaker
This circuit is a portable Bluetooth audio system powered by a Li-ion battery. It includes a Bluetooth audio receiver that sends audio signals to a 5V amplifier, which then drives a speaker and a tweeter. The system is powered through a battery charger and controlled by a push switch.
Cirkit Designer LogoOpen Project in Cirkit Designer
Image of trip: A project utilizing 5V Bluetooth Audio Receiver in a practical application
Battery-Powered Bluetooth Audio Amplifier with PAM8403
This circuit is a Bluetooth audio amplifier system powered by a 38.5V battery. It uses a 5V Bluetooth audio receiver to receive audio signals, which are then amplified by a PAM8403 amplifier and output to two speakers for stereo sound.
Cirkit Designer LogoOpen Project in Cirkit Designer
Image of speaker bluetooh portable: A project utilizing 5V Bluetooth Audio Receiver in a practical application
Bluetooth Audio Receiver with Battery-Powered Amplifier and Loudspeakers
This circuit is a Bluetooth-enabled audio system powered by a rechargeable 18650 Li-ion battery. It includes a TP4056 module for battery charging and protection, a PAM8403 amplifier with volume control to drive two loudspeakers, and a Bluetooth audio receiver to wirelessly receive audio signals.
Cirkit Designer LogoOpen Project in Cirkit Designer
Image of sp circuit: A project utilizing 5V Bluetooth Audio Receiver in a practical application
Bluetooth-Controlled Arduino Speaker with Integrated Microphone
This circuit is a Bluetooth-enabled audio system with a microphone input. It uses a 5V Bluetooth Audio Receiver to receive audio signals wirelessly, which are then amplified by a PAM8403 amplifier before being output to a loudspeaker. Additionally, a condenser microphone is connected to the amplifier, allowing for audio input, and an Arduino UNO is present for potential control or further expansion, although it currently has no active code for operation.
Cirkit Designer LogoOpen Project in Cirkit Designer

Technical Specifications

General Specifications

  • Bluetooth Version: 4.0 (or higher)
  • Supply Voltage: 5V DC
  • Operating Current: 30-50mA
  • Operating Temperature: -10°C to +50°C
  • Audio Output: Stereo, can drive 3W speakers directly
  • Frequency Range: 2.4GHz - 2.480GHz
  • Sensitivity: -85dBm at 0.1% BER
  • SNR: ≥75dB
  • THD+N: -0.1%
  • Range: Up to 10 meters (without obstacles)

Pin Configuration and Descriptions

Pin Number Name Description
1 VCC Connect to 5V power supply
2 GND Ground connection
3 L_OUT Left channel audio output
4 R_OUT Right channel audio output
5 KEY Active low pairing button input
6 LED Status indicator output (blinks during pairing)

Usage Instructions

Connecting to a Circuit

  1. Power Supply: Connect the VCC pin to a 5V power source and the GND pin to the common ground.
  2. Audio Output: Connect the L_OUT and R_OUT pins to the respective inputs of an audio amplifier or directly to speakers if the receiver supports driving them.
  3. Pairing Button: Optionally, connect a momentary push button to the KEY pin for initiating pairing mode.
  4. Status LED: Connect an LED through a current-limiting resistor to the LED pin to visualize the receiver's status.

Best Practices

  • Ensure that the power supply is regulated and does not exceed 5V to avoid damaging the receiver.
  • Keep the receiver away from sources of interference, such as Wi-Fi routers or microwave ovens.
  • For optimal audio quality, use shielded cables for connections to the audio output.
  • When integrating with an Arduino or similar microcontroller, ensure that the Bluetooth receiver is powered separately if the microcontroller cannot provide sufficient current.

Example Arduino UNO Connection

// No specific code is required for the basic operation of the Bluetooth Audio Receiver.
// However, if you wish to control or monitor the receiver using an Arduino UNO, you can
// read the status of the pairing button or control the status LED.

const int pairingButtonPin = 2; // Connect to KEY pin of the receiver
const int statusLedPin = 13;    // Connect to LED pin of the receiver

void setup() {
  pinMode(pairingButtonPin, INPUT_PULLUP);
  pinMode(statusLedPin, OUTPUT);
}

void loop() {
  // Read the state of the pairing button
  bool isPairing = !digitalRead(pairingButtonPin); // Active low button

  // If the button is pressed, blink the LED
  if (isPairing) {
    digitalWrite(statusLedPin, HIGH);
    delay(250);
    digitalWrite(statusLedPin, LOW);
    delay(250);
  } else {
    digitalWrite(statusLedPin, LOW);
  }
}

Troubleshooting and FAQs

Common Issues

  • No Audio Output: Ensure that the receiver is properly powered and that the audio cables are securely connected.
  • Unable to Pair: Make sure the receiver is in pairing mode and that it is not already paired with another device.
  • Poor Audio Quality: Check for sources of interference and ensure that the audio cables are of good quality and properly shielded.

FAQs

Q: Can the receiver be used with devices other than an Arduino? A: Yes, the receiver can be used with any compatible device that provides a 5V power supply and can process the audio output signals.

Q: How do I put the receiver into pairing mode? A: Typically, you would press and hold the connected pairing button for a few seconds until the status LED begins to blink rapidly.

Q: What is the maximum range of the Bluetooth connection? A: The receiver has a range of up to 10 meters in open space, but this can be reduced by walls and other obstacles.

Q: Can the receiver connect to multiple devices at once? A: Most Bluetooth audio receivers can only maintain a connection with one device at a time.

For further assistance, consult the manufacturer's datasheet or contact technical support.