How to Use MCP23S17: Examples, Pinouts, and Specs
Introduction
The MCP23S17 is a 16-bit I/O expander that communicates via the SPI (Serial Peripheral Interface) protocol. It is designed to provide additional GPIO (General Purpose Input/Output) pins for microcontroller-based applications. This component is highly versatile and can be configured for both input and output operations, making it ideal for projects requiring more I/O pins than what is available on the microcontroller.
Explore Projects Built with MCP23S17


Explore Projects Built with MCP23S17
Common Applications and Use Cases
- Expanding GPIO pins in microcontroller projects
- Driving LEDs, relays, or other output devices
- Reading multiple switches or sensors
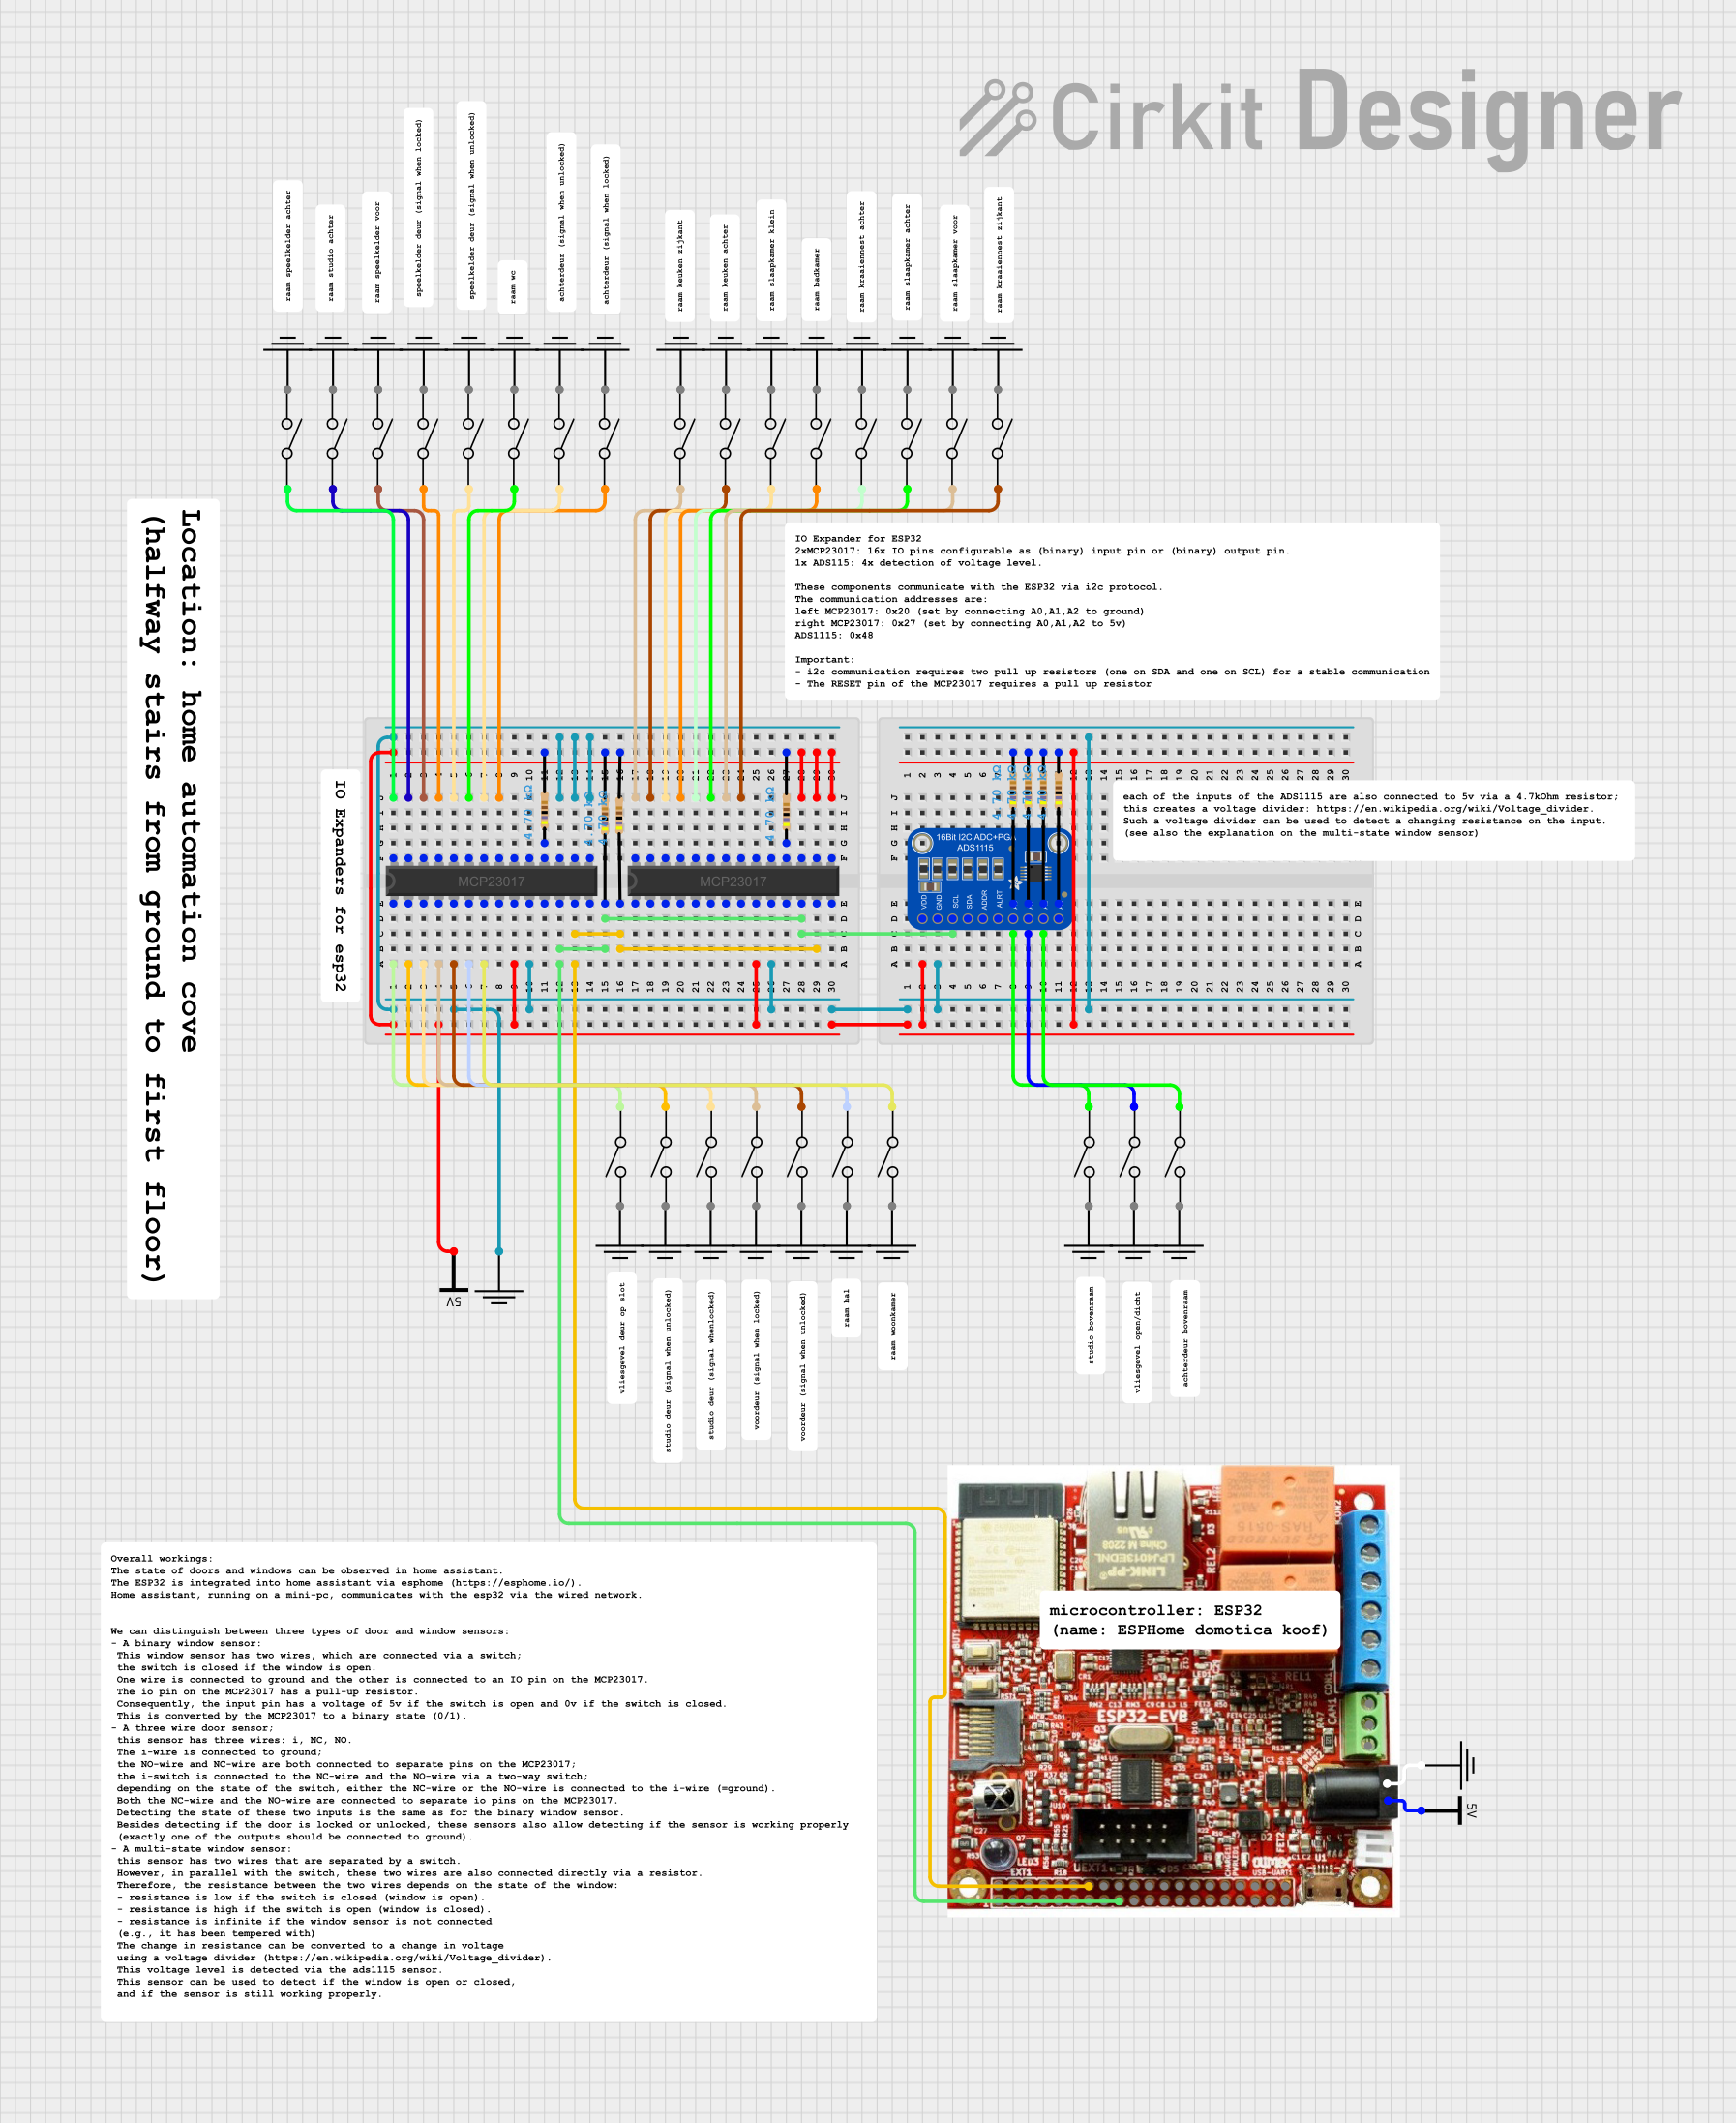
- Home automation systems
- Industrial control systems
- Robotics and embedded systems
Technical Specifications
The MCP23S17 offers a range of features and specifications that make it a powerful and flexible I/O expander.
Key Technical Details
- Interface: SPI (up to 10 MHz)
- Operating Voltage: 1.8V to 5.5V
- I/O Pins: 16 (organized as two 8-bit ports: PORTA and PORTB)
- Maximum Sink Current per Pin: 25 mA
- Maximum Source Current per Pin: 25 mA
- Interrupt Capability: Configurable interrupt-on-change for each pin
- Package Options: PDIP, SOIC, SSOP, QFN
- Operating Temperature: -40°C to +125°C
- Addressing: Supports up to 8 devices on the same SPI bus (via hardware address pins)
Pin Configuration and Descriptions
The MCP23S17 has 28 pins, with the following key pin assignments:
| Pin | Name | Description |
|---|---|---|
| 1 | A0 | Hardware address pin 0 (used for device addressing on the SPI bus) |
| 2 | A1 | Hardware address pin 1 |
| 3 | A2 | Hardware address pin 2 |
| 4 | RESET | Active-low reset input |
| 5 | CS | Chip Select (active-low) |
| 6 | SCK | SPI Clock |
| 7 | SI | SPI Data Input |
| 8 | SO | SPI Data Output |
| 9-16 | GPA0-GPA7 | General Purpose I/O pins for PORTA |
| 17-24 | GPB0-GPB7 | General Purpose I/O pins for PORTB |
| 25 | INTB | Interrupt output for PORTB (active-low) |
| 26 | INTA | Interrupt output for PORTA (active-low) |
| 27 | VSS | Ground |
| 28 | VDD | Power supply (1.8V to 5.5V) |
Usage Instructions
The MCP23S17 is straightforward to use in a circuit. Below are the steps and considerations for integrating it into your project.
How to Use the MCP23S17 in a Circuit
- Power and Ground: Connect the VDD pin to your power supply (1.8V to 5.5V) and the VSS pin to ground.
- SPI Connections:
- Connect the SCK pin to the SPI clock pin of your microcontroller.
- Connect the SI pin to the SPI MOSI (Master Out Slave In) pin.
- Connect the SO pin to the SPI MISO (Master In Slave Out) pin.
- Connect the CS pin to a GPIO pin on your microcontroller to act as the chip select.
- Address Configuration: Use the A0, A1, and A2 pins to set the hardware address of the device. This allows up to 8 MCP23S17 devices to share the same SPI bus.
- GPIO Configuration:
- Configure the I/O pins as input or output by writing to the IODIRA and IODIRB registers.
- Use the OLATA and OLATB registers to control output states.
- Read input states from the GPIOA and GPIOB registers.
- Interrupts (Optional): Connect the INTA and/or INTB pins to your microcontroller if you want to use interrupt-on-change functionality.
Important Considerations and Best Practices
- Pull-up Resistors: Use pull-up resistors on input pins if required by your application.
- Decoupling Capacitor: Place a 0.1 µF decoupling capacitor close to the VDD pin to stabilize the power supply.
- SPI Speed: Ensure the SPI clock speed does not exceed 10 MHz.
- Reset Pin: Tie the RESET pin to VDD if not used, or connect it to a GPIO pin for manual reset control.
Example Code for Arduino UNO
Below is an example of how to use the MCP23S17 with an Arduino UNO to toggle an LED connected to GPA0.
#include <SPI.h>

// MCP23S17 SPI settings
#define CS_PIN 10  // Chip Select pin for MCP23S17
#define OPCODE 0x40 // MCP23S17 opcode (A2, A1, A0 = 0)

// MCP23S17 register addresses
#define IODIRA 0x00 // I/O direction register for PORTA
#define OLATA  0x14 // Output latch register for PORTA

void setup() {
  pinMode(CS_PIN, OUTPUT); // Set CS pin as output
  digitalWrite(CS_PIN, HIGH); // Set CS pin high (inactive)

  SPI.begin(); // Initialize SPI
  SPI.setClockDivider(SPI_CLOCK_DIV4); // Set SPI clock speed (4 MHz for Arduino UNO)

  // Configure GPA0 as output
  writeRegister(IODIRA, 0xFE); // Set GPA0 as output, others as input
}

void loop() {
  // Toggle GPA0
  writeRegister(OLATA, 0x01); // Set GPA0 high
  delay(500); // Wait 500 ms
  writeRegister(OLATA, 0x00); // Set GPA0 low
  delay(500); // Wait 500 ms
}

// Function to write to MCP23S17 register
void writeRegister(byte reg, byte value) {
  digitalWrite(CS_PIN, LOW); // Select MCP23S17
  SPI.transfer(OPCODE); // Send opcode
  SPI.transfer(reg); // Send register address
  SPI.transfer(value); // Send data
  digitalWrite(CS_PIN, HIGH); // Deselect MCP23S17
}
Troubleshooting and FAQs
Common Issues and Solutions
No Response from MCP23S17:
- Ensure the CS pin is correctly connected and toggled during SPI communication.
- Verify the SPI clock speed does not exceed 10 MHz.
- Check the hardware address pins (A0, A1, A2) for proper configuration.
Incorrect GPIO Behavior:
- Double-check the IODIRA and IODIRB register configurations.
- Ensure pull-up resistors are used for input pins if required.
Interrupts Not Working:
- Verify that the INTA/INTB pins are connected to the microcontroller.
- Ensure the interrupt-on-change feature is enabled in the configuration registers.
FAQs
Q: Can I use multiple MCP23S17 devices on the same SPI bus?
A: Yes, up to 8 devices can be used by configuring the A0, A1, and A2 address pins.Q: What is the maximum current the MCP23S17 can handle?
A: Each pin can source or sink up to 25 mA, with a total maximum current of 125 mA per port.Q: Do I need external pull-up resistors for the GPIO pins?
A: Pull-up resistors are required for input pins if the connected device does not provide them.
This concludes the documentation for the MCP23S17.