Cirkit Designer Logo
Cirkit Designer
Your all-in-one circuit design IDE
Home / 
Component Documentation

How to Use SD SDHC: Examples, Pinouts, and Specs

Image of SD SDHC
Cirkit Designer LogoDesign with SD SDHC in Cirkit Designer

Introduction

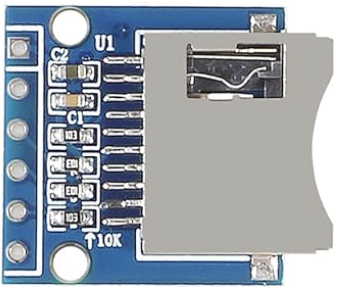
The SD/SDHC Card Module is an electronic component that allows microcontrollers to interface with Secure Digital (SD) or Secure Digital High Capacity (SDHC) memory cards. These cards are widely used for data storage and transfer in portable devices. The module is commonly used in embedded systems for logging data, storing configurations, or even for multimedia storage purposes.

Common applications include:

  • Data logging devices
  • Digital cameras
  • MP3 players
  • Mobile phones
  • GPS units

Explore Projects Built with SD SDHC

Use Cirkit Designer to design, explore, and prototype these projects online. Some projects support real-time simulation. Click "Open Project" to start designing instantly!
Arduino UNO SD Card Data Logger
Image of sd card: A project utilizing SD SDHC in a practical application
This circuit consists of an Arduino UNO connected to an SD card module. The Arduino provides power and ground to the SD module and interfaces with it using SPI communication through digital pins D10 (CS), D11 (MOSI), D12 (MISO), and D13 (SCK). The setup is intended for reading from or writing to an SD card using the Arduino.
Cirkit Designer LogoOpen Project in Cirkit Designer
Arduino UNO Battery-Powered Data Logger with Micro SD Card Storage
Image of arduino sd: A project utilizing SD SDHC in a practical application
This circuit is designed to interface an Arduino UNO with a Micro SD Card Module for data storage, powered by two 18650 Li-ion batteries through a USB plug and controlled by a rocker switch. The Arduino communicates with the SD card module via SPI protocol and is also connected to the USB plug for potential data transfer or power supply.
Cirkit Designer LogoOpen Project in Cirkit Designer
Arduino UNO Weather Station with SD Card Data Logging
Image of Projeto de medição de temperatura e humidade: A project utilizing SD SDHC in a practical application
This circuit uses an Arduino UNO to interface with an SD SDHC card module and a DHT11 temperature and humidity sensor. The Arduino reads data from the DHT11 sensor and can store or process this data using the SD card module, enabling data logging or further analysis.
Cirkit Designer LogoOpen Project in Cirkit Designer
Arduino UNO-Based Multi-Button Interface with SD Card Logging and OLED Display
Image of MP3 Player: A project utilizing SD SDHC in a practical application
This circuit features an Arduino UNO microcontroller interfaced with an SD card module and a 0.96" OLED display for data storage and visual output. It also includes five pushbuttons connected through resistors to the Arduino's digital pins, allowing for user input to control the system.
Cirkit Designer LogoOpen Project in Cirkit Designer

Explore Projects Built with SD SDHC

Use Cirkit Designer to design, explore, and prototype these projects online. Some projects support real-time simulation. Click "Open Project" to start designing instantly!
Image of sd card: A project utilizing SD SDHC in a practical application
Arduino UNO SD Card Data Logger
This circuit consists of an Arduino UNO connected to an SD card module. The Arduino provides power and ground to the SD module and interfaces with it using SPI communication through digital pins D10 (CS), D11 (MOSI), D12 (MISO), and D13 (SCK). The setup is intended for reading from or writing to an SD card using the Arduino.
Cirkit Designer LogoOpen Project in Cirkit Designer
Image of arduino sd: A project utilizing SD SDHC in a practical application
Arduino UNO Battery-Powered Data Logger with Micro SD Card Storage
This circuit is designed to interface an Arduino UNO with a Micro SD Card Module for data storage, powered by two 18650 Li-ion batteries through a USB plug and controlled by a rocker switch. The Arduino communicates with the SD card module via SPI protocol and is also connected to the USB plug for potential data transfer or power supply.
Cirkit Designer LogoOpen Project in Cirkit Designer
Image of Projeto de medição de temperatura e humidade: A project utilizing SD SDHC in a practical application
Arduino UNO Weather Station with SD Card Data Logging
This circuit uses an Arduino UNO to interface with an SD SDHC card module and a DHT11 temperature and humidity sensor. The Arduino reads data from the DHT11 sensor and can store or process this data using the SD card module, enabling data logging or further analysis.
Cirkit Designer LogoOpen Project in Cirkit Designer
Image of MP3 Player: A project utilizing SD SDHC in a practical application
Arduino UNO-Based Multi-Button Interface with SD Card Logging and OLED Display
This circuit features an Arduino UNO microcontroller interfaced with an SD card module and a 0.96" OLED display for data storage and visual output. It also includes five pushbuttons connected through resistors to the Arduino's digital pins, allowing for user input to control the system.
Cirkit Designer LogoOpen Project in Cirkit Designer

Technical Specifications

Key Technical Details

  • Voltage: 3.3V to 5V (with onboard voltage regulator)
  • Interface: SPI (Serial Peripheral Interface)
  • Supported Card Types: Standard SD cards (up to 2GB), SDHC cards (up to 32GB)
  • Data Transfer Rate: Up to 25 MB/s for High-Speed cards

Pin Configuration and Descriptions

Pin Name Description
CS Chip Select, active low
MOSI Master Out Slave In, SPI data input
MISO Master In Slave Out, SPI data output
SCK Serial Clock, SPI clock input
VCC Supply Voltage, 3.3V to 5V
GND Ground

Usage Instructions

Interfacing with a Circuit

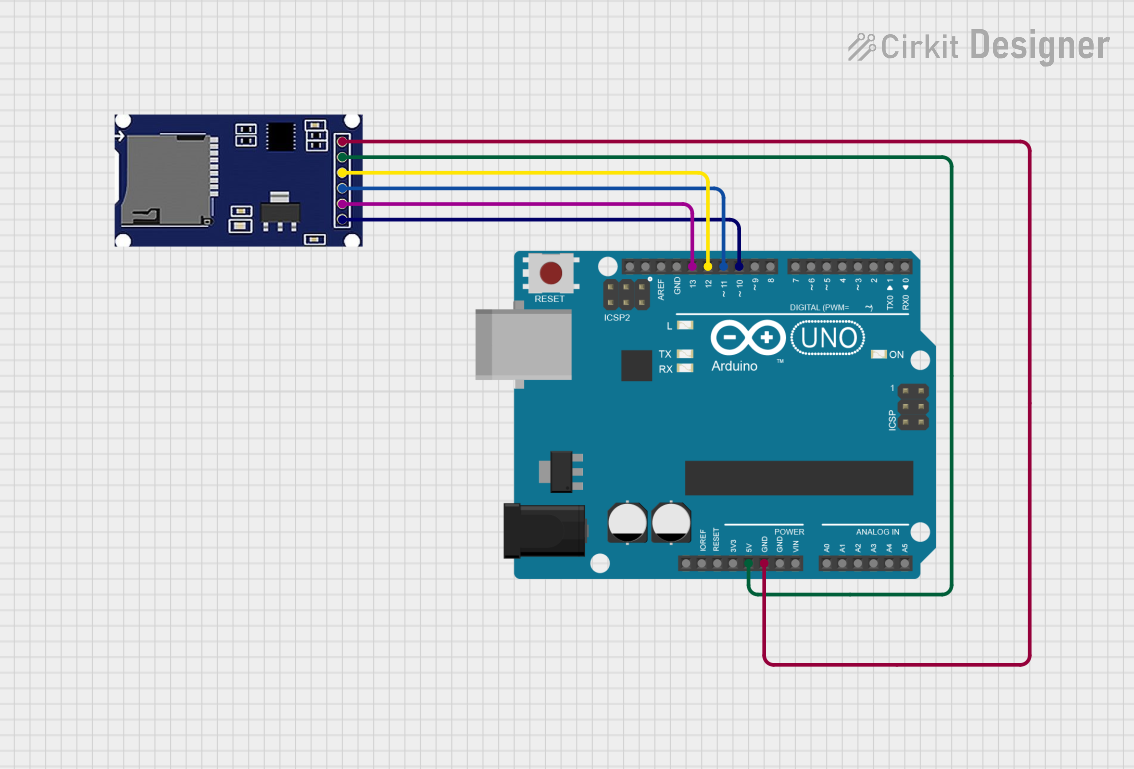
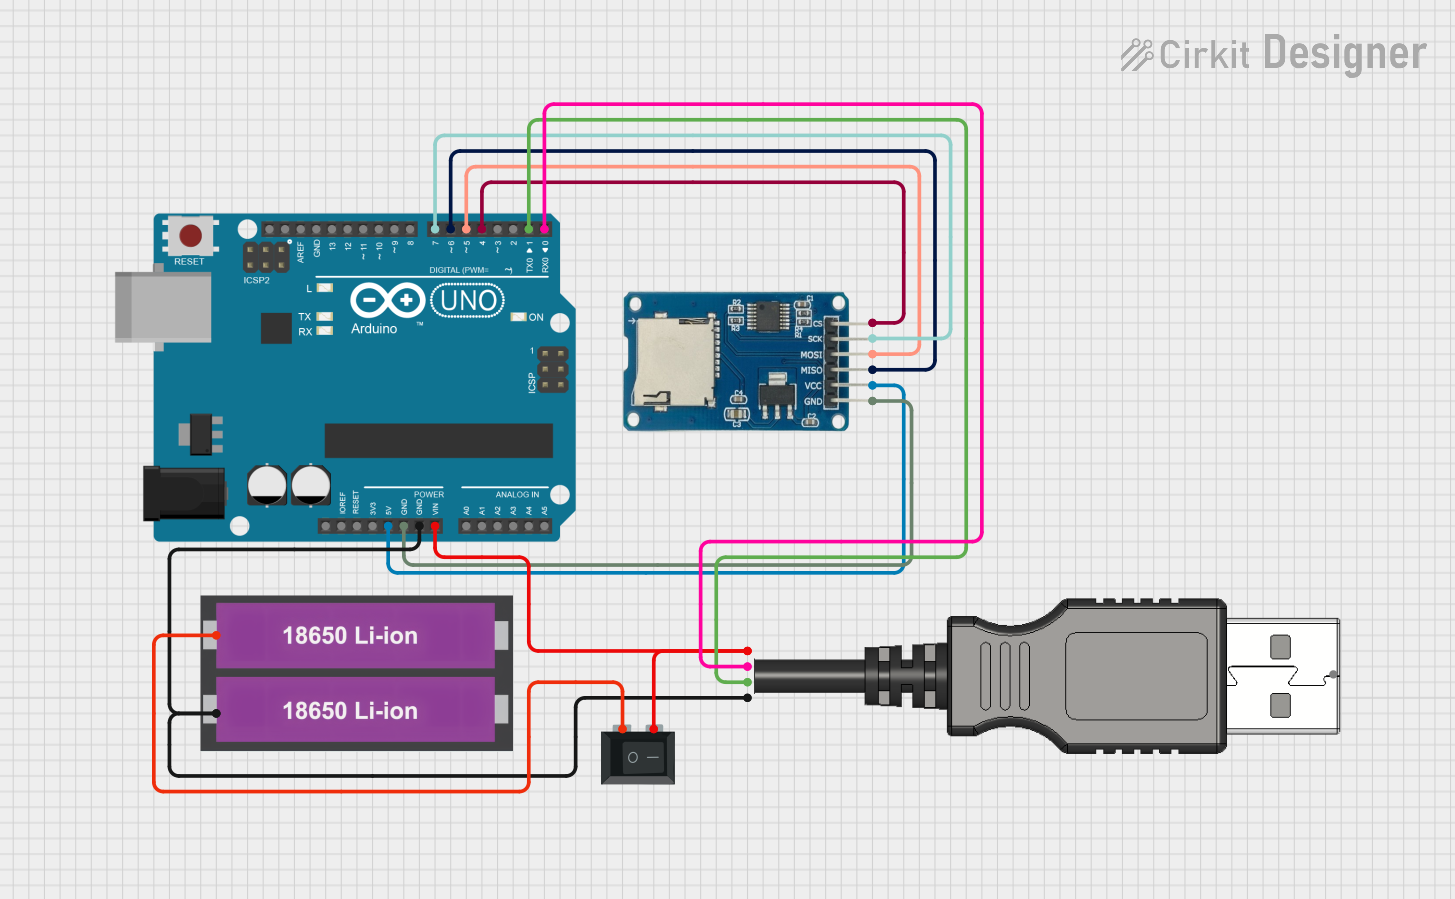
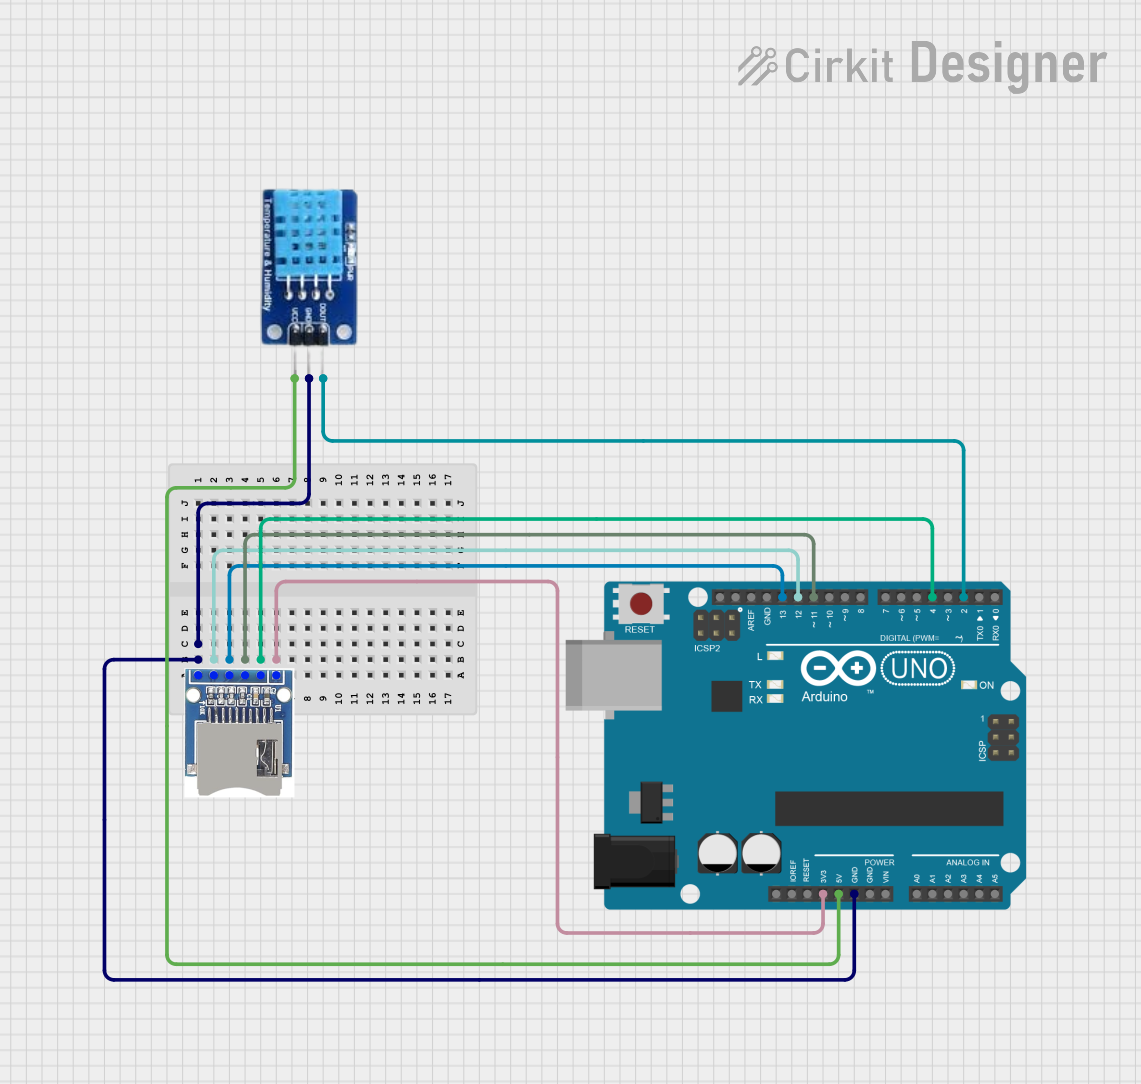
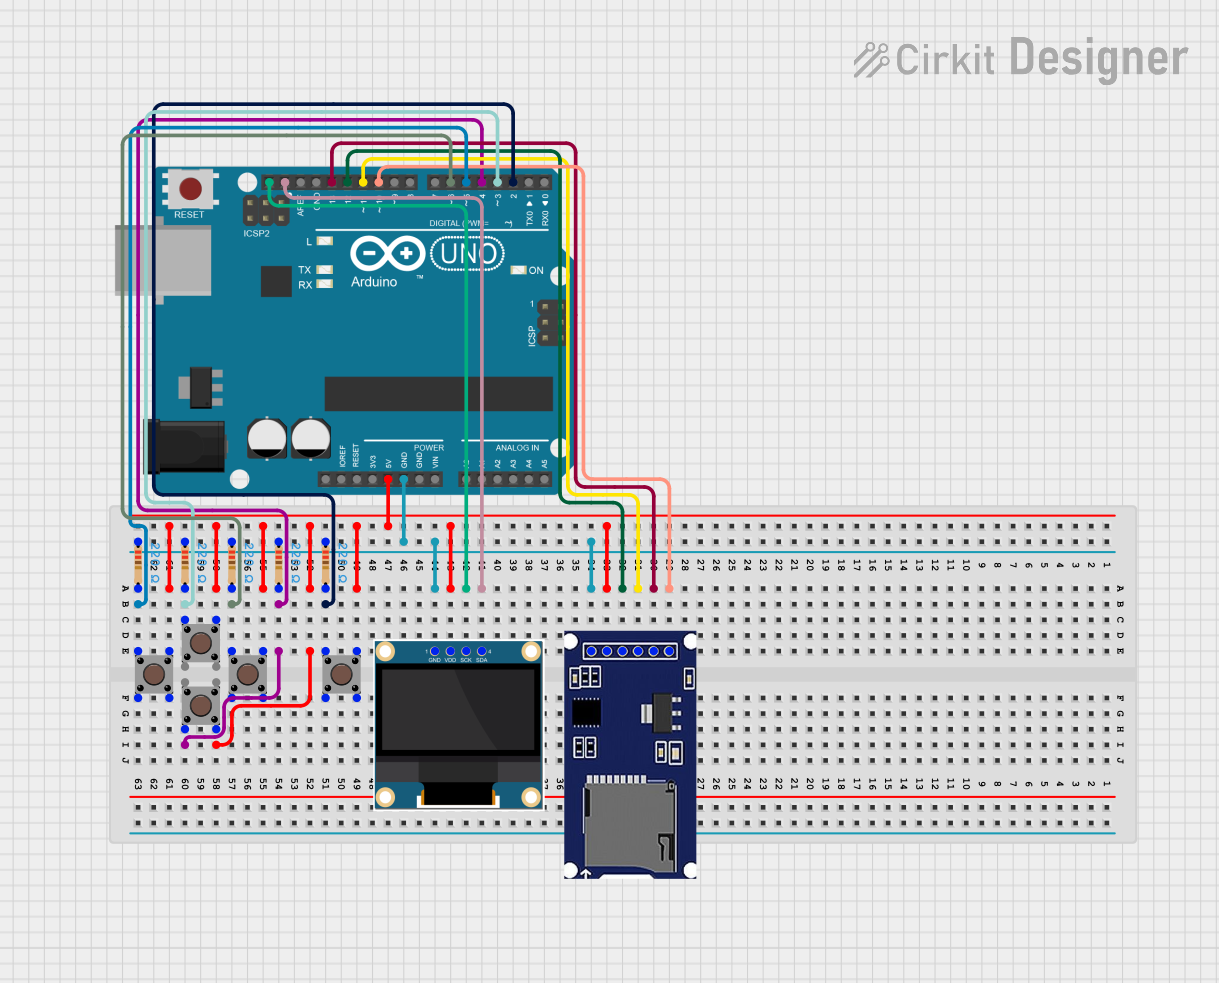
To use the SD/SDHC Card Module with a microcontroller like an Arduino UNO, follow these steps:

  1. Connect the module's VCC pin to the 5V output on the Arduino.
  2. Connect the GND pin to one of the Arduino's GND pins.
  3. Connect the CS, MOSI, MISO, and SCK pins to the corresponding SPI pins on the Arduino. For an Arduino UNO, the connections are as follows:
    • CS to digital pin 10 (or another pin if you modify the CS pin in your code)
    • MOSI to digital pin 11
    • MISO to digital pin 12
    • SCK to digital pin 13

Important Considerations and Best Practices

  • Always power off the circuit before inserting or removing the SD card to prevent data corruption.
  • Format the SD card to FAT16 or FAT32 file system before use.
  • Use the onboard voltage regulator if your microcontroller operates at 5V to avoid damaging the SD card.
  • Ensure that the SPI bus is not shared with other SPI devices, or if it is, that proper chip select logic is implemented.

Example Arduino Code

#include <SPI.h>
#include <SD.h>

File myFile;
const int chipSelect = 10; // Chip select pin for the SD card module

void setup() {
  Serial.begin(9600);
  while (!Serial) {
    ; // Wait for serial port to connect.
  }

  Serial.print("Initializing SD card...");

  if (!SD.begin(chipSelect)) {
    Serial.println("initialization failed!");
    return;
  }
  Serial.println("initialization done.");

  // Open a new file and immediately close it to create it.
  myFile = SD.open("test.txt", FILE_WRITE);
  if (myFile) {
    Serial.println("Writing to test.txt...");
    myFile.println("Hello, SD card!");
    myFile.close(); // Close the file
    Serial.println("Done.");
  } else {
    // If the file didn't open, print an error
    Serial.println("error opening test.txt");
  }
}

void loop() {
  // Nothing here for now.
}

Troubleshooting and FAQs

Common Issues

  • Card not recognized: Ensure that the card is properly inserted and formatted to FAT16 or FAT32.
  • Read/write errors: Check the wiring, especially the SPI connections. Also, make sure the chip select pin is correctly defined in your code.
  • Corrupted data: Avoid removing the card or powering off the system while read/write operations are in progress.

Solutions and Tips for Troubleshooting

  • Double-check the connections and ensure that the correct voltage is applied.
  • Use the SD.cardType() function to check if the card is recognized by the module.
  • Format the SD card on a computer to ensure it has a compatible file system.
  • Check for loose connections or soldering issues on the SD card module.

FAQs

Q: Can I use a microSD card with this module? A: Yes, with a microSD to SD adapter, you can use microSD cards.

Q: What is the maximum size of SD card I can use? A: The module supports SD cards up to 2GB and SDHC cards up to 32GB.

Q: How do I create directories or multiple files on the SD card? A: You can use the SD.mkdir() function to create directories and SD.open() with different filenames to create multiple files.

Q: Can I use this module with other microcontrollers? A: Yes, as long as the microcontroller supports SPI communication and operates at a compatible voltage level.