How to Use Solar LiPo Charger Module: Examples, Pinouts, and Specs
Introduction
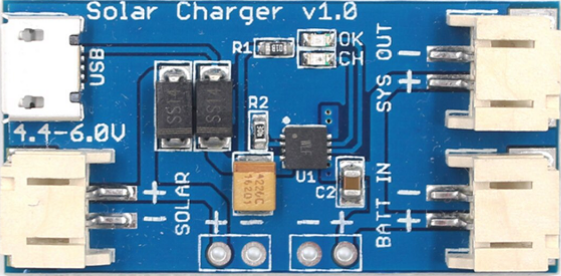
The Solar LiPo Charger Module is a compact and efficient device designed to charge lithium polymer (LiPo) batteries using solar energy. It features a solar panel input, a battery management system, and integrated protection circuitry to ensure safe and reliable charging. This module is ideal for renewable energy projects, portable electronics, and IoT devices that require sustainable power solutions.
Explore Projects Built with Solar LiPo Charger Module

Explore Projects Built with Solar LiPo Charger Module
Common Applications and Use Cases
- Solar-powered IoT devices
- Portable electronics and wearables
- Remote environmental monitoring systems
- DIY renewable energy projects
- Backup power systems for small devices
Technical Specifications
Below are the key technical details of the Solar LiPo Charger Module:
| Parameter | Value |
|---|---|
| Input Voltage Range | 4.4V to 6V (typical for solar panel input) |
| Battery Output Voltage | 3.7V (nominal for single-cell LiPo) |
| Maximum Charging Current | 500mA to 1A (depending on configuration) |
| Efficiency | Up to 90% (depending on input conditions) |
| Protection Features | Overcharge, over-discharge, and short-circuit protection |
| Operating Temperature Range | -20°C to 60°C |
| Dimensions | Varies by model, typically compact (e.g., 25mm x 30mm) |
Pin Configuration and Descriptions
The Solar LiPo Charger Module typically has the following pin configuration:
| Pin Name | Description |
|---|---|
| VIN | Input voltage from the solar panel (4.4V to 6V recommended). |
| GND | Ground connection for the module. |
| BAT+ | Positive terminal for the LiPo battery connection. |
| BAT- | Negative terminal for the LiPo battery connection. |
| LOAD+ | Positive terminal for powering the load (optional, depending on the module). |
| LOAD- | Negative terminal for powering the load (optional, depending on the module). |
Usage Instructions
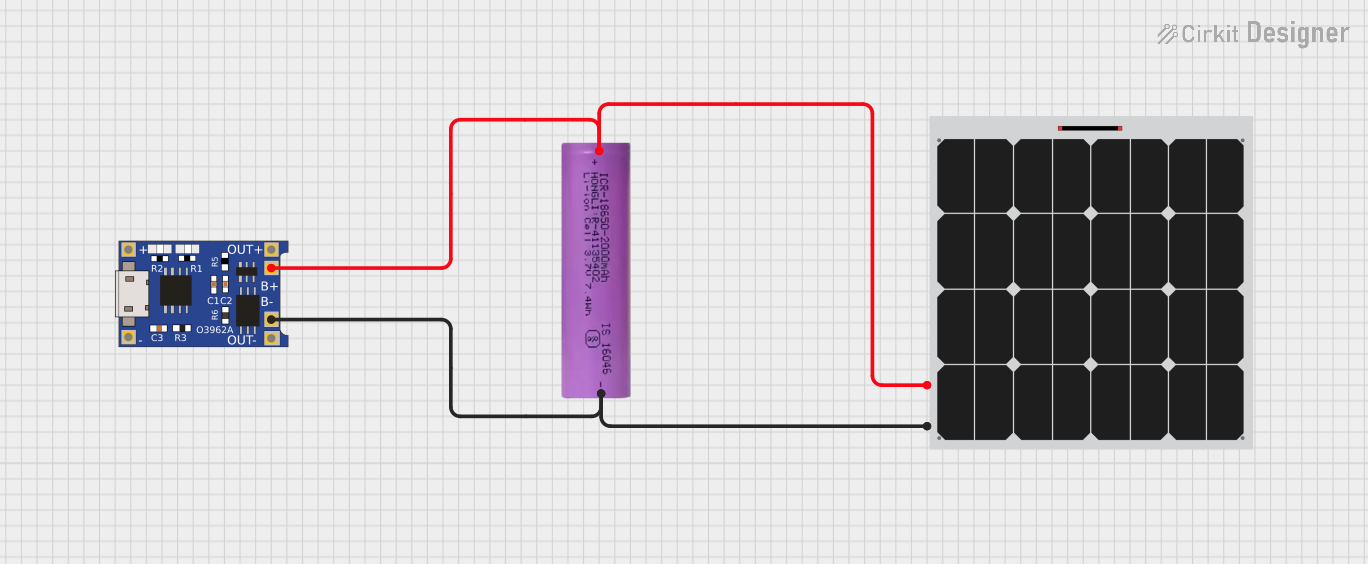
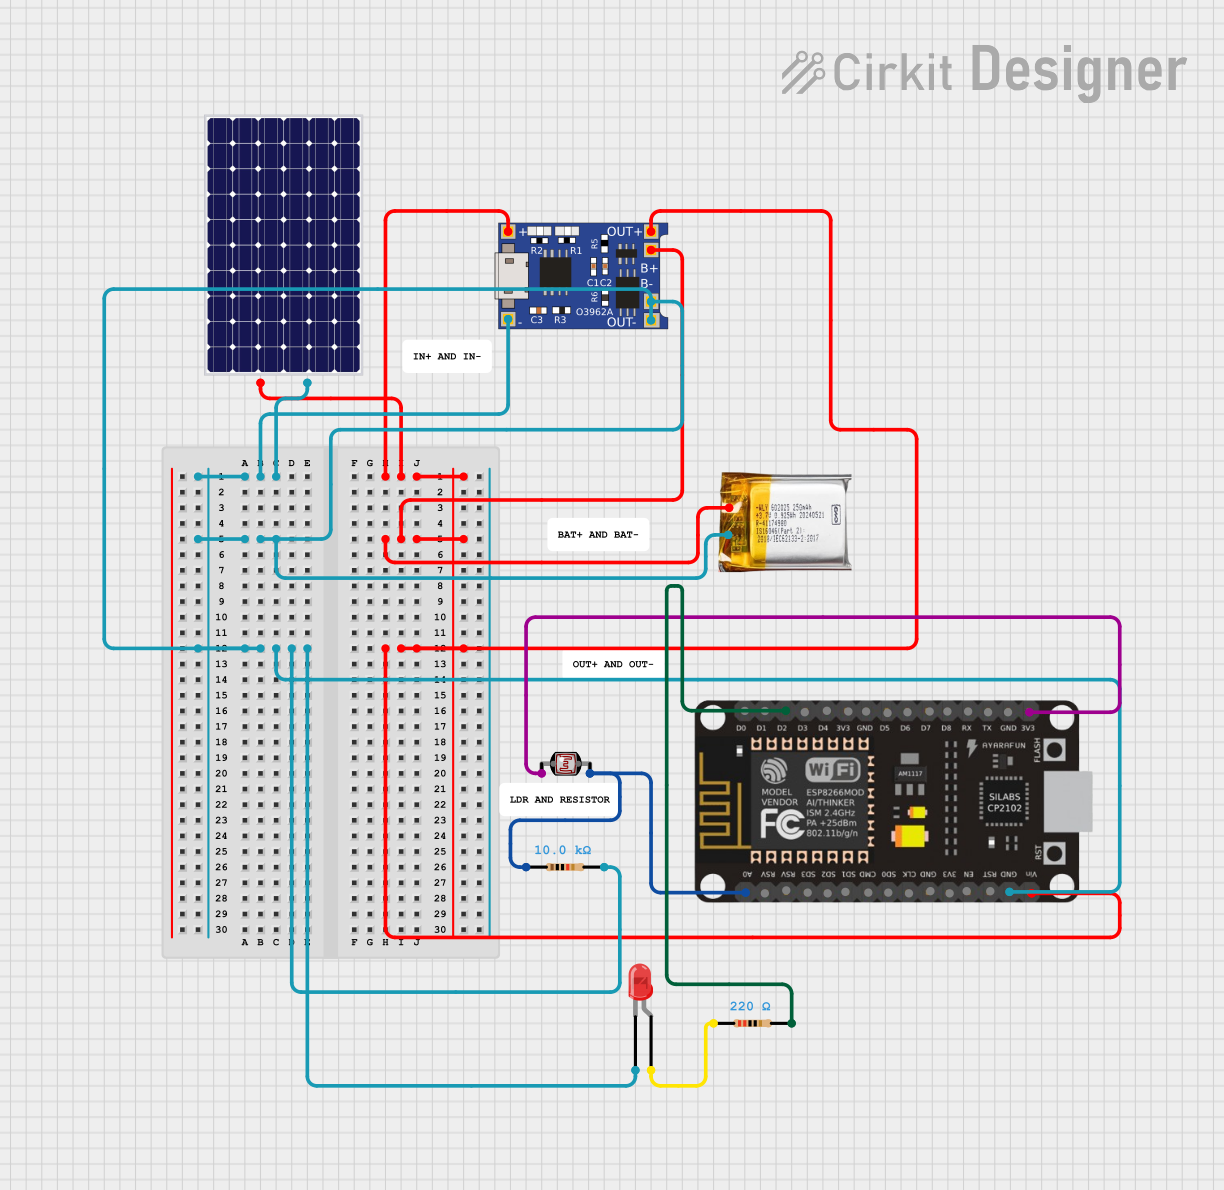
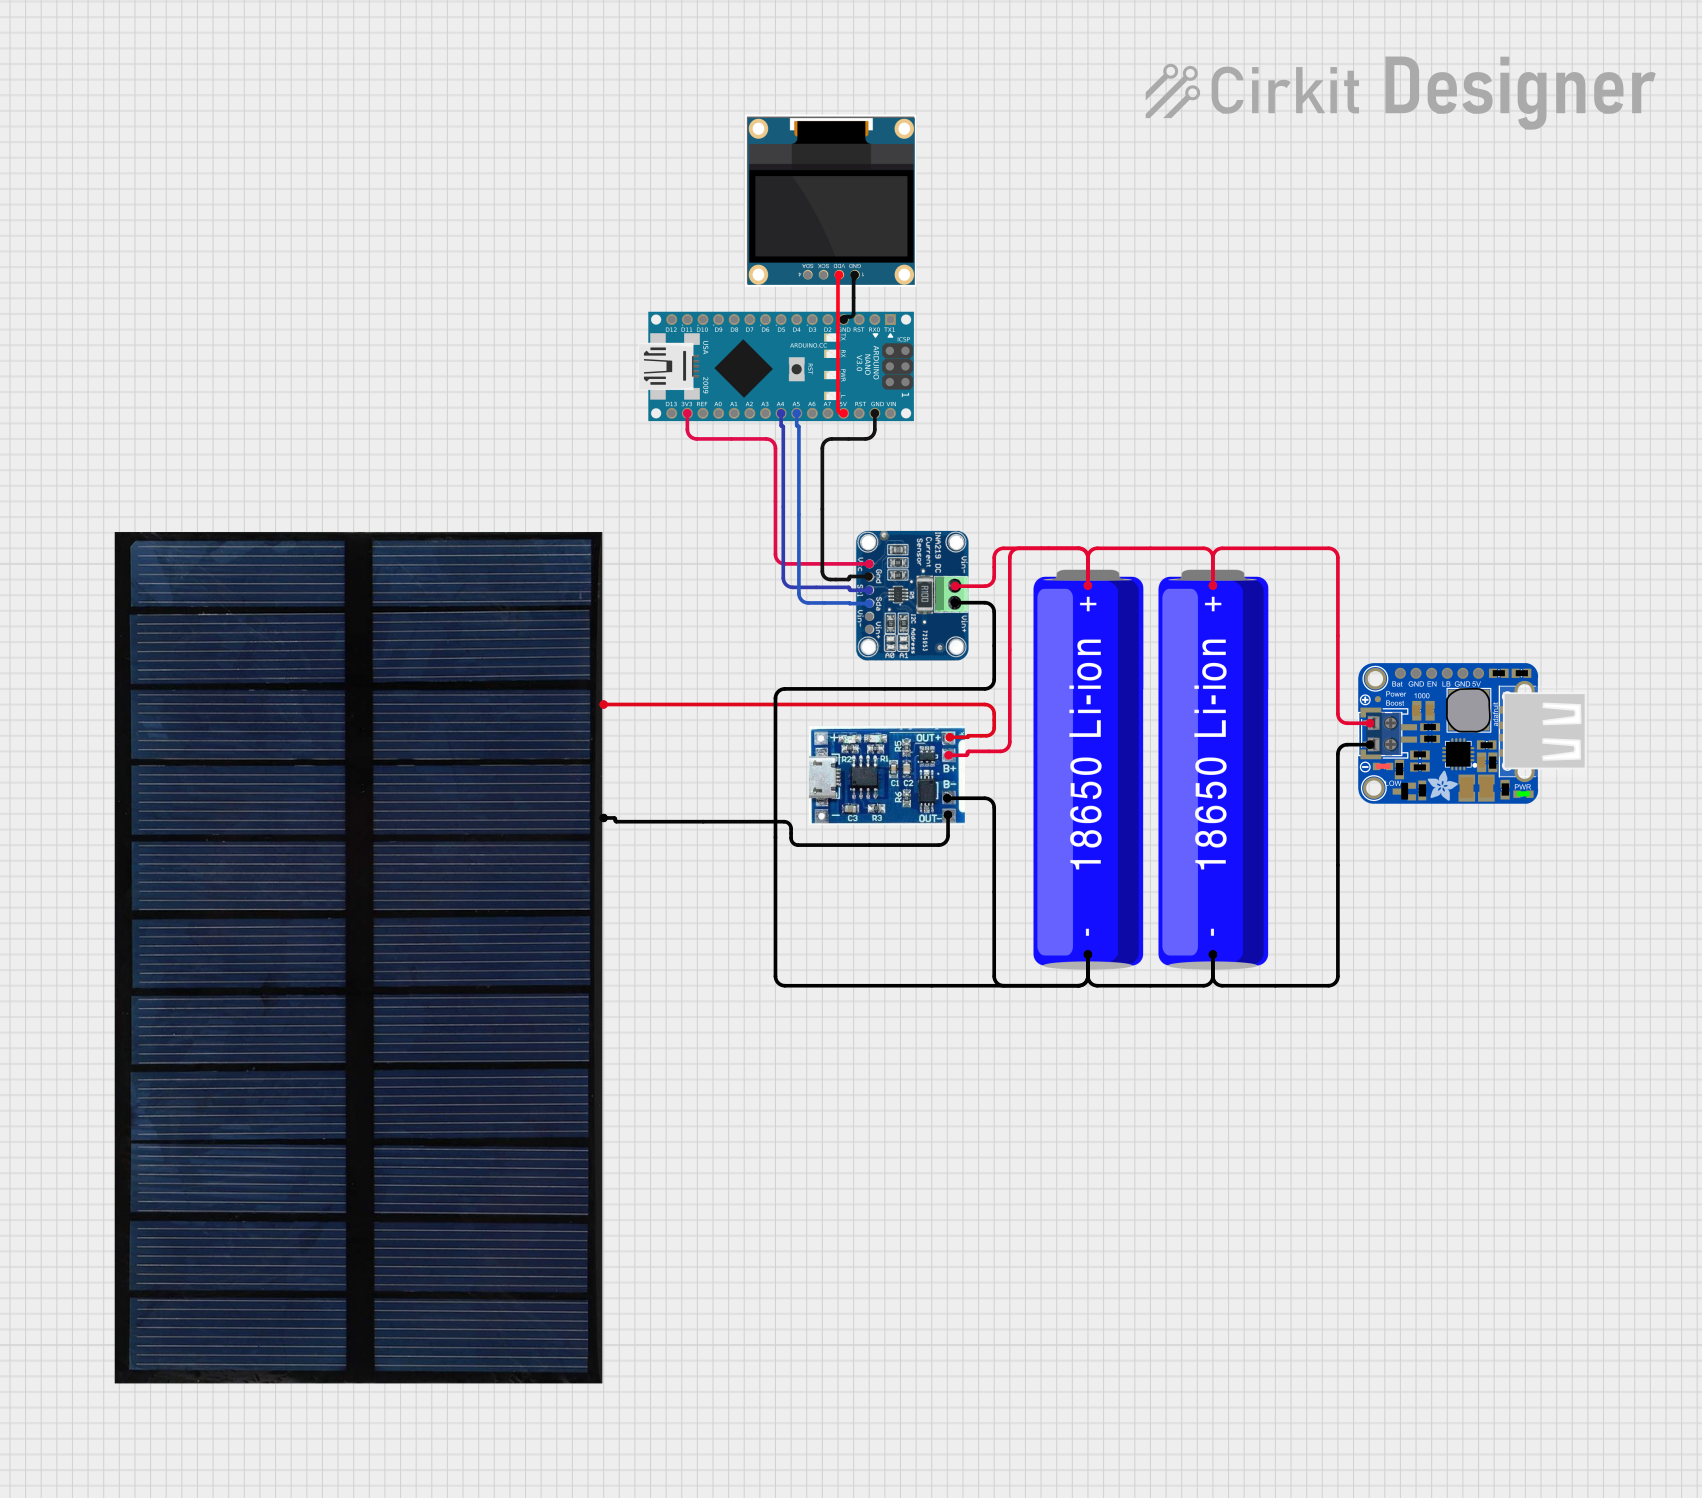
How to Use the Solar LiPo Charger Module in a Circuit
- Connect the Solar Panel: Attach the solar panel's positive terminal to the
VINpin and the negative terminal to theGNDpin. Ensure the solar panel's output voltage is within the module's input range (4.4V to 6V). - Connect the LiPo Battery: Connect the LiPo battery's positive terminal to the
BAT+pin and the negative terminal to theBAT-pin. Double-check the polarity to avoid damage. - Optional Load Connection: If the module supports powering a load directly, connect the load's positive terminal to
LOAD+and the negative terminal toLOAD-. - Monitor Charging: Many modules include an LED indicator to show the charging status:
- Red LED: Charging in progress.
- Green LED: Charging complete.
Important Considerations and Best Practices
- Solar Panel Selection: Use a solar panel with an output voltage and current that match the module's specifications for optimal performance.
- Battery Compatibility: Ensure the LiPo battery is a single-cell (3.7V nominal) type. Multi-cell batteries are not supported.
- Heat Management: Avoid placing the module in direct sunlight to prevent overheating.
- Reverse Polarity Protection: Double-check all connections to avoid reverse polarity, which can damage the module or battery.
- Arduino Integration: The module can be used to power Arduino projects. Connect the
LOAD+andLOAD-pins to the Arduino's VIN and GND pins, respectively.
Example Code for Arduino UNO
Below is an example of how to monitor the battery voltage using an Arduino UNO:
// Solar LiPo Charger Module - Battery Voltage Monitoring Example
// This code reads the battery voltage and displays it on the Serial Monitor.

const int batteryPin = A0; // Analog pin connected to BAT+ (via a voltage divider)
const float voltageDividerRatio = 2.0; // Adjust based on your voltage divider

void setup() {
  Serial.begin(9600); // Initialize Serial communication
  pinMode(batteryPin, INPUT); // Set the battery pin as input
}

void loop() {
  int rawValue = analogRead(batteryPin); // Read the analog value
  float batteryVoltage = (rawValue / 1023.0) * 5.0 * voltageDividerRatio;

  // Print the battery voltage to the Serial Monitor
  Serial.print("Battery Voltage: ");
  Serial.print(batteryVoltage);
  Serial.println(" V");

  delay(1000); // Wait for 1 second before the next reading
}
Note: Use a voltage divider circuit to scale down the battery voltage to a safe range (0-5V) for the Arduino's analog input pins.
Troubleshooting and FAQs
Common Issues and Solutions
Module Not Charging the Battery
- Cause: Insufficient solar panel output or incorrect connections.
- Solution: Ensure the solar panel provides at least 4.4V under sunlight. Verify all connections.
Battery Overheating
- Cause: Faulty battery or excessive charging current.
- Solution: Use a compatible LiPo battery and ensure the module's current limit matches the battery's specifications.
No Output to Load
- Cause: Load connections are incorrect or the battery is not charged.
- Solution: Verify the
LOAD+andLOAD-connections. Check the battery voltage.
LED Indicators Not Working
- Cause: Faulty module or insufficient input voltage.
- Solution: Test the module with a multimeter and ensure the solar panel provides adequate voltage.
FAQs
Can I use a USB power source instead of a solar panel?
- Yes, most modules support USB input as an alternative to solar panels. Check the module's specifications.
What happens if the battery is fully charged?
- The module's protection circuitry will stop charging the battery to prevent overcharging.
Can I use this module with a multi-cell LiPo battery?
- No, this module is designed for single-cell (3.7V nominal) LiPo batteries only.
Is it safe to leave the module connected to the solar panel and battery indefinitely?
- Yes, the module includes protection features to prevent overcharging and over-discharging.