Cirkit Designer
Your all-in-one circuit design IDE
Home /
Component Documentation
How to Use ESP32: Examples, Pinouts, and Specs
Introduction
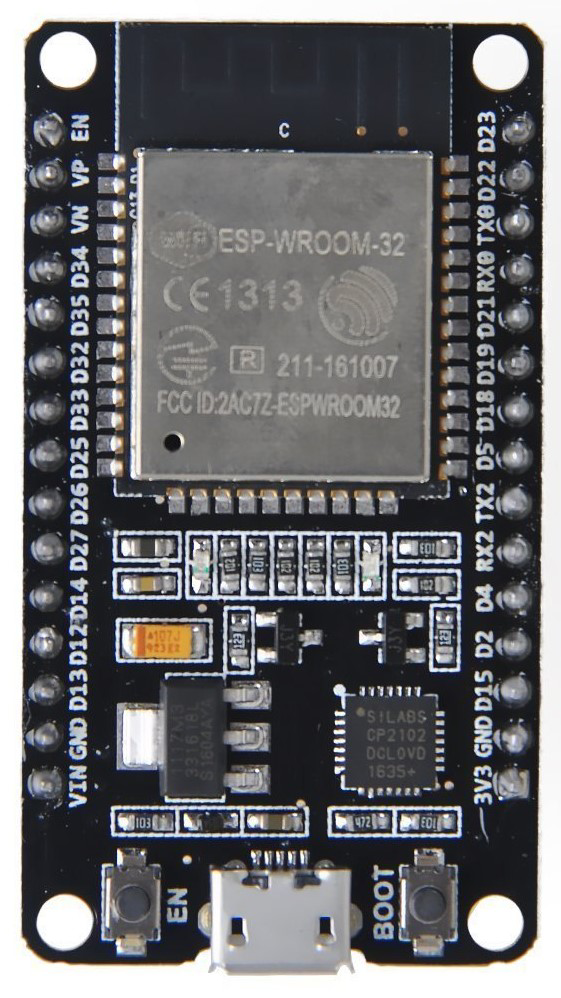
The ESP32, manufactured by THINGS KIT MINI with the part ID NODEMCU, is a low-cost, low-power system on a chip (SoC) with integrated Wi-Fi and dual-mode Bluetooth. It is widely used in Internet of Things (IoT) applications due to its robust performance and versatility. The ESP32 is ideal for projects that require wireless communication, such as home automation, wearable electronics, and sensor networks.
Explore Projects Built with ESP32
ESP32-Based Sensor Monitoring System with OLED Display and E-Stop

This circuit features an ESP32 microcontroller that interfaces with a variety of sensors and output devices. It is powered by a Lipo battery through a buck converter, ensuring a stable voltage supply. The ESP32 collects data from a DHT11 temperature and humidity sensor and a vibration sensor, controls a buzzer, and displays information on an OLED screen. An emergency stop (E Stop) is connected for safety purposes, allowing the system to be quickly deactivated.
ESP32-Based NTP Clock with DHT22 Temperature Sensor and WS2812 LED Matrix Display
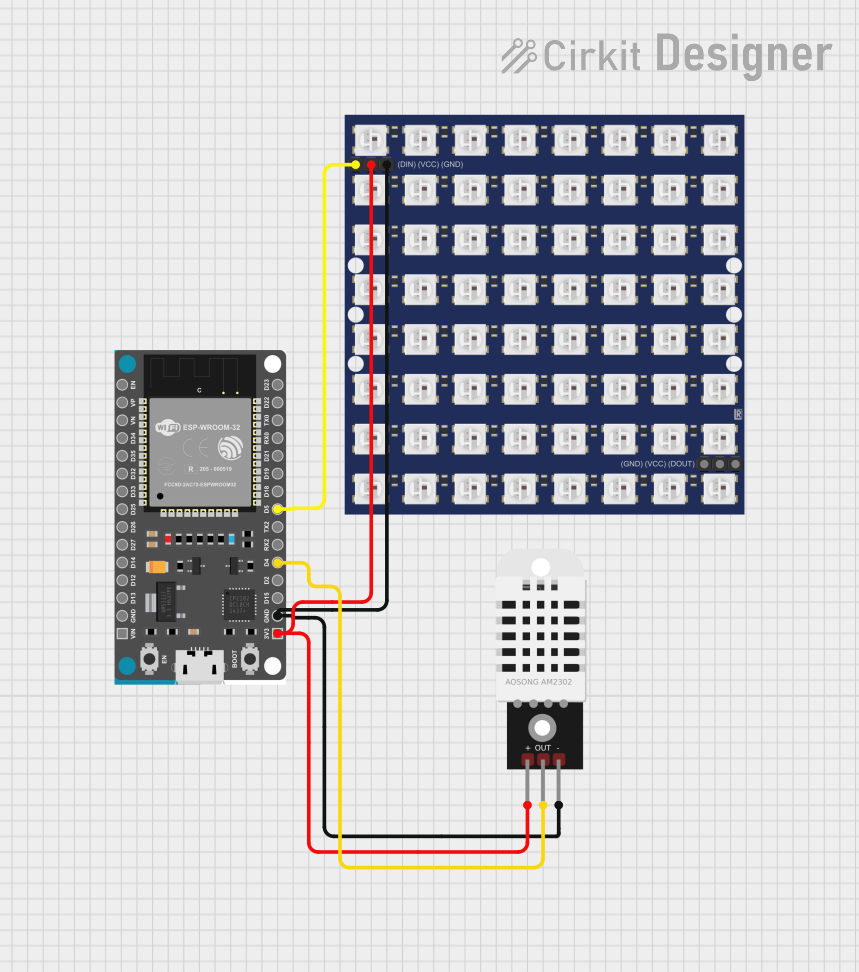
This circuit features an ESP32 Devkit V1 microcontroller connected to a DHT22 temperature and humidity sensor and an 8x8 WS2812 RGB LED matrix. The ESP32 reads temperature data from the DHT22 sensor and displays the current date, time, and temperature on the LED matrix, with date and time synchronized via NTP (Network Time Protocol). The ESP32 provides power to both the DHT22 and the LED matrix and communicates with the DHT22 via GPIO 4 and with the LED matrix via GPIO 5.
ESP32-Based Environmental Monitoring System with Water Flow Sensing

This circuit features an ESP32 Devkit V1 microcontroller connected to a DHT22 temperature and humidity sensor and a water flow sensor. The ESP32 reads environmental data from the DHT22 via a digital input pin (D33) and monitors water flow through the water flow sensor connected to another digital input pin (D23). The ESP32 is powered through its VIN pin, and both sensors are powered by the ESP32's 3V3 output, with common ground connections.
ESP32-Based Smart Weather Station with Wi-Fi Connectivity
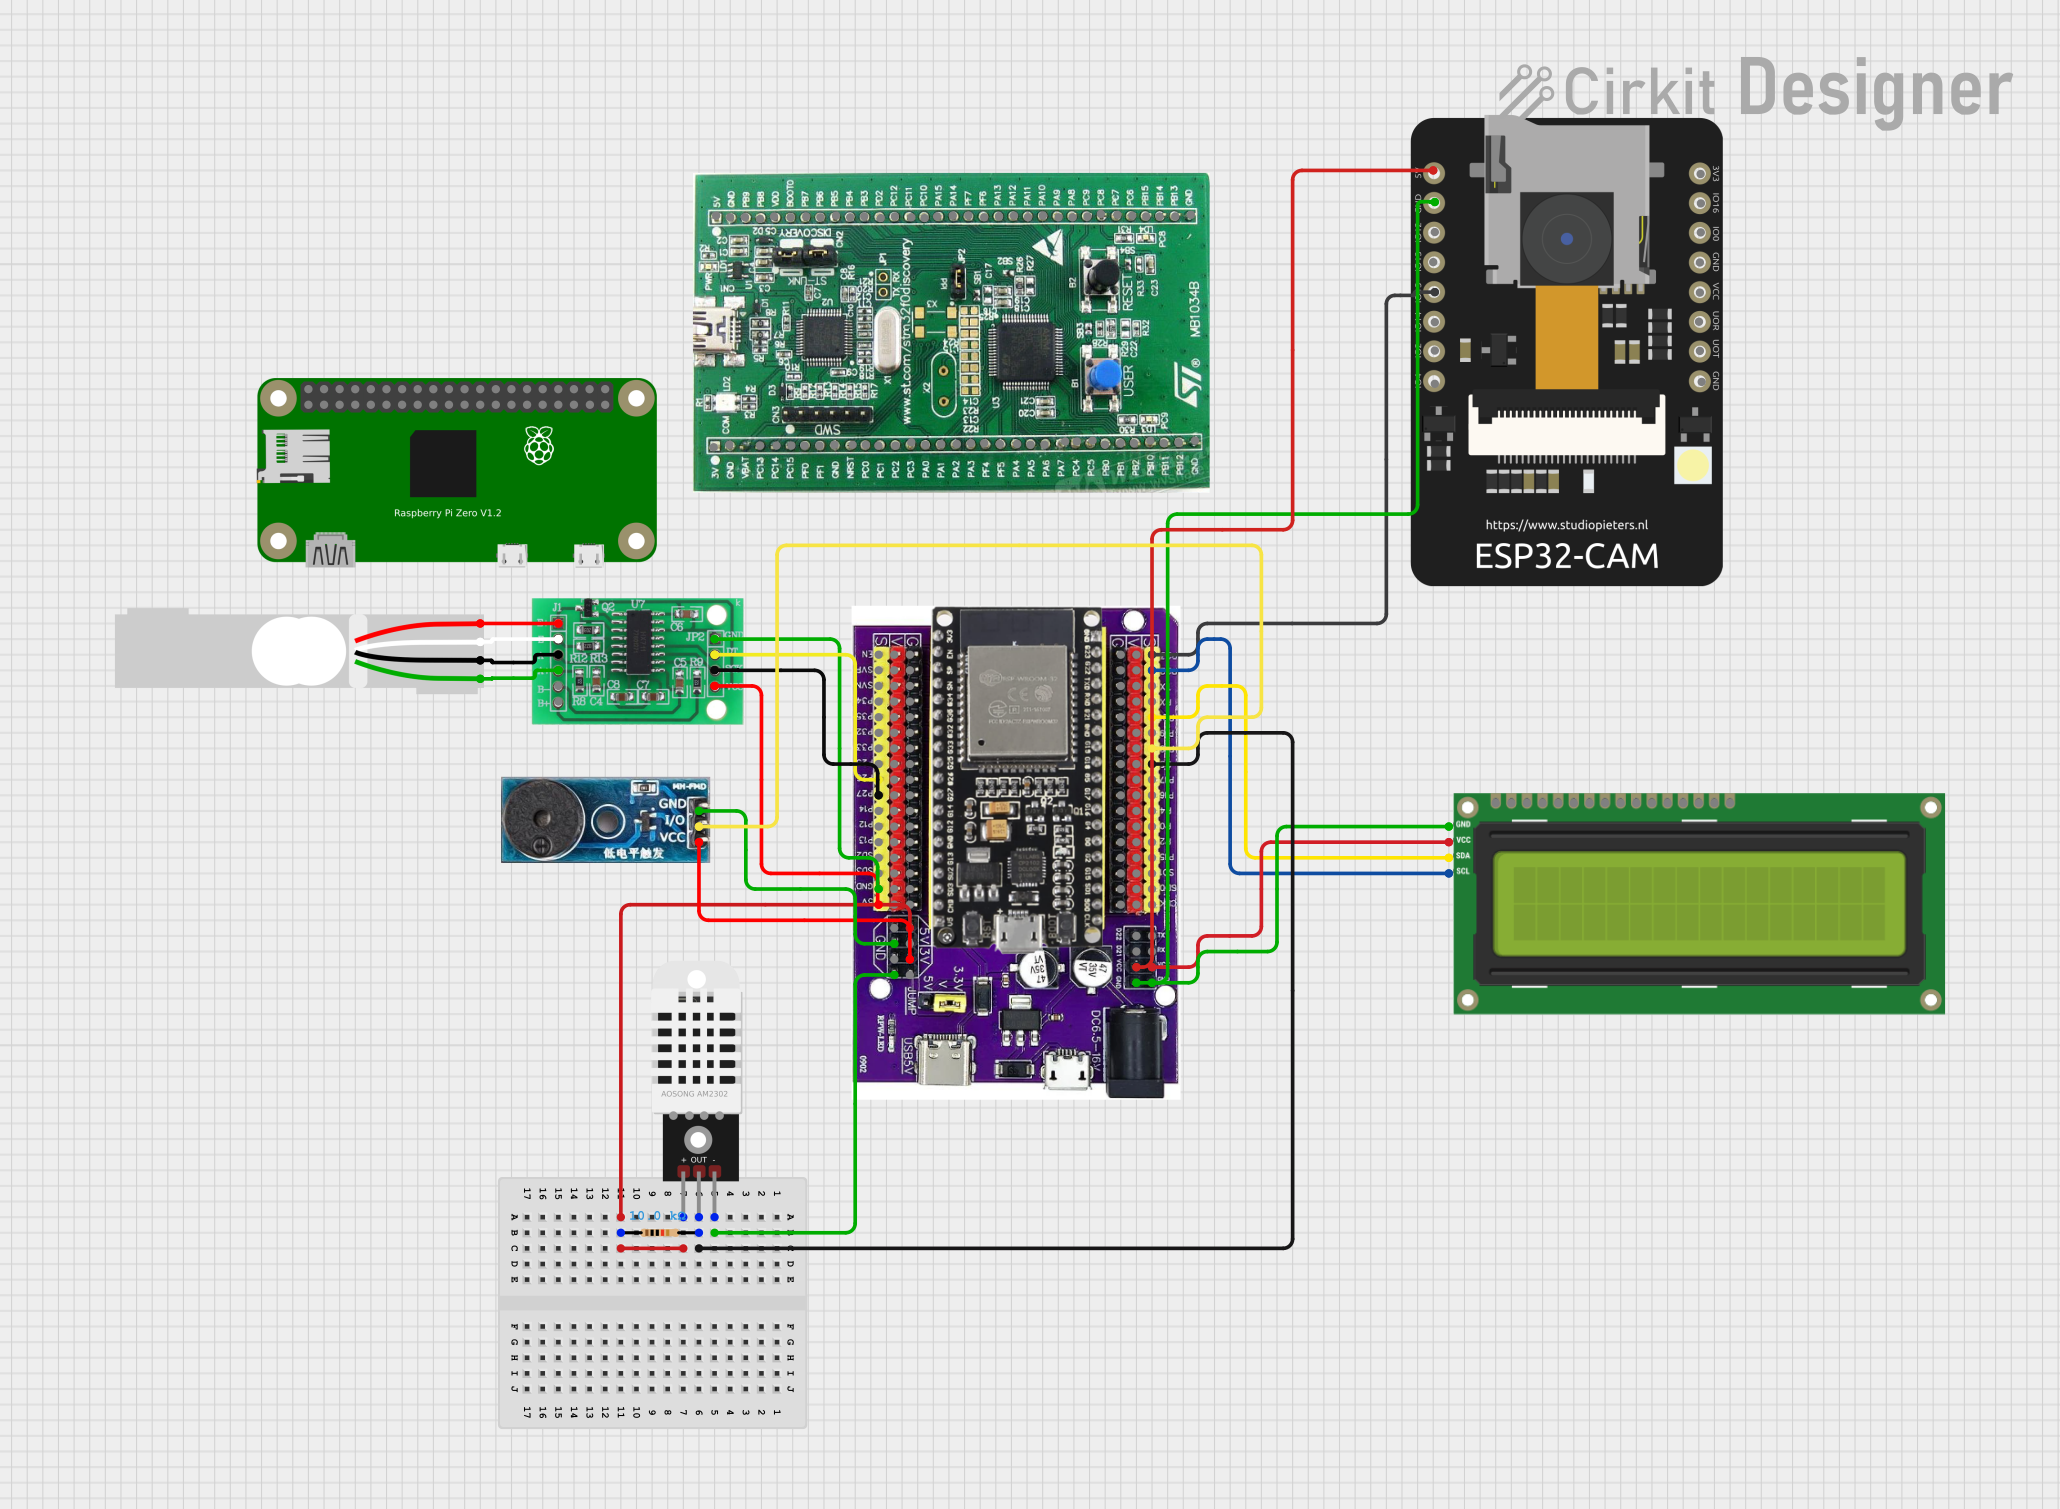
This circuit features an ESP32 microcontroller interfacing with various sensors and modules, including a DHT22 temperature and humidity sensor, an ESP32 CAM for image capture, an I2C LCD screen for display, a load cell with an HX711 interface for weight measurement, and a buzzer for audio alerts. The ESP32 handles data acquisition, processing, and communication with these peripherals to create a multi-functional monitoring and alert system.
Explore Projects Built with ESP32
ESP32-Based Sensor Monitoring System with OLED Display and E-Stop
This circuit features an ESP32 microcontroller that interfaces with a variety of sensors and output devices. It is powered by a Lipo battery through a buck converter, ensuring a stable voltage supply. The ESP32 collects data from a DHT11 temperature and humidity sensor and a vibration sensor, controls a buzzer, and displays information on an OLED screen. An emergency stop (E Stop) is connected for safety purposes, allowing the system to be quickly deactivated.
ESP32-Based NTP Clock with DHT22 Temperature Sensor and WS2812 LED Matrix Display
This circuit features an ESP32 Devkit V1 microcontroller connected to a DHT22 temperature and humidity sensor and an 8x8 WS2812 RGB LED matrix. The ESP32 reads temperature data from the DHT22 sensor and displays the current date, time, and temperature on the LED matrix, with date and time synchronized via NTP (Network Time Protocol). The ESP32 provides power to both the DHT22 and the LED matrix and communicates with the DHT22 via GPIO 4 and with the LED matrix via GPIO 5.
ESP32-Based Environmental Monitoring System with Water Flow Sensing
This circuit features an ESP32 Devkit V1 microcontroller connected to a DHT22 temperature and humidity sensor and a water flow sensor. The ESP32 reads environmental data from the DHT22 via a digital input pin (D33) and monitors water flow through the water flow sensor connected to another digital input pin (D23). The ESP32 is powered through its VIN pin, and both sensors are powered by the ESP32's 3V3 output, with common ground connections.
ESP32-Based Smart Weather Station with Wi-Fi Connectivity
This circuit features an ESP32 microcontroller interfacing with various sensors and modules, including a DHT22 temperature and humidity sensor, an ESP32 CAM for image capture, an I2C LCD screen for display, a load cell with an HX711 interface for weight measurement, and a buzzer for audio alerts. The ESP32 handles data acquisition, processing, and communication with these peripherals to create a multi-functional monitoring and alert system.
Technical Specifications
Key Technical Details
| Specification | Value |
|---|---|
| Microcontroller | Tensilica Xtensa LX6 dual-core |
| Operating Voltage | 3.3V |
| Input Voltage | 5V (via USB) |
| Digital I/O Pins | 34 |
| Analog Input Pins | 18 (12-bit ADC) |
| Analog Output Pins | 2 (8-bit DAC) |
| Flash Memory | 4MB (external) |
| SRAM | 520KB |
| Wi-Fi | 802.11 b/g/n |
| Bluetooth | v4.2 BR/EDR and BLE |
| Operating Temperature | -40°C to +125°C |
Pin Configuration and Descriptions
| Pin Number | Pin Name | Description |
|---|---|---|
| 1 | EN | Enable pin (active high) |
| 2 | GPIO0 | General-purpose I/O |
| 3 | GPIO1 | General-purpose I/O |
| 4 | GPIO2 | General-purpose I/O |
| 5 | GPIO3 | General-purpose I/O |
| 6 | GPIO4 | General-purpose I/O |
| 7 | GPIO5 | General-purpose I/O |
| 8 | GPIO6 | General-purpose I/O |
| 9 | GPIO7 | General-purpose I/O |
| 10 | GPIO8 | General-purpose I/O |
| 11 | GPIO9 | General-purpose I/O |
| 12 | GPIO10 | General-purpose I/O |
| 13 | GPIO11 | General-purpose I/O |
| 14 | GPIO12 | General-purpose I/O |
| 15 | GPIO13 | General-purpose I/O |
| 16 | GPIO14 | General-purpose I/O |
| 17 | GPIO15 | General-purpose I/O |
| 18 | GPIO16 | General-purpose I/O |
| 19 | GPIO17 | General-purpose I/O |
| 20 | GPIO18 | General-purpose I/O |
| 21 | GPIO19 | General-purpose I/O |
| 22 | GPIO20 | General-purpose I/O |
| 23 | GPIO21 | General-purpose I/O |
| 24 | GPIO22 | General-purpose I/O |
| 25 | GPIO23 | General-purpose I/O |
| 26 | GPIO24 | General-purpose I/O |
| 27 | GPIO25 | General-purpose I/O |
| 28 | GPIO26 | General-purpose I/O |
| 29 | GPIO27 | General-purpose I/O |
| 30 | GPIO28 | General-purpose I/O |
| 31 | GPIO29 | General-purpose I/O |
| 32 | GPIO30 | General-purpose I/O |
| 33 | GPIO31 | General-purpose I/O |
| 34 | GPIO32 | General-purpose I/O |
| 35 | GPIO33 | General-purpose I/O |
| 36 | GPIO34 | General-purpose I/O |
| 37 | GPIO35 | General-purpose I/O |
| 38 | GPIO36 | General-purpose I/O |
| 39 | GPIO37 | General-purpose I/O |
| 40 | GPIO38 | General-purpose I/O |
| 41 | GPIO39 | General-purpose I/O |
Usage Instructions
How to Use the ESP32 in a Circuit
Powering the ESP32:
- Connect the 5V pin to a 5V power source (e.g., USB).
- Ensure the GND pin is connected to the ground of the power source.
Programming the ESP32:
- Use the Arduino IDE or ESP-IDF to write and upload code.
- Connect the ESP32 to your computer via a USB cable.
- Select the appropriate board and port in the Arduino IDE.
Connecting Peripherals:
- Use the GPIO pins to connect sensors, actuators, and other peripherals.
- Ensure the peripherals operate at 3.3V logic levels to avoid damaging the ESP32.
Important Considerations and Best Practices
- Voltage Levels: Ensure all connected devices operate at 3.3V logic levels.
- Power Supply: Use a stable power supply to avoid brownouts and resets.
- Heat Dissipation: Provide adequate ventilation to prevent overheating.
- Firmware Updates: Regularly update the firmware to benefit from the latest features and security patches.
Example Code for Arduino UNO
#include <WiFi.h>

// Replace with your network credentials
const char* ssid = "your_SSID";
const char* password = "your_PASSWORD";

void setup() {
  Serial.begin(115200);

  // Connect to Wi-Fi
  WiFi.begin(ssid, password);

  // Wait for connection
  while (WiFi.status() != WL_CONNECTED) {
    delay(1000);
    Serial.println("Connecting to WiFi...");
  }

  Serial.println("Connected to WiFi");
}

void loop() {
  // Put your main code here, to run repeatedly
}
Troubleshooting and FAQs
Common Issues
ESP32 Not Connecting to Wi-Fi:
- Ensure the SSID and password are correct.
- Check if the Wi-Fi network is operational.
- Move the ESP32 closer to the Wi-Fi router.
ESP32 Keeps Resetting:
- Check the power supply for stability.
- Ensure the ESP32 is not overheating.
- Verify that no short circuits are present on the board.
Unable to Upload Code:
- Ensure the correct board and port are selected in the Arduino IDE.
- Press and hold the BOOT button while uploading the code.
Solutions and Tips for Troubleshooting
- Serial Monitor: Use the Serial Monitor in the Arduino IDE to debug and view error messages.
- Firmware Update: Update the ESP32 firmware to the latest version.
- Community Support: Seek help from online forums and communities dedicated to ESP32 development.
By following this documentation, users can effectively utilize the ESP32 in their projects, ensuring reliable performance and successful implementation.