How to Use XIAO ESP32C3: Examples, Pinouts, and Specs
Introduction
The XIAO ESP32C3 is a highly integrated, low-power development board produced by Seeed Studio, designed for Internet of Things (IoT) applications and embedded systems development. Based on the ESP32-C3 microcontroller from Espressif Systems, this board offers Wi-Fi connectivity, a rich set of peripherals, and a compact form factor, making it ideal for space-constrained projects.
Explore Projects Built with XIAO ESP32C3
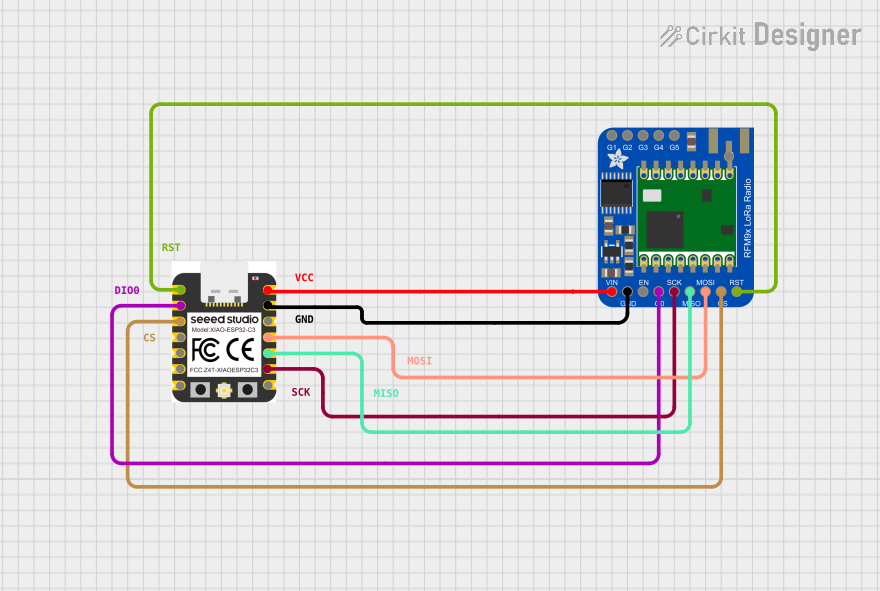
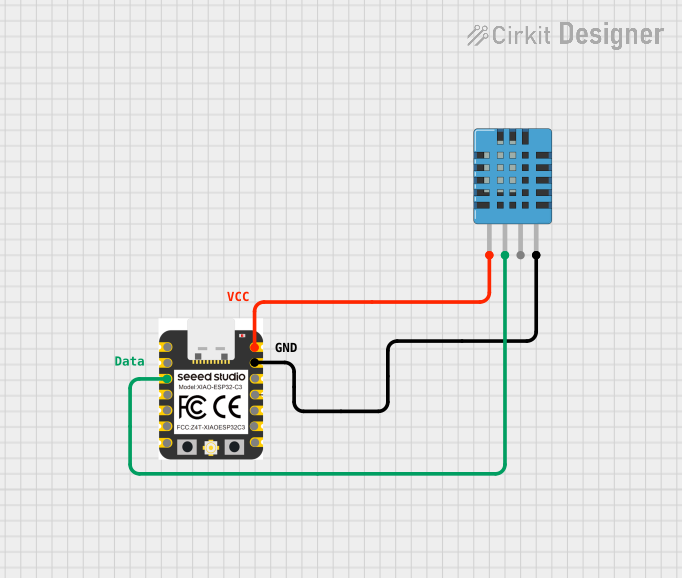


Explore Projects Built with XIAO ESP32C3
Common Applications and Use Cases
- Smart home devices
- Wireless sensors and actuators
- IoT nodes
- Wearable electronics
- Prototyping for embedded systems
Technical Specifications
Key Technical Details
- Microcontroller: ESP32-C3
- Operating Voltage: 3.3V
- Input Voltage (recommended): 5V via USB-C or battery
- Digital I/O Pins: 11
- Analog Input Pins: 4
- Flash Memory: 4MB
- SRAM: 400 KB
- CPU Frequency: up to 160 MHz
- Wi-Fi: 802.11 b/g/n (2.4 GHz)
- Bluetooth: BLE 5.0
- Interface: USB-C
Pin Configuration and Descriptions
| Pin Number | Function | Description |
|---|---|---|
| 1 | 3V3 | 3.3V power supply |
| 2 | GND | Ground |
| 3 | ADC/DAC/GPIO | Analog-to-Digital Converter/Digital-to-Analog Converter/General Purpose I/O |
| ... | ... | ... |
| n | GPIO | General Purpose I/O |
Note: The full pinout diagram and detailed descriptions can be found in the official datasheet provided by Seeed Studio.
Usage Instructions
How to Use the Component in a Circuit
Powering the Board:
- Connect the USB-C cable to the board and a 5V USB power source.
- Alternatively, connect a battery to the designated pins, ensuring correct polarity.
Connecting to Wi-Fi:
- Utilize the onboard Wi-Fi capabilities to connect to a network for IoT applications.
Programming the Board:
- The XIAO ESP32C3 can be programmed using the Arduino IDE or other compatible development environments.
- Select the appropriate board and port in your IDE before uploading your code.
Important Considerations and Best Practices
- Always ensure that the input voltage does not exceed the recommended levels to prevent damage.
- When designing circuits, consider the current limitations of the GPIO pins.
- Use proper decoupling capacitors close to the power pins to minimize power supply noise.
- For Wi-Fi and Bluetooth applications, ensure that the antenna area is not obstructed to maintain signal integrity.
Troubleshooting and FAQs
Common Issues Users Might Face
Board not recognized by the computer:
- Check the USB cable and connections.
- Ensure that the correct drivers are installed.
Wi-Fi connectivity issues:
- Verify the network credentials and signal strength.
- Check for sources of Wi-Fi interference.
Programming errors:
- Ensure that the correct board and port are selected in the IDE.
- Check the code for syntax and logical errors.
Solutions and Tips for Troubleshooting
- If the board is not recognized, try using a different USB port or cable.
- For Wi-Fi issues, try restarting the router and the board to re-establish the connection.
- When encountering programming errors, refer to the error messages in the IDE for clues on how to resolve them.
Example Code for Arduino UNO
#include <WiFi.h>

// Replace with your network credentials
const char* ssid = "your_SSID";
const char* password = "your_PASSWORD";

void setup() {
  Serial.begin(115200);

  // Connect to Wi-Fi
  WiFi.begin(ssid, password);
  while (WiFi.status() != WL_CONNECTED) {
    delay(1000);
    Serial.println("Connecting to WiFi...");
  }
  Serial.println("Connected to WiFi");
}

void loop() {
  // Your code here
}
Note: This example demonstrates how to connect the XIAO ESP32C3 to a Wi-Fi network. Ensure that you replace your_SSID and your_PASSWORD with your actual Wi-Fi credentials.
For more detailed information, refer to the Seeed Studio Wiki and the Espressif ESP32-C3 Documentation.