How to Use 6 x aa battery holder: Examples, Pinouts, and Specs
Introduction
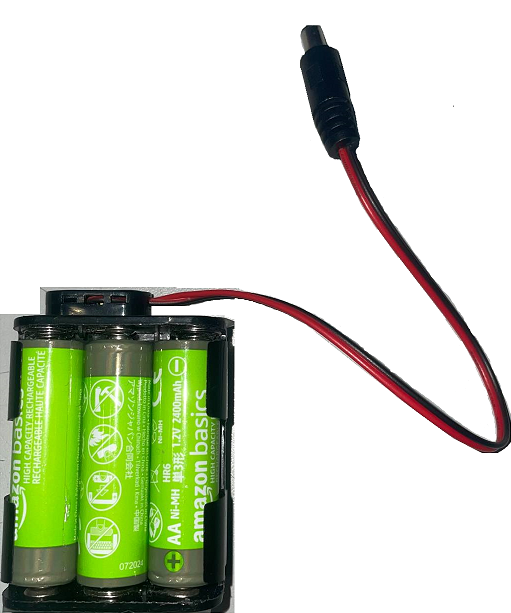
The 6 x AA Battery Holder is a compact and durable component designed to securely hold six AA batteries. It provides a convenient way to connect multiple batteries in series or parallel, depending on the wiring configuration, to achieve the desired voltage and current for powering electronic circuits. This holder is widely used in DIY electronics, robotics, portable devices, and other battery-powered projects.
Explore Projects Built with 6 x aa battery holder


Explore Projects Built with 6 x aa battery holder
Common Applications and Use Cases
- Power supply for Arduino, Raspberry Pi, and other microcontroller projects.
- Robotics and motorized systems requiring higher voltage or current.
- Portable electronic devices and gadgets.
- Backup power solutions for small circuits.
- Educational and prototyping purposes.
Technical Specifications
- Material: Plastic housing with metal spring terminals.
- Battery Type: AA (1.5V each).
- Battery Configuration: Supports series or parallel connections.
- Output Voltage:
- Series configuration: Up to 9V (6 x 1.5V).
- Parallel configuration: 1.5V with increased current capacity.
- Current Rating: Dependent on the batteries used.
- Dimensions: Varies by manufacturer, typically compact and lightweight.
- Wiring: Includes leads or terminals for easy connection to circuits.
Pin Configuration and Descriptions
The 6 x AA Battery Holder does not have traditional pins but includes two output leads or terminals for connection. The table below describes the leads:
| Lead/Terminal | Description |
|---|---|
| Red Lead | Positive terminal (+) |
| Black Lead | Negative terminal (-) |
Usage Instructions
How to Use the Component in a Circuit
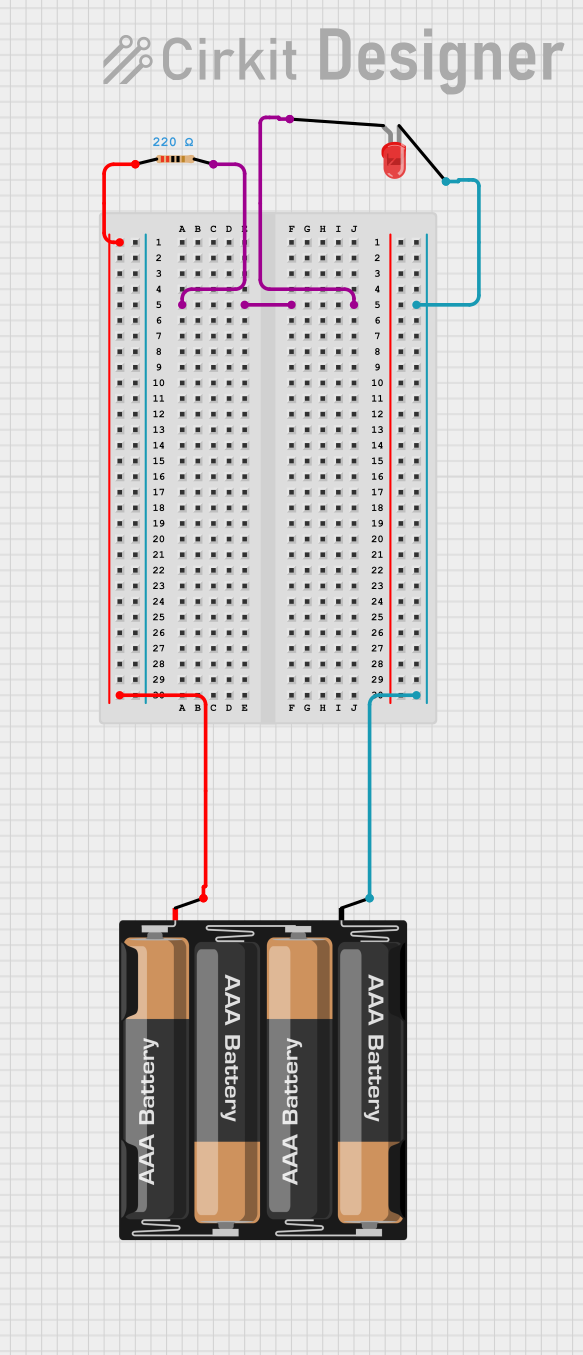
- Insert Batteries: Place six AA batteries into the holder, ensuring correct polarity as indicated on the holder.
- Connect Leads:
- For series configuration (default in most holders), connect the red lead to the positive input of your circuit and the black lead to the negative input.
- For parallel configuration, modify the wiring inside the holder (if supported) or use an external circuit to connect all positive terminals together and all negative terminals together.
- Verify Voltage: Use a multimeter to confirm the output voltage before connecting to your circuit.
- Connect to Circuit: Attach the leads to your circuit, ensuring proper polarity to avoid damage.
Important Considerations and Best Practices
- Battery Type: Use only AA batteries of the same type and charge level to ensure consistent performance.
- Heat Management: Avoid overloading the holder with excessive current, as this can cause overheating.
- Polarity: Double-check the polarity of the leads before connecting to your circuit to prevent damage.
- Secure Connections: Ensure the leads are securely connected to your circuit to avoid intermittent power issues.
- Battery Life: Remove batteries when not in use for extended periods to prevent leakage and corrosion.
Example: Using with an Arduino UNO
The 6 x AA Battery Holder can be used to power an Arduino UNO. Below is an example of how to connect it:
- Insert six AA batteries into the holder.
- Measure the output voltage to ensure it is approximately 9V.
- Connect the red lead to the Arduino's VIN pin and the black lead to the GND pin.
Sample Code for Arduino UNO
// Example code to blink an LED using Arduino UNO powered by a 6 x AA Battery Holder
// Ensure the battery holder is connected to the VIN and GND pins of the Arduino.

const int ledPin = 13; // Built-in LED pin on most Arduino boards

void setup() {
  pinMode(ledPin, OUTPUT); // Set the LED pin as an output
}

void loop() {
  digitalWrite(ledPin, HIGH); // Turn the LED on
  delay(1000);                // Wait for 1 second
  digitalWrite(ledPin, LOW);  // Turn the LED off
  delay(1000);                // Wait for 1 second
}
Troubleshooting and FAQs
Common Issues and Solutions
No Output Voltage:
- Cause: Batteries are inserted incorrectly or are depleted.
- Solution: Check the polarity of the batteries and replace them if necessary.
Intermittent Power:
- Cause: Loose connections between the leads and the circuit.
- Solution: Ensure the leads are securely connected and inspect for damaged wires.
Overheating:
- Cause: Excessive current draw from the circuit.
- Solution: Verify the current requirements of your circuit and ensure they are within the safe limits of the batteries.
Corrosion or Leakage:
- Cause: Batteries left in the holder for an extended period.
- Solution: Remove batteries when not in use and clean the terminals if corrosion occurs.
FAQs
Q: Can I use rechargeable batteries with this holder?
A: Yes, you can use rechargeable AA batteries. However, note that their nominal voltage is typically 1.2V instead of 1.5V, resulting in a total output of 7.2V in series.
Q: How do I modify the holder for parallel configuration?
A: Most holders are designed for series connections by default. To achieve a parallel configuration, you may need to rewire the internal connections or use an external circuit to combine all positive and negative terminals.
Q: Is the holder waterproof?
A: No, the holder is not waterproof. Avoid exposing it to moisture or water to prevent damage.
Q: Can I use fewer than six batteries in the holder?
A: It is not recommended, as the holder is designed for six batteries. Using fewer batteries may result in poor contact and unreliable performance.