Cirkit Designer Logo
Cirkit Designer
Your all-in-one circuit design IDE
Home / 
Component Documentation

How to Use Adafruit Voice Bonnet: Examples, Pinouts, and Specs

Image of Adafruit Voice Bonnet
Cirkit Designer LogoDesign with Adafruit Voice Bonnet in Cirkit Designer

Introduction

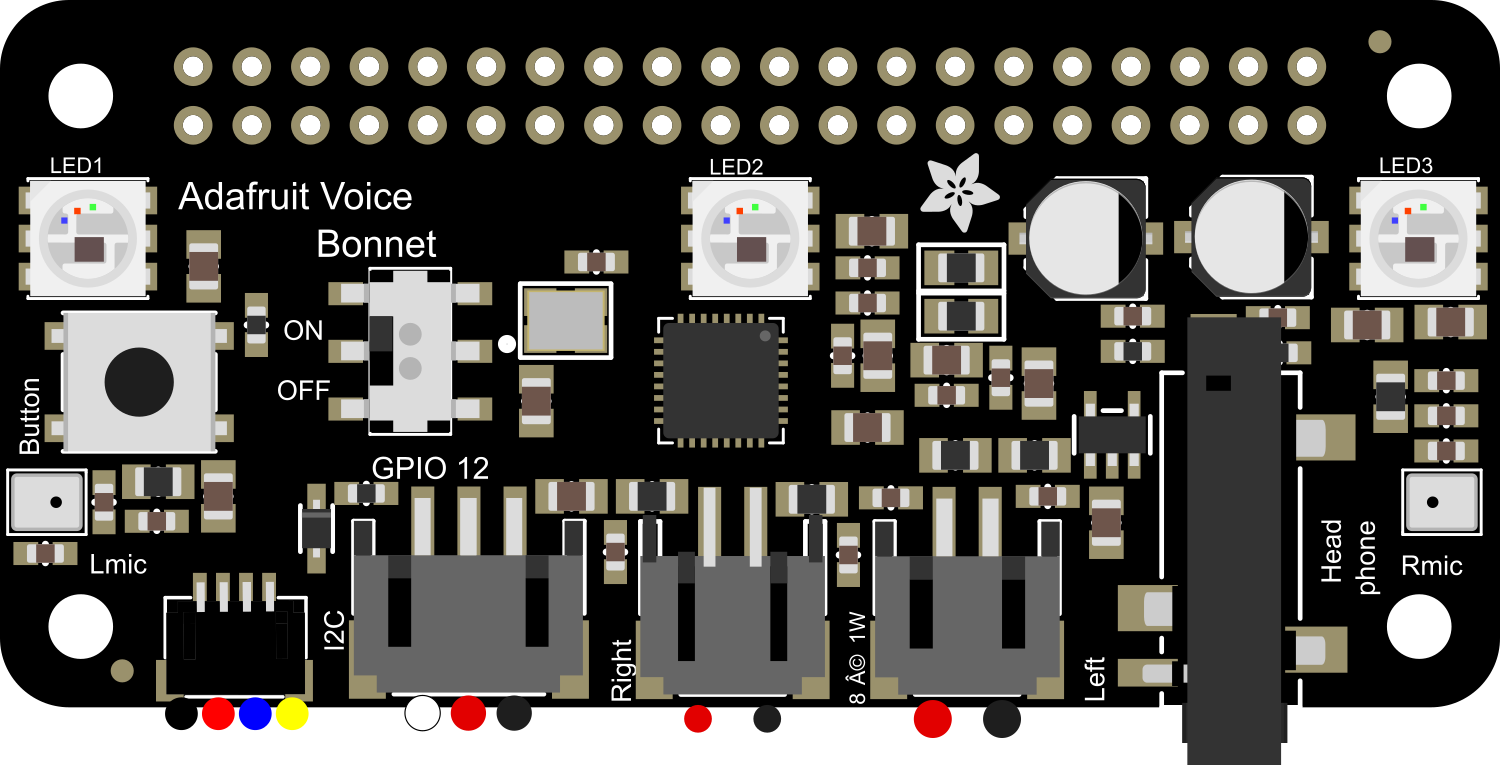
The Adafruit Voice Bonnet is an advanced audio interface designed for Raspberry Pi boards. It allows users to add voice recognition and audio playback capabilities to their projects. This bonnet is ideal for creating interactive projects like smart assistants, voice-activated controls, and educational tools where audio input and output are essential.

Explore Projects Built with Adafruit Voice Bonnet

Use Cirkit Designer to design, explore, and prototype these projects online. Some projects support real-time simulation. Click "Open Project" to start designing instantly!
Raspberry Pi 4B-Based GPS and GSM Tracking System with Audio Feedback
Image of unlimited range: A project utilizing Adafruit Voice Bonnet in a practical application
This circuit features a Raspberry Pi 4B as the central processing unit, interfaced with a GPS NEO-6M V2 module for location tracking and an Adafruit FONA 808 Shield for cellular communication. It includes a PAM8406 5V Digital Audio Amplifier connected to an Adafruit STEMMA Speaker for audio output, and a Condenser Microphone connected to the FONA 808 for audio input. Power management is handled by a 12V battery connected to a voltage regulator that steps down the voltage to 5V and 3V required by the various components.
Cirkit Designer LogoOpen Project in Cirkit Designer
ESP32-Based Voice-Controlled Speaker
Image of Main Design: A project utilizing Adafruit Voice Bonnet in a practical application
This circuit is a digital voice playback and recording system powered by a 3.7V battery. It features an ESP32 microcontroller for processing, an Adafruit MAX98357A amplifier to drive a loudspeaker for audio output, and an Adafruit MAX9814 microphone amplifier for audio input. A pushbutton provides user interaction, and a 3.3V regulator ensures stable power supply to the components.
Cirkit Designer LogoOpen Project in Cirkit Designer
ESP32-Based Voice Assistant with Battery-Powered Microphone and Speaker
Image of Minor: A project utilizing Adafruit Voice Bonnet in a practical application
This circuit is a voice-controlled system that uses an ESP32 microcontroller to process audio input from a microphone, send the data to a Gemini API for speech-to-text conversion, and output responses through a speaker. It includes an IR sensor for additional input, an LED for status indication, and a battery with a charging module for power management.
Cirkit Designer LogoOpen Project in Cirkit Designer
Arduino UNO Voice Assistant with KY-037 Microphone and Speaker
Image of VOICE PY 2: A project utilizing Adafruit Voice Bonnet in a practical application
This circuit is a voice assistant project that uses an Arduino UNO to interface with a KY-037 microphone and a speaker. The microphone detects voice commands, which are processed by the Arduino, and the speaker provides audio feedback based on the detected commands.
Cirkit Designer LogoOpen Project in Cirkit Designer

Explore Projects Built with Adafruit Voice Bonnet

Use Cirkit Designer to design, explore, and prototype these projects online. Some projects support real-time simulation. Click "Open Project" to start designing instantly!
Image of unlimited range: A project utilizing Adafruit Voice Bonnet in a practical application
Raspberry Pi 4B-Based GPS and GSM Tracking System with Audio Feedback
This circuit features a Raspberry Pi 4B as the central processing unit, interfaced with a GPS NEO-6M V2 module for location tracking and an Adafruit FONA 808 Shield for cellular communication. It includes a PAM8406 5V Digital Audio Amplifier connected to an Adafruit STEMMA Speaker for audio output, and a Condenser Microphone connected to the FONA 808 for audio input. Power management is handled by a 12V battery connected to a voltage regulator that steps down the voltage to 5V and 3V required by the various components.
Cirkit Designer LogoOpen Project in Cirkit Designer
Image of Main Design: A project utilizing Adafruit Voice Bonnet in a practical application
ESP32-Based Voice-Controlled Speaker
This circuit is a digital voice playback and recording system powered by a 3.7V battery. It features an ESP32 microcontroller for processing, an Adafruit MAX98357A amplifier to drive a loudspeaker for audio output, and an Adafruit MAX9814 microphone amplifier for audio input. A pushbutton provides user interaction, and a 3.3V regulator ensures stable power supply to the components.
Cirkit Designer LogoOpen Project in Cirkit Designer
Image of Minor: A project utilizing Adafruit Voice Bonnet in a practical application
ESP32-Based Voice Assistant with Battery-Powered Microphone and Speaker
This circuit is a voice-controlled system that uses an ESP32 microcontroller to process audio input from a microphone, send the data to a Gemini API for speech-to-text conversion, and output responses through a speaker. It includes an IR sensor for additional input, an LED for status indication, and a battery with a charging module for power management.
Cirkit Designer LogoOpen Project in Cirkit Designer
Image of VOICE PY 2: A project utilizing Adafruit Voice Bonnet in a practical application
Arduino UNO Voice Assistant with KY-037 Microphone and Speaker
This circuit is a voice assistant project that uses an Arduino UNO to interface with a KY-037 microphone and a speaker. The microphone detects voice commands, which are processed by the Arduino, and the speaker provides audio feedback based on the detected commands.
Cirkit Designer LogoOpen Project in Cirkit Designer

Common Applications and Use Cases

  • Voice-activated smart home devices
  • Interactive voice response systems
  • Educational tools for learning and accessibility
  • DIY personal assistants
  • Audio message recording and playback

Technical Specifications

Key Technical Details

  • Compatibility: Designed for Raspberry Pi Zero W, Pi 3, Pi 4, and other models with 40-pin GPIO
  • Microphone: Dual MEMS microphones for stereo input
  • Speaker Outputs: 1 Watt speaker outputs with I2S class-D amplifiers
  • Audio Codec: Integrated MAX98357A codec for audio decoding
  • LED Indicators: Onboard LEDs for status indication
  • Dimensions: Fits the Raspberry Pi Zero form factor

Pin Configuration and Descriptions

Pin Number Function Description
1 3V3 Power Power supply for the bonnet
2 5V Power Power supply for the Raspberry Pi
3 GPIO2 (SDA) I2C Data for communication with the bonnet
4 5V Power Power supply for the Raspberry Pi
5 GPIO3 (SCL) I2C Clock for communication with the bonnet
6 Ground Ground connection
... ... ...
40 GPIO21 (PCM_DIN) I2S Data input for audio playback

Note: This table is not exhaustive and only includes key pins related to the Adafruit Voice Bonnet's functionality.

Usage Instructions

How to Use the Component in a Circuit

  1. Mounting the Bonnet: Carefully align the 40-pin header of the Voice Bonnet with the GPIO pins on your Raspberry Pi and press down to connect.
  2. Power Supply: Ensure your Raspberry Pi is powered through its micro-USB or USB-C connector, which will also power the Voice Bonnet.
  3. Speaker Connection: Connect speakers to the speaker terminals on the bonnet, ensuring correct polarity.
  4. Microphone Usage: The onboard microphones are active by default; no additional setup is required for them.

Important Considerations and Best Practices

  • Audio Output: The Bonnet's amplifiers can drive speakers with an impedance as low as 4 Ohms. Ensure your speakers match this specification.
  • Software Configuration: Install the necessary drivers and software on your Raspberry Pi to enable the Voice Bonnet's functionality.
  • Volume Control: Be cautious with the volume levels to avoid damaging the speakers or your hearing.
  • GPIO Access: If you need to use other GPIO pins for your project, ensure they do not conflict with the pins used by the Voice Bonnet.

Troubleshooting and FAQs

Common Issues Users Might Face

  • No Audio Output: Check speaker connections, ensure the Raspberry Pi is powered, and verify that the software and drivers are correctly installed.
  • Poor Microphone Sensitivity: Ensure there are no obstructions near the microphones and that the environment is not too noisy.

Solutions and Tips for Troubleshooting

  • Audio Testing: Use speaker-test and arecord commands to test speaker output and microphone input, respectively.
  • Software Reinstallation: If the device is not recognized, try reinstalling the drivers and software packages.
  • Check for Conflicts: Ensure no other software or hardware is conflicting with the Voice Bonnet's operation.

FAQs

Q: Can I use the Voice Bonnet with other microcontrollers? A: The Voice Bonnet is specifically designed for Raspberry Pi boards with a 40-pin GPIO header.

Q: How do I change the audio volume? A: You can adjust the volume using the alsamixer command or through your Python script.

Q: Does the Voice Bonnet support stereo microphone input? A: Yes, it has dual MEMS microphones for stereo audio capture.

Q: Can I use external microphones with the Voice Bonnet? A: The Bonnet is designed to work with its onboard microphones, but with additional hardware and configuration, it may be possible to use external microphones.

For more detailed information, refer to the Adafruit Voice Bonnet product page and the Raspberry Pi documentation.