
How to Use Mini560 5V: Examples, Pinouts, and Specs
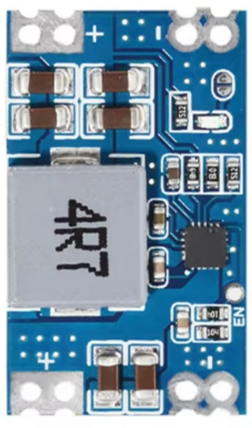
 Design with Mini560 5V in Cirkit Designer
Introduction
The Mini560 5V is a compact, low-power DC-DC step-down voltage regulator designed to convert higher input voltages into a stable 5V output. This component is ideal for powering small electronic devices, microcontrollers, sensors, and other low-power circuits. Its small size and high efficiency make it a popular choice for portable and embedded applications.
Explore Projects Built with Mini560 5V
 Open Project in Cirkit Designer
 Open Project in Cirkit Designer
 Open Project in Cirkit Designer
 Open Project in Cirkit Designer
Explore Projects Built with Mini560 5V
Open Project in Cirkit DesignerOpen Project in Cirkit DesignerOpen Project in Cirkit DesignerOpen Project in Cirkit DesignerCommon Applications
- Powering microcontrollers (e.g., Arduino, ESP32, Raspberry Pi Pico)
- Supplying 5V to sensors and modules in embedded systems
- Battery-powered devices requiring efficient voltage regulation
- DIY electronics and prototyping projects
Technical Specifications
The Mini560 5V regulator is designed to provide reliable and efficient voltage conversion. Below are its key technical details:
| Parameter | Value |
|---|---|
| Input Voltage Range | 6V to 23V |
| Output Voltage | 5V (fixed) |
| Maximum Output Current | 2A (with proper heat dissipation) |
| Efficiency | Up to 92% |
| Operating Temperature | -40°C to +85°C |
| Dimensions | 22mm x 17mm x 4mm |
Pin Configuration and Descriptions
The Mini560 5V regulator has three main pins for input and output connections:
| Pin Name | Description |
|---|---|
| VIN | Input voltage pin (connect to 6V-23V power source) |
| GND | Ground pin (common ground for input and output) |
| VOUT | Regulated 5V output pin (connect to load circuit) |
Usage Instructions
How to Use the Mini560 5V in a Circuit
Connect the Input Voltage (VIN):
- Attach the VIN pin to a DC power source with a voltage between 6V and 23V.
- Ensure the power source can supply sufficient current for your load.
Connect the Ground (GND):
- Connect the GND pin to the ground of your power source and load circuit.
Connect the Output Voltage (VOUT):
- Attach the VOUT pin to the input of your load circuit. This pin provides a stable 5V output.
Verify Connections:
- Double-check all connections to ensure proper polarity and avoid short circuits.
Power On:
- Turn on the power source and measure the output voltage at VOUT to confirm it is 5V.
Important Considerations and Best Practices
- Heat Dissipation: The Mini560 can handle up to 2A of current, but proper heat dissipation (e.g., a heatsink or adequate airflow) is required for high-current applications.
- Input Voltage Range: Ensure the input voltage stays within the specified range (6V-23V) to avoid damaging the regulator.
- Capacitors: For improved stability, consider adding input and output capacitors (e.g., 10µF electrolytic or ceramic capacitors) close to the VIN and VOUT pins.
- Polarity Protection: The Mini560 does not have built-in reverse polarity protection. Always connect the input voltage with the correct polarity.
Example: Using Mini560 with Arduino UNO
The Mini560 can be used to power an Arduino UNO from a 12V DC power source. Below is an example circuit and Arduino code:
Circuit Connections
- Connect the 12V DC power source to the VIN and GND pins of the Mini560.
- Connect the VOUT pin of the Mini560 to the 5V pin of the Arduino UNO.
- Connect the GND pin of the Mini560 to the GND pin of the Arduino UNO.
Arduino Code Example
// Example code to blink an LED connected to pin 13 of Arduino UNO
// Ensure the Arduino is powered via the Mini560 regulator

void setup() {
  pinMode(13, OUTPUT); // Set pin 13 as an output
}

void loop() {
  digitalWrite(13, HIGH); // Turn the LED on
  delay(1000);            // Wait for 1 second
  digitalWrite(13, LOW);  // Turn the LED off
  delay(1000);            // Wait for 1 second
}
Troubleshooting and FAQs
Common Issues and Solutions
No Output Voltage:
- Cause: Incorrect wiring or insufficient input voltage.
- Solution: Verify that the input voltage is within the 6V-23V range and check all connections.
Overheating:
- Cause: Excessive current draw or poor heat dissipation.
- Solution: Reduce the load current or improve heat dissipation using a heatsink or fan.
Output Voltage Fluctuations:
- Cause: Insufficient input/output capacitors or unstable input voltage.
- Solution: Add capacitors (e.g., 10µF) near the VIN and VOUT pins and ensure a stable input voltage.
Regulator Not Working After Reverse Polarity:
- Cause: The Mini560 does not have reverse polarity protection.
- Solution: Replace the damaged regulator and use a diode for polarity protection in future designs.
FAQs
Q: Can the Mini560 power a Raspberry Pi?
A: The Mini560 can provide up to 2A at 5V, which is sufficient for most Raspberry Pi models. However, ensure proper heat dissipation when operating at high currents.
Q: Can I use the Mini560 with a 24V power source?
A: No, the maximum input voltage for the Mini560 is 23V. Using a 24V source may damage the regulator.
Q: Do I need to add capacitors to the Mini560?
A: While the Mini560 can operate without external capacitors, adding input and output capacitors (e.g., 10µF) improves stability and reduces voltage ripple.
Q: Is the Mini560 suitable for battery-powered applications?
A: Yes, the Mini560's high efficiency makes it ideal for battery-powered devices, as it minimizes power loss during voltage conversion.