How to Use 18650 12V 3S Li-ion battery: Examples, Pinouts, and Specs

Introduction
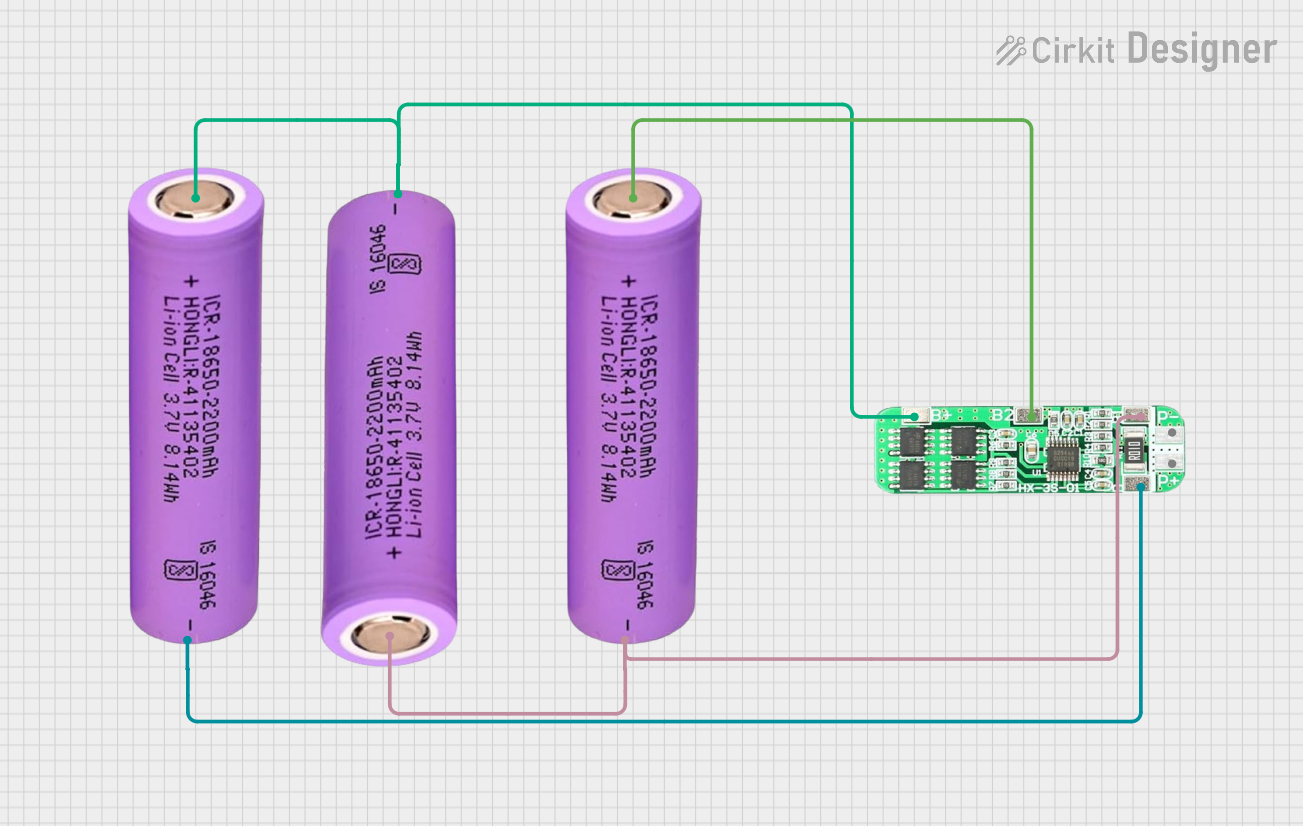
The 18650 12V 3S Li-ion battery is a rechargeable lithium-ion battery pack consisting of three 18650 cells connected in series. This configuration provides a nominal voltage of 12V, making it suitable for a wide range of applications. Known for its high energy density, long cycle life, and lightweight design, this battery pack is commonly used in portable electronics, electric vehicles, robotics, and backup power systems.
Explore Projects Built with 18650 12V 3S Li-ion battery


Explore Projects Built with 18650 12V 3S Li-ion battery
Common Applications
- Portable electronic devices (e.g., LED lights, power tools)
- Electric vehicles and e-bikes
- DIY projects and robotics
- Uninterruptible power supplies (UPS)
- Solar energy storage systems
Technical Specifications
The following table outlines the key technical details of the 18650 12V 3S Li-ion battery:
| Parameter | Specification |
|---|---|
| Nominal Voltage | 12.6V (fully charged), 11.1V nominal |
| Capacity | Varies (e.g., 2000mAh to 3000mAh per cell) |
| Configuration | 3 cells in series (3S) |
| Maximum Charging Voltage | 12.6V |
| Minimum Discharge Voltage | 9.0V |
| Maximum Discharge Current | Typically 10A (varies by model) |
| Charging Current | Standard: 0.5C, Maximum: 1C |
| Protection Circuit Module (PCM) | Overcharge, over-discharge, and short-circuit protection |
| Dimensions | Varies based on cell holder design |
| Weight | ~150g to 200g (depending on capacity) |
Pin Configuration and Descriptions
The 18650 12V 3S Li-ion battery pack typically has three main terminals:
| Pin | Label | Description |
|---|---|---|
| 1 | + (Positive) | Positive terminal for power output |
| 2 | - (Negative) | Negative terminal for power output |
| 3 | BMS (Optional) | Connection to the Battery Management System (BMS) for monitoring and protection |
Note: Some battery packs may include additional terminals for balance charging or monitoring individual cell voltages.
Usage Instructions
How to Use the 18650 12V 3S Li-ion Battery in a Circuit
Connect the Terminals:
- Connect the positive terminal (
+) of the battery to the positive input of your circuit. - Connect the negative terminal (
-) to the ground or negative input of your circuit. - If using a Battery Management System (BMS), ensure proper connections to the BMS terminals.
- Connect the positive terminal (
Charging the Battery:
- Use a dedicated Li-ion battery charger designed for 3S (12.6V) configurations.
- Ensure the charger has overcharge protection to prevent damage to the cells.
- Connect the charger to the battery pack's charging terminals as per the manufacturer's instructions.
Discharging the Battery:
- Ensure the load does not exceed the maximum discharge current rating of the battery.
- Monitor the voltage to avoid discharging below 9.0V, as this can damage the cells.
Mounting and Safety:
- Secure the battery pack in a well-ventilated area to prevent overheating.
- Avoid exposing the battery to water, extreme temperatures, or physical damage.
Important Considerations and Best Practices
- Use a BMS: Always use a Battery Management System to protect the cells from overcharging, over-discharging, and short circuits.
- Avoid Overloading: Do not connect loads that exceed the battery's maximum discharge current.
- Storage: Store the battery in a cool, dry place at around 50% charge for long-term storage.
- Recycling: Dispose of or recycle the battery responsibly at the end of its life.
Example: Using the Battery with an Arduino UNO
The 18650 12V 3S Li-ion battery can power an Arduino UNO through its VIN pin. Below is an example circuit and code to blink an LED using the battery:
Circuit Connections
- Connect the positive terminal of the battery to the VIN pin of the Arduino UNO.
- Connect the negative terminal of the battery to the GND pin of the Arduino UNO.
- Connect an LED to pin 13 of the Arduino UNO with a 220-ohm resistor in series.
Arduino Code
// Simple LED Blink Example
// This code blinks an LED connected to pin 13 of the Arduino UNO.
// Ensure the battery voltage is within the Arduino's input voltage range (7-12V).

void setup() {
  pinMode(13, OUTPUT); // Set pin 13 as an output
}

void loop() {
  digitalWrite(13, HIGH); // Turn the LED on
  delay(1000);            // Wait for 1 second
  digitalWrite(13, LOW);  // Turn the LED off
  delay(1000);            // Wait for 1 second
}
Warning: Ensure the battery voltage does not exceed the Arduino's recommended input voltage range (7-12V) to avoid damage.
Troubleshooting and FAQs
Common Issues and Solutions
Battery Not Charging:
- Cause: Faulty charger or damaged BMS.
- Solution: Verify the charger output voltage and inspect the BMS for damage.
Battery Drains Quickly:
- Cause: High self-discharge rate or excessive load.
- Solution: Check for parasitic loads and ensure the battery is not over-discharged.
Battery Overheats:
- Cause: Overcharging, overloading, or poor ventilation.
- Solution: Use a charger with overcharge protection and ensure proper ventilation.
Voltage Drops Below 9.0V:
- Cause: Over-discharge or faulty BMS.
- Solution: Recharge the battery immediately and inspect the BMS for proper operation.
FAQs
Q: Can I use this battery without a BMS?
A: It is not recommended. A BMS is essential for protecting the cells and ensuring safe operation.Q: How do I know when the battery is fully charged?
A: The battery is fully charged when the voltage reaches 12.6V, and the charger indicates a full charge.Q: Can I connect multiple 3S packs in parallel?
A: Yes, but ensure all packs have the same voltage and capacity, and use a BMS for each pack.Q: What is the lifespan of this battery?
A: The lifespan depends on usage and charging habits but typically ranges from 300 to 500 charge cycles.
By following this documentation, you can safely and effectively use the 18650 12V 3S Li-ion battery in your projects.