How to Use MP303-2 power supply: Examples, Pinouts, and Specs
Introduction
The MP303-2 is a compact and versatile power supply designed to deliver stable and regulated output voltage for a wide range of electronic applications. It is equipped with multiple output channels, adjustable voltage settings, and robust built-in protection mechanisms, making it suitable for both hobbyist and professional use. The MP303-2 is commonly used in prototyping, testing, and powering electronic circuits that require precise voltage control.
Explore Projects Built with MP303-2 power supply


Explore Projects Built with MP303-2 power supply
Common Applications
- Powering microcontrollers, sensors, and modules in embedded systems
- Testing and debugging electronic circuits
- Laboratory and educational use for experiments
- Providing stable power for audio, communication, and industrial devices
Technical Specifications
Key Technical Details
| Parameter | Value |
|---|---|
| Input Voltage Range | 100-240V AC, 50/60Hz |
| Output Voltage Range | 0-30V DC (adjustable) |
| Output Current Range | 0-2A DC (adjustable) |
| Number of Output Channels | 2 |
| Voltage Regulation | ±0.01% |
| Ripple and Noise | <10mV RMS |
| Protection Features | Overvoltage, overcurrent, short circuit |
| Dimensions | 150mm x 80mm x 50mm |
| Weight | 500g |
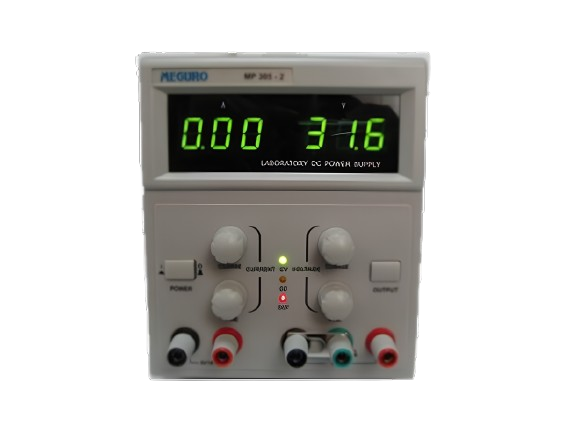
Pin Configuration and Descriptions
The MP303-2 power supply typically features the following connectors and controls:
| Pin/Connector/Control | Description |
|---|---|
| AC Input Port | Connects to the mains power supply (100-240V AC). |
| Output Channel 1 (+/-) | Provides adjustable DC voltage and current. |
| Output Channel 2 (+/-) | Provides adjustable DC voltage and current. |
| Voltage Adjustment Knob | Adjusts the output voltage for the selected channel. |
| Current Adjustment Knob | Adjusts the output current for the selected channel. |
| Power Switch | Turns the power supply on or off. |
| Display Panel | Shows real-time voltage, current, and power readings. |
Usage Instructions
How to Use the MP303-2 in a Circuit
Connect the Power Supply to AC Mains:
- Plug the AC input port of the MP303-2 into a standard wall outlet (100-240V AC).
- Ensure the power switch is in the "OFF" position before connecting.
Set the Desired Voltage and Current:
- Use the voltage adjustment knob to set the required output voltage.
- Use the current adjustment knob to limit the maximum current output.
Connect the Output Terminals to Your Circuit:
- Use the "+" and "−" terminals of the desired output channel to connect to your circuit.
- Double-check the polarity to avoid damage to your components.
Power On the Supply:
- Turn on the power switch and verify the output voltage and current on the display panel.
- Adjust the settings as needed while monitoring the display.
Monitor and Operate:
- Continuously monitor the display to ensure the voltage and current remain within safe limits for your circuit.
Important Considerations and Best Practices
- Always verify the voltage and current requirements of your circuit before connecting the MP303-2.
- Avoid shorting the output terminals, even though the power supply has built-in protection.
- Use proper heat dissipation for high-power applications to prevent overheating.
- Disconnect the power supply from the mains when not in use to conserve energy and ensure safety.
Example: Using MP303-2 with an Arduino UNO
The MP303-2 can be used to power an Arduino UNO by providing a stable 5V DC output. Below is an example of how to connect and use it:
- Set the MP303-2 output voltage to 5V using the voltage adjustment knob.
- Connect the "+" terminal of the MP303-2 to the Arduino's 5V pin.
- Connect the "−" terminal of the MP303-2 to the Arduino's GND pin.
- Power on the MP303-2 and verify the Arduino is functioning correctly.
Here is a simple Arduino code example to blink an LED while powered by the MP303-2:
// Simple LED Blink Example
// This code blinks an LED connected to pin 13 of the Arduino UNO.
// Ensure the MP303-2 is set to 5V and connected to the Arduino's 5V and GND pins.

void setup() {
  pinMode(13, OUTPUT); // Set pin 13 as an output pin
}

void loop() {
  digitalWrite(13, HIGH); // Turn the LED on
  delay(1000);            // Wait for 1 second
  digitalWrite(13, LOW);  // Turn the LED off
  delay(1000);            // Wait for 1 second
}
Troubleshooting and FAQs
Common Issues and Solutions
| Issue | Possible Cause | Solution |
|---|---|---|
| No output voltage | Power switch is off | Turn on the power switch. |
| AC mains not connected | Check the AC input connection. | |
| Output voltage fluctuates | Loose connections | Ensure all connections are secure. |
| Overcurrent protection activated | Reduce the load current. | |
| Display shows incorrect readings | Calibration issue | Recalibrate the power supply if possible. |
| Faulty display panel | Contact the manufacturer for support. |
FAQs
Can I use the MP303-2 to power multiple devices simultaneously?
- Yes, the MP303-2 has two independent output channels, allowing you to power multiple devices. Ensure the total current draw does not exceed the rated limits.
What happens if I accidentally short the output terminals?
- The MP303-2 has built-in short-circuit protection. However, it is recommended to avoid intentional shorting to prevent unnecessary stress on the device.
Can I use the MP303-2 to charge batteries?
- Yes, but ensure the voltage and current settings are appropriate for the specific battery type and capacity. Monitor the charging process to prevent overcharging.
How do I clean the MP303-2?
- Use a soft, dry cloth to clean the exterior. Avoid using water or solvents, as they may damage the device.
By following this documentation, users can safely and effectively operate the MP303-2 power supply for a variety of applications.