How to Use DFRobot MicroSD Card Module: Examples, Pinouts, and Specs

 Design with DFRobot MicroSD Card Module in Cirkit Designer
Introduction
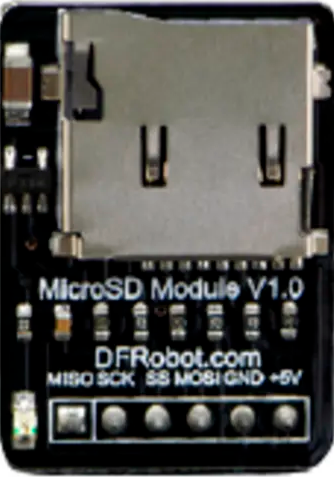
The DFRobot MicroSD Card Module (Part ID: DFR0229) is a compact and reliable solution for adding data storage capabilities to embedded systems. This module allows users to interface with MicroSD cards, enabling data storage, retrieval, and management in a variety of applications. It supports SPI (Serial Peripheral Interface) communication, making it compatible with a wide range of microcontrollers, including Arduino boards.
Explore Projects Built with DFRobot MicroSD Card Module

 Open Project in Cirkit Designer
 Open Project in Cirkit Designer
 Open Project in Cirkit Designer
 Open Project in Cirkit Designer
Explore Projects Built with DFRobot MicroSD Card Module

 Open Project in Cirkit Designer
 Open Project in Cirkit Designer
 Open Project in Cirkit Designer
 Open Project in Cirkit Designer
Common Applications and Use Cases
- Data logging for sensors in IoT projects
- Storing configuration files or firmware updates
- Multimedia storage for audio, video, or image files
- File-based data exchange between embedded systems and computers
- Projects requiring large, non-volatile memory
Technical Specifications
The DFRobot MicroSD Card Module is designed for ease of use and compatibility with standard MicroSD cards. Below are the key technical details:
General Specifications
| Parameter | Value |
|---|---|
| Manufacturer | DFRobot |
| Part ID | DFR0229 |
| Communication Protocol | SPI |
| Operating Voltage | 3.3V to 5V |
| Current Consumption | ~20mA (idle), ~100mA (active) |
| Supported Card Types | MicroSD, MicroSDHC |
| File System Support | FAT16, FAT32 |
| Dimensions | 42mm x 24mm |
Pin Configuration and Descriptions
The module features a 6-pin interface for easy connection to microcontrollers. The pinout is as follows:
| Pin Name | Pin Number | Description |
|---|---|---|
| GND | 1 | Ground connection |
| VCC | 2 | Power supply input (3.3V or 5V) |
| MISO | 3 | Master In Slave Out - SPI data output from the module |
| MOSI | 4 | Master Out Slave In - SPI data input to the module |
| SCK | 5 | Serial Clock - SPI clock signal |
| CS | 6 | Chip Select - Used to enable/disable the module during SPI communication |
Usage Instructions
How to Use the Component in a Circuit
- Power the Module: Connect the
VCCpin to a 3.3V or 5V power source and theGNDpin to ground. - Connect SPI Pins: Connect the
MISO,MOSI,SCK, andCSpins to the corresponding SPI pins on your microcontroller. - Insert a MicroSD Card: Ensure the MicroSD card is formatted to FAT16 or FAT32 before inserting it into the module.
- Initialize the Module: Use appropriate libraries (e.g., the Arduino SD library) to initialize the module and access the MicroSD card.
Important Considerations and Best Practices
- Voltage Compatibility: The module includes a voltage regulator and level shifters, allowing it to work with both 3.3V and 5V systems. Ensure your microcontroller's SPI pins are compatible.
- Card Formatting: Always format the MicroSD card to FAT16 or FAT32 before use. Unformatted or improperly formatted cards may not work.
- Chip Select (CS) Pin: If using multiple SPI devices, ensure each device has a unique
CSpin and manage it appropriately in your code. - Avoid Hot-Swapping: Do not insert or remove the MicroSD card while the module is powered, as this may damage the card or module.
Example Code for Arduino UNO
Below is an example of how to use the DFRobot MicroSD Card Module with an Arduino UNO:
#include <SPI.h>
#include <SD.h>

// Define the Chip Select (CS) pin for the SD card module
const int chipSelect = 4;

void setup() {
  // Initialize serial communication for debugging
  Serial.begin(9600);
  while (!Serial) {
    ; // Wait for the serial port to connect (for native USB boards)
  }

  Serial.println("Initializing SD card...");

  // Initialize the SD card
  if (!SD.begin(chipSelect)) {
    Serial.println("SD card initialization failed!");
    return; // Stop further execution if initialization fails
  }
  Serial.println("SD card initialized successfully.");

  // Create or open a file on the SD card
  File dataFile = SD.open("example.txt", FILE_WRITE);
  if (dataFile) {
    dataFile.println("Hello, DFRobot MicroSD Card Module!");
    dataFile.close(); // Always close the file after writing
    Serial.println("Data written to example.txt.");
  } else {
    Serial.println("Error opening example.txt for writing.");
  }
}

void loop() {
  // Nothing to do here
}
Troubleshooting and FAQs
Common Issues and Solutions
SD Card Initialization Fails
- Cause: Incorrect wiring or incompatible card format.
- Solution: Double-check the wiring and ensure the MicroSD card is formatted to FAT16 or FAT32.
File Not Found or Cannot Be Opened
- Cause: The file does not exist or the file name is incorrect.
- Solution: Verify the file name and ensure it matches the case sensitivity of the file system.
Data Corruption
- Cause: Removing the MicroSD card while the module is powered or during a write operation.
- Solution: Avoid hot-swapping the card and ensure all files are closed properly in the code.
High Power Consumption
- Cause: The module is in active mode for extended periods.
- Solution: Use sleep modes or power down the module when not in use.
FAQs
Q: Can I use this module with a 3.3V microcontroller?
A: Yes, the module is compatible with both 3.3V and 5V systems due to its built-in voltage regulator and level shifters.
Q: What is the maximum capacity of the MicroSD card supported?
A: The module supports MicroSD cards up to 32GB formatted in FAT16 or FAT32.
Q: Can I use this module with other communication protocols like I2C?
A: No, the module only supports SPI communication.
Q: How do I check if the MicroSD card is inserted correctly?
A: Ensure the card clicks into place securely. You can also check for successful initialization in your code.