How to Use XIAO ESP32S3: Examples, Pinouts, and Specs
Introduction
The XIAO ESP32S3 by Seeed Studio is a compact and powerful microcontroller board built around the ESP32-S3 chip. It is specifically designed for IoT (Internet of Things) applications, offering built-in Wi-Fi and Bluetooth Low Energy (BLE) capabilities. With its small form factor and robust processing power, the XIAO ESP32S3 is ideal for projects requiring wireless connectivity, such as smart home devices, wearable electronics, and industrial IoT systems.
Explore Projects Built with XIAO ESP32S3


Explore Projects Built with XIAO ESP32S3
Common Applications and Use Cases
- IoT devices and smart home automation
- Wearable electronics
- Wireless data logging and monitoring
- Robotics and automation systems
- Prototyping for AI and machine learning at the edge
- Bluetooth-enabled devices
Technical Specifications
The XIAO ESP32S3 is packed with features that make it versatile and efficient for a wide range of applications. Below are its key technical details:
Key Technical Details
| Specification | Value |
|---|---|
| Microcontroller | ESP32-S3 (Xtensa® 32-bit LX7 dual-core) |
| Operating Voltage | 3.3V |
| Flash Memory | 8MB |
| PSRAM | 8MB |
| Wi-Fi Standard | 802.11 b/g/n (2.4 GHz) |
| Bluetooth | BLE 5.0 |
| GPIO Pins | 11 (including multifunctional pins) |
| ADC Resolution | 12-bit |
| Interfaces | I2C, SPI, UART, I2S, PWM |
| USB Interface | USB Type-C (supports programming and power) |
| Power Supply | 5V via USB Type-C or external battery |
| Dimensions | 21 x 17.5 mm |
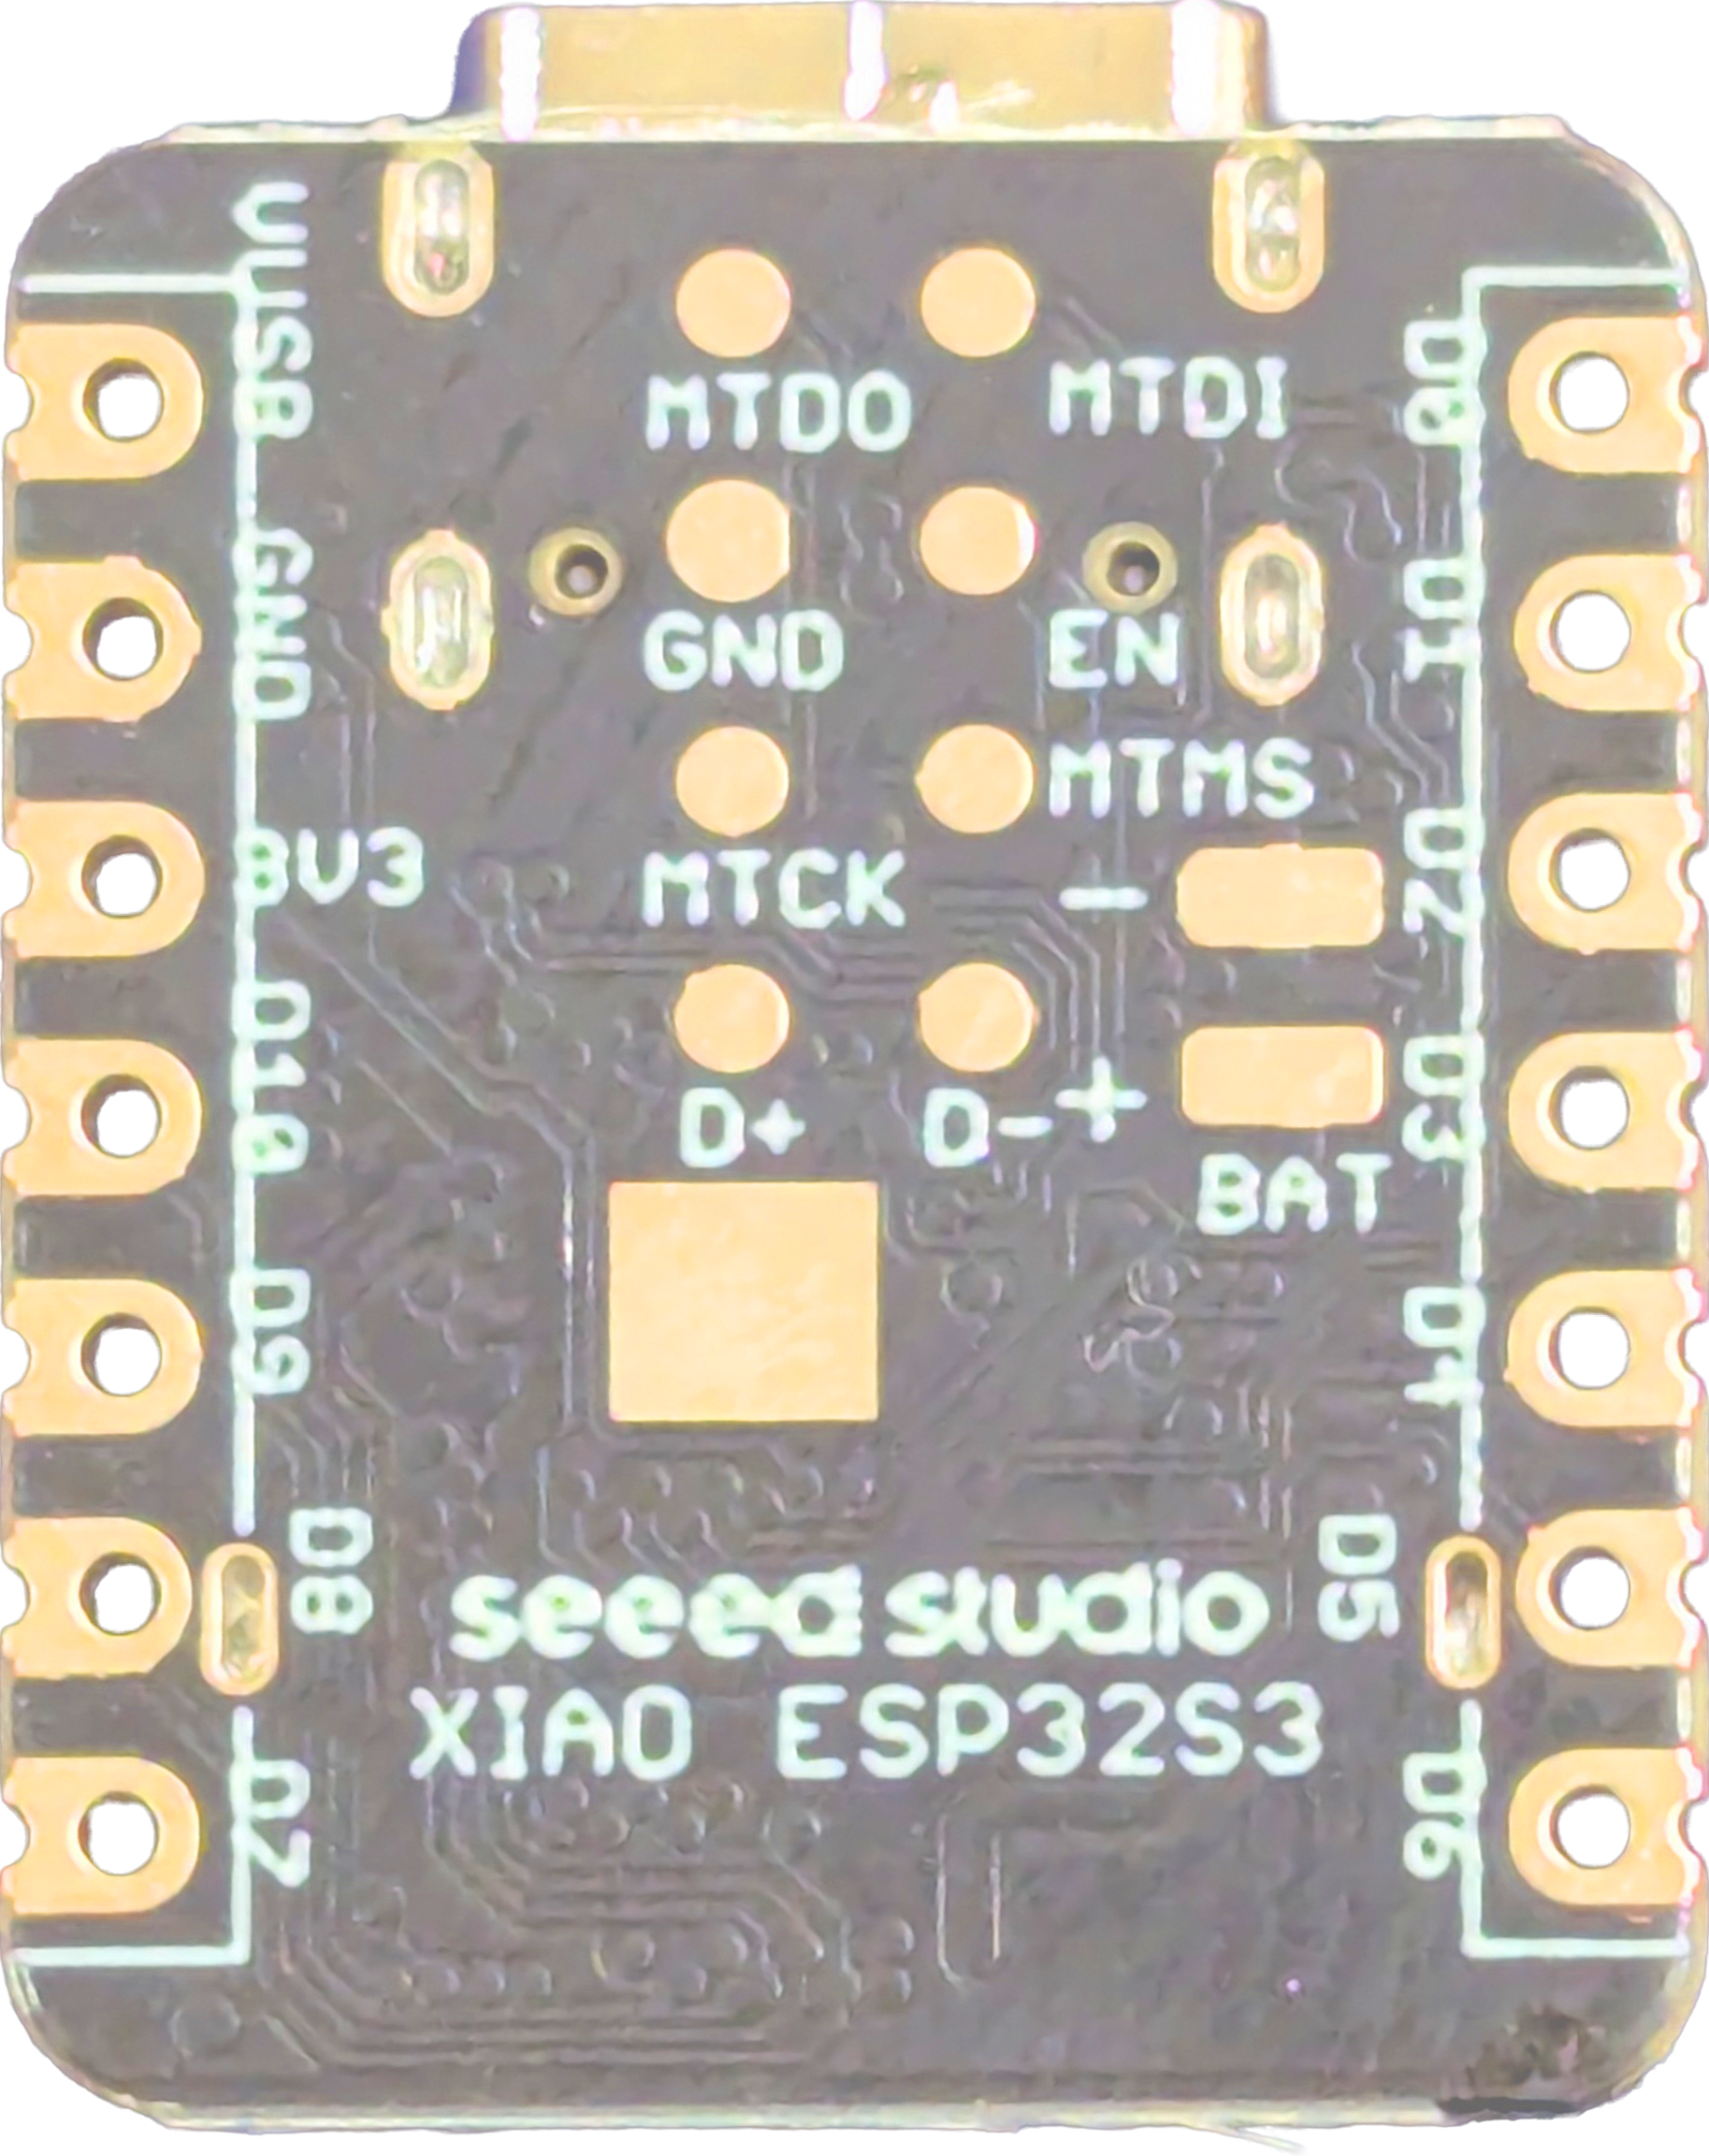
Pin Configuration and Descriptions
The XIAO ESP32S3 features a total of 14 pins, including power, GPIO, and communication pins. Below is the pinout description:
| Pin Number | Pin Name | Functionality |
|---|---|---|
| 1 | 3V3 | 3.3V power output |
| 2 | GND | Ground |
| 3 | GPIO0 | General-purpose I/O, ADC, PWM |
| 4 | GPIO1 | General-purpose I/O, ADC, PWM |
| 5 | GPIO2 | General-purpose I/O, ADC, PWM |
| 6 | GPIO3 | General-purpose I/O, ADC, PWM |
| 7 | GPIO4 | General-purpose I/O, ADC, PWM |
| 8 | GPIO5 | General-purpose I/O, ADC, PWM |
| 9 | RX | UART Receive |
| 10 | TX | UART Transmit |
| 11 | SCL | I2C Clock |
| 12 | SDA | I2C Data |
| 13 | USB_DM | USB Data- (for programming and communication) |
| 14 | USB_DP | USB Data+ (for programming and communication) |
Usage Instructions
How to Use the XIAO ESP32S3 in a Circuit
Powering the Board:
- Connect the XIAO ESP32S3 to a computer or power source using a USB Type-C cable.
- Alternatively, supply 5V to the board via an external battery or power supply.
Programming the Board:
- Install the Arduino IDE and add the ESP32 board package.
- Select "XIAO ESP32S3" as the target board in the Arduino IDE.
- Write your code and upload it to the board via the USB Type-C connection.
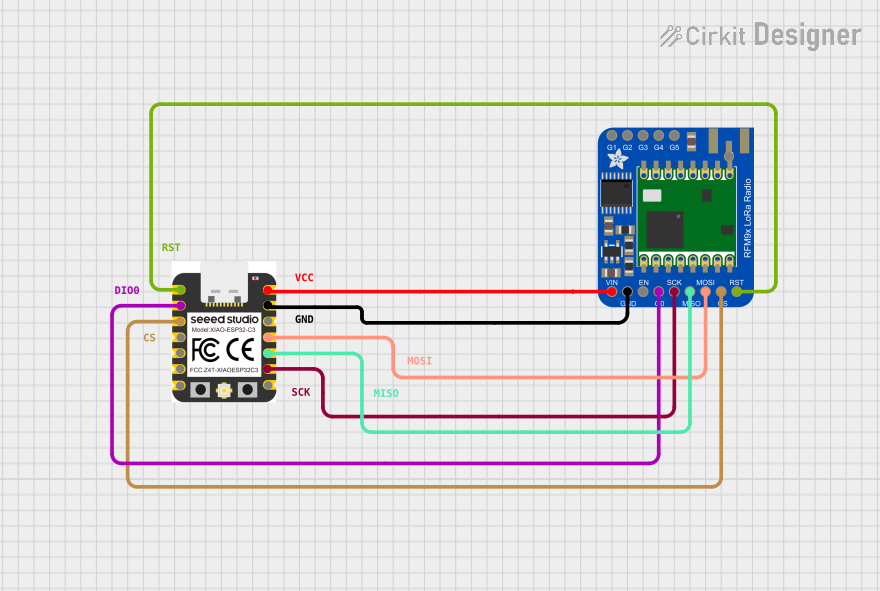
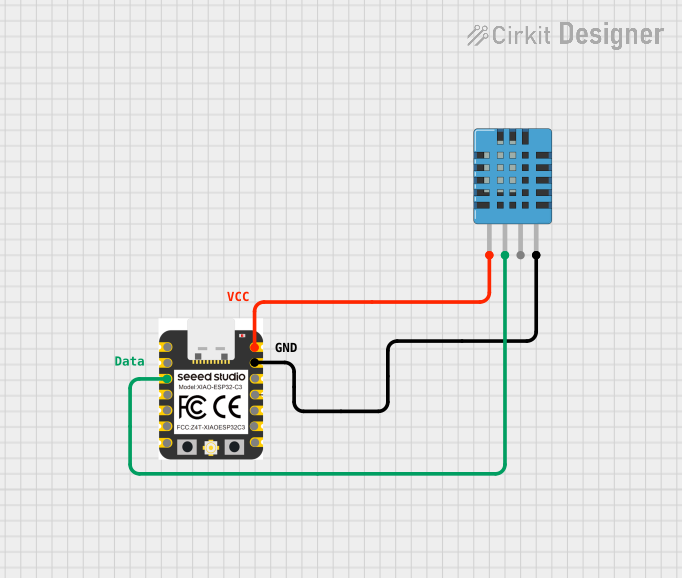
Connecting Peripherals:
- Use the GPIO pins to connect sensors, actuators, or other peripherals.
- Ensure that the voltage levels of connected devices are compatible with the 3.3V logic of the XIAO ESP32S3.
Wireless Connectivity:
- Use the built-in Wi-Fi for internet-based applications.
- Use BLE for short-range wireless communication with other devices.
Important Considerations and Best Practices
- Voltage Levels: Ensure that all connected peripherals operate at 3.3V logic levels to avoid damaging the board.
- Pin Multiplexing: Some pins have multiple functions (e.g., GPIO, ADC, PWM). Configure them appropriately in your code.
- Heat Management: While the board is efficient, prolonged high-performance tasks may generate heat. Ensure proper ventilation if necessary.
- Firmware Updates: Keep the ESP32-S3 firmware updated for optimal performance and security.
Example Code for Arduino UNO Integration
Below is an example of using the XIAO ESP32S3 to read data from a temperature sensor and send it to a smartphone via BLE:
#include <Wire.h>
#include <Adafruit_Sensor.h>
#include <Adafruit_BME280.h>
#include <BLEDevice.h>
#include <BLEServer.h>
#include <BLEUtils.h>
#include <BLE2902.h>

// Create a BME280 sensor object
Adafruit_BME280 bme;

// BLE service and characteristic UUIDs
#define SERVICE_UUID "12345678-1234-1234-1234-123456789abc"
#define CHARACTERISTIC_UUID "abcd1234-abcd-1234-abcd-123456789abc"

BLECharacteristic *pCharacteristic;

void setup() {
  Serial.begin(115200);

  // Initialize BME280 sensor
  if (!bme.begin(0x76)) {
    Serial.println("Could not find a valid BME280 sensor, check wiring!");
    while (1);
  }

  // Initialize BLE
  BLEDevice::init("XIAO ESP32S3");
  BLEServer *pServer = BLEDevice::createServer();
  BLEService *pService = pServer->createService(SERVICE_UUID);
  pCharacteristic = pService->createCharacteristic(
                      CHARACTERISTIC_UUID,
                      BLECharacteristic::PROPERTY_READ |
                      BLECharacteristic::PROPERTY_NOTIFY
                    );
  pCharacteristic->addDescriptor(new BLE2902());
  pService->start();
  BLEAdvertising *pAdvertising = BLEDevice::getAdvertising();
  pAdvertising->start();
}

void loop() {
  // Read temperature from BME280
  float temperature = bme.readTemperature();

  // Send temperature data via BLE
  char tempStr[8];
  dtostrf(temperature, 6, 2, tempStr);
  pCharacteristic->setValue(tempStr);
  pCharacteristic->notify();

  delay(1000); // Wait 1 second before sending the next reading
}
Troubleshooting and FAQs
Common Issues
Board Not Detected by Arduino IDE:
- Ensure the correct board and port are selected in the Arduino IDE.
- Install the ESP32 board package if not already installed.
Wi-Fi Connection Fails:
- Double-check the SSID and password in your code.
- Ensure the Wi-Fi network is operating on the 2.4 GHz band (not 5 GHz).
BLE Device Not Discoverable:
- Verify that BLE is initialized correctly in your code.
- Restart the board and the BLE scanning device.
Overheating:
- Avoid running high-power tasks continuously without proper ventilation.
Solutions and Tips for Troubleshooting
- Use a multimeter to check power supply voltages and ensure proper connections.
- Update the Arduino IDE and ESP32 board package to the latest versions.
- Refer to the Seeed Studio documentation for additional resources and support.