How to Use 5V 5A Raspberry Pi Power Supply 2: Examples, Pinouts, and Specs
Introduction
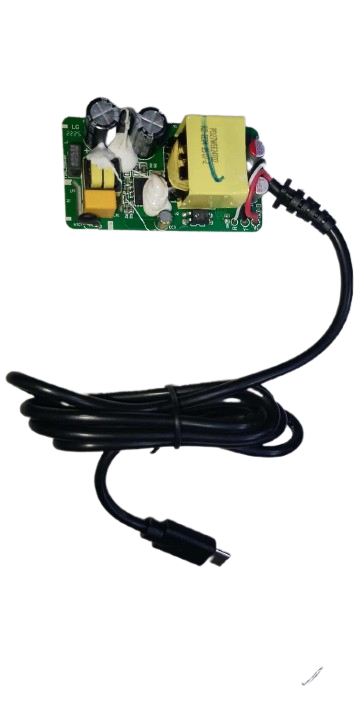
The 5V 5A Raspberry Pi Power Supply 2 is a high-quality power adapter designed to deliver a stable 5V output with a maximum current of 5A. This power supply is ideal for powering Raspberry Pi boards, single-board computers, and other devices requiring a reliable 5V power source. Its robust design ensures consistent performance, making it suitable for both hobbyist and professional applications.
Explore Projects Built with 5V 5A Raspberry Pi Power Supply 2

Explore Projects Built with 5V 5A Raspberry Pi Power Supply 2
Common Applications and Use Cases
- Powering Raspberry Pi boards (e.g., Raspberry Pi 4, Raspberry Pi 3)
- Supplying power to USB hubs, external hard drives, or SSDs
- Supporting IoT devices and embedded systems
- Providing power for LED strips or other 5V DC devices
- Use in prototyping and development environments
Technical Specifications
The following table outlines the key technical details of the 5V 5A Raspberry Pi Power Supply 2:
| Specification | Details |
|---|---|
| Output Voltage | 5V DC |
| Maximum Output Current | 5A |
| Input Voltage Range | 100-240V AC, 50/60Hz |
| Connector Type | USB-C (or Micro-USB, depending on model) |
| Cable Length | 1.5 meters (approx.) |
| Power Efficiency | >85% |
| Protection Features | Over-voltage, over-current, short-circuit protection |
Pin Configuration and Descriptions
For USB-C or Micro-USB connectors, the pin configuration is as follows:
USB-C Connector Pinout
| Pin | Name | Description |
|---|---|---|
| 1 | VBUS | +5V DC output |
| 2 | GND | Ground |
| 3 | CC1/CC2 | Configuration channel for USB-C devices |
| 4 | D+ | Data line (not used for power supply) |
| 5 | D- | Data line (not used for power supply) |
Micro-USB Connector Pinout (if applicable)
| Pin | Name | Description |
|---|---|---|
| 1 | VBUS | +5V DC output |
| 2 | D- | Data line (not used for power supply) |
| 3 | D+ | Data line (not used for power supply) |
| 4 | ID | Identification pin (not used for power supply) |
| 5 | GND | Ground |
Usage Instructions
How to Use the Component in a Circuit
Connect the Power Supply to the Device:
Plug the USB-C or Micro-USB connector into the power input port of your Raspberry Pi or compatible device.Ensure Proper Voltage and Current Requirements:
Verify that the device being powered requires a 5V input and does not exceed the 5A current limit.Plug into a Power Outlet:
Connect the power supply to a standard AC outlet (100-240V AC). The power supply will automatically regulate the output to 5V DC.Monitor Device Operation:
Ensure that the device powers on and operates correctly. If the device does not power on, check the connections and ensure the power supply is functioning.
Important Considerations and Best Practices
- Avoid Overloading: Do not connect devices that draw more than 5A, as this may damage the power supply or connected devices.
- Use Proper Connectors: Ensure the connector type (USB-C or Micro-USB) matches the input port of your device.
- Ventilation: Place the power supply in a well-ventilated area to prevent overheating.
- Check Compatibility: Confirm that the power supply is compatible with your device before use.
- Avoid Modifications: Do not attempt to modify the power supply, as this may void the warranty and compromise safety.
Example: Powering a Raspberry Pi 4 with an Arduino UNO
If you are using the power supply to power a Raspberry Pi 4 and connect it to an Arduino UNO for a project, follow these steps:
- Connect the 5V 5A power supply to the Raspberry Pi 4 using the USB-C connector.
- Use a USB cable to connect the Raspberry Pi 4 to the Arduino UNO.
- Write and upload the following code to the Arduino UNO to communicate with the Raspberry Pi:
// Example Arduino code to send data to a Raspberry Pi
// Ensure the Raspberry Pi is powered by the 5V 5A power supply

void setup() {
  Serial.begin(9600); // Initialize serial communication at 9600 baud
}

void loop() {
  Serial.println("Hello from Arduino!"); // Send a message to the Raspberry Pi
  delay(1000); // Wait for 1 second before sending the next message
}
Troubleshooting and FAQs
Common Issues Users Might Face
Device Does Not Power On:
- Cause: Loose connection or incompatible connector type.
- Solution: Check all connections and ensure the connector matches the device's input port.
Power Supply Overheats:
- Cause: Insufficient ventilation or excessive current draw.
- Solution: Place the power supply in a well-ventilated area and ensure the connected device does not exceed the 5A limit.
Intermittent Power Loss:
- Cause: Faulty cable or connector.
- Solution: Inspect the cable and connector for damage and replace if necessary.
Device Restarts Unexpectedly:
- Cause: Voltage drop due to high current draw.
- Solution: Ensure the total current draw of connected devices does not exceed 5A.
Solutions and Tips for Troubleshooting
- Use a multimeter to verify the output voltage of the power supply.
- Test the power supply with a different device to rule out issues with the connected device.
- If the power supply fails to operate, contact the manufacturer for support or replacement.
By following this documentation, you can effectively use the 5V 5A Raspberry Pi Power Supply 2 to power your devices safely and efficiently.