How to Use SAM M10Q : Examples, Pinouts, and Specs
Introduction
The SAM M10Q, manufactured by u-blox, is a low-power, high-performance microcontroller designed specifically for Internet of Things (IoT) applications. It is built around a 32-bit ARM Cortex-M0+ core and integrates wireless connectivity, making it ideal for applications requiring efficient communication and control. The SAM M10Q also features a range of peripherals for interfacing with sensors, actuators, and other devices, making it a versatile choice for embedded systems.
Explore Projects Built with SAM M10Q


Explore Projects Built with SAM M10Q
Common Applications and Use Cases
- Smart home devices (e.g., thermostats, lighting systems)
- Industrial IoT (e.g., predictive maintenance, asset tracking)
- Wearable technology
- Environmental monitoring systems
- Wireless sensor networks
- Low-power data acquisition systems
Technical Specifications
Key Technical Details
| Parameter | Value |
|---|---|
| Core Architecture | ARM Cortex-M0+ |
| Operating Voltage | 1.8V to 3.6V |
| Clock Speed | Up to 48 MHz |
| Flash Memory | 256 KB |
| SRAM | 32 KB |
| Wireless Connectivity | Integrated (e.g., Bluetooth, Wi-Fi, etc.) |
| GPIO Pins | Up to 32 |
| Communication Interfaces | UART, SPI, I2C, CAN, USB |
| ADC Resolution | 12-bit |
| Power Consumption | Ultra-low power (optimized for IoT) |
| Package Type | QFN-40 |
| Operating Temperature Range | -40°C to +85°C |
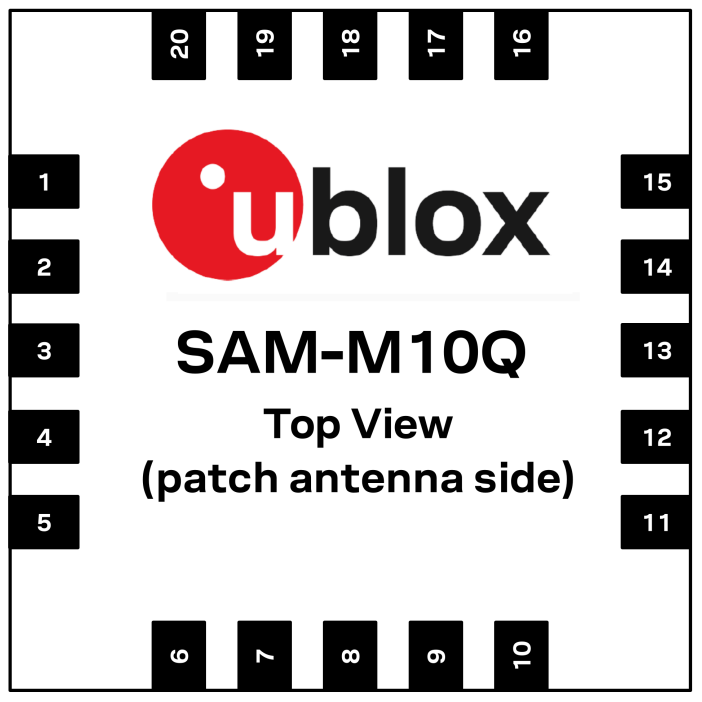
Pin Configuration and Descriptions
The SAM M10Q comes in a QFN-40 package with the following pin configuration:
| Pin Number | Pin Name | Description |
|---|---|---|
| 1 | VDD | Power supply (1.8V to 3.6V) |
| 2 | GND | Ground |
| 3 | GPIO1 | General-purpose I/O |
| 4 | GPIO2 | General-purpose I/O |
| 5 | UART_TX | UART Transmit |
| 6 | UART_RX | UART Receive |
| 7 | SPI_MOSI | SPI Master Out Slave In |
| 8 | SPI_MISO | SPI Master In Slave Out |
| 9 | SPI_SCK | SPI Clock |
| 10 | I2C_SCL | I2C Clock |
| 11 | I2C_SDA | I2C Data |
| 12 | ADC_IN1 | Analog-to-Digital Converter Input 1 |
| 13 | ADC_IN2 | Analog-to-Digital Converter Input 2 |
| 14 | RESET | Reset Pin |
| 15-40 | GPIO3-32 | Additional General-purpose I/O pins |
Usage Instructions
How to Use the SAM M10Q in a Circuit
- Power Supply: Connect the VDD pin to a stable power source (1.8V to 3.6V) and the GND pin to ground.
- Programming: Use the UART_TX and UART_RX pins for programming and debugging. A USB-to-UART converter can be used for interfacing with a PC.
- Peripheral Connections:
- Use the SPI or I2C pins to connect external sensors or actuators.
- Connect analog sensors to the ADC_IN pins for data acquisition.
- Wireless Communication: Configure the integrated wireless module (e.g., Bluetooth or Wi-Fi) using the appropriate firmware or software tools provided by u-blox.
- GPIO Usage: Configure the GPIO pins as input or output depending on your application requirements.
Important Considerations and Best Practices
- Power Management: Utilize the low-power modes of the SAM M10Q to extend battery life in IoT applications.
- Decoupling Capacitors: Place decoupling capacitors (e.g., 0.1 µF) close to the VDD pin to ensure stable operation.
- Reset Circuit: Connect a pull-up resistor (e.g., 10 kΩ) to the RESET pin to prevent accidental resets.
- Firmware Updates: Regularly update the firmware to ensure compatibility with the latest wireless protocols and security standards.
Example: Connecting SAM M10Q to an Arduino UNO
The SAM M10Q can be interfaced with an Arduino UNO via UART for communication. Below is an example Arduino sketch to send data to the SAM M10Q:
// Example: Sending data from Arduino UNO to SAM M10Q via UART

void setup() {
  Serial.begin(9600); // Initialize UART communication at 9600 baud
  delay(1000);        // Wait for the SAM M10Q to initialize
}

void loop() {
  Serial.println("Hello, SAM M10Q!"); // Send a message to the SAM M10Q
  delay(1000);                        // Wait 1 second before sending again
}
Troubleshooting and FAQs
Common Issues and Solutions
Issue: The SAM M10Q does not power on.
- Solution: Verify that the VDD pin is connected to a stable power source within the specified voltage range (1.8V to 3.6V). Check for proper grounding.
Issue: UART communication is not working.
- Solution: Ensure that the UART_TX and UART_RX pins are correctly connected to the corresponding pins on the external device. Verify the baud rate settings.
Issue: Wireless connectivity is unstable.
- Solution: Check the antenna connection and ensure that the firmware is up to date. Avoid placing the SAM M10Q near sources of electromagnetic interference.
Issue: GPIO pins are not responding.
- Solution: Confirm that the GPIO pins are correctly configured as input or output in the firmware. Check for any short circuits or incorrect connections.
FAQs
Q: Can the SAM M10Q operate at 5V?
- A: No, the SAM M10Q operates within a voltage range of 1.8V to 3.6V. Exceeding this range may damage the component.
Q: Does the SAM M10Q support external interrupts?
- A: Yes, the GPIO pins can be configured to support external interrupts.
Q: How do I update the firmware on the SAM M10Q?
- A: Firmware updates can be performed via the UART interface or using the tools provided by u-blox. Refer to the manufacturer's documentation for detailed instructions.
Q: Is the SAM M10Q suitable for battery-powered applications?
- A: Yes, the SAM M10Q is optimized for low-power operation, making it ideal for battery-powered IoT devices.