How to Use I2C port expander: Examples, Pinouts, and Specs

Introduction
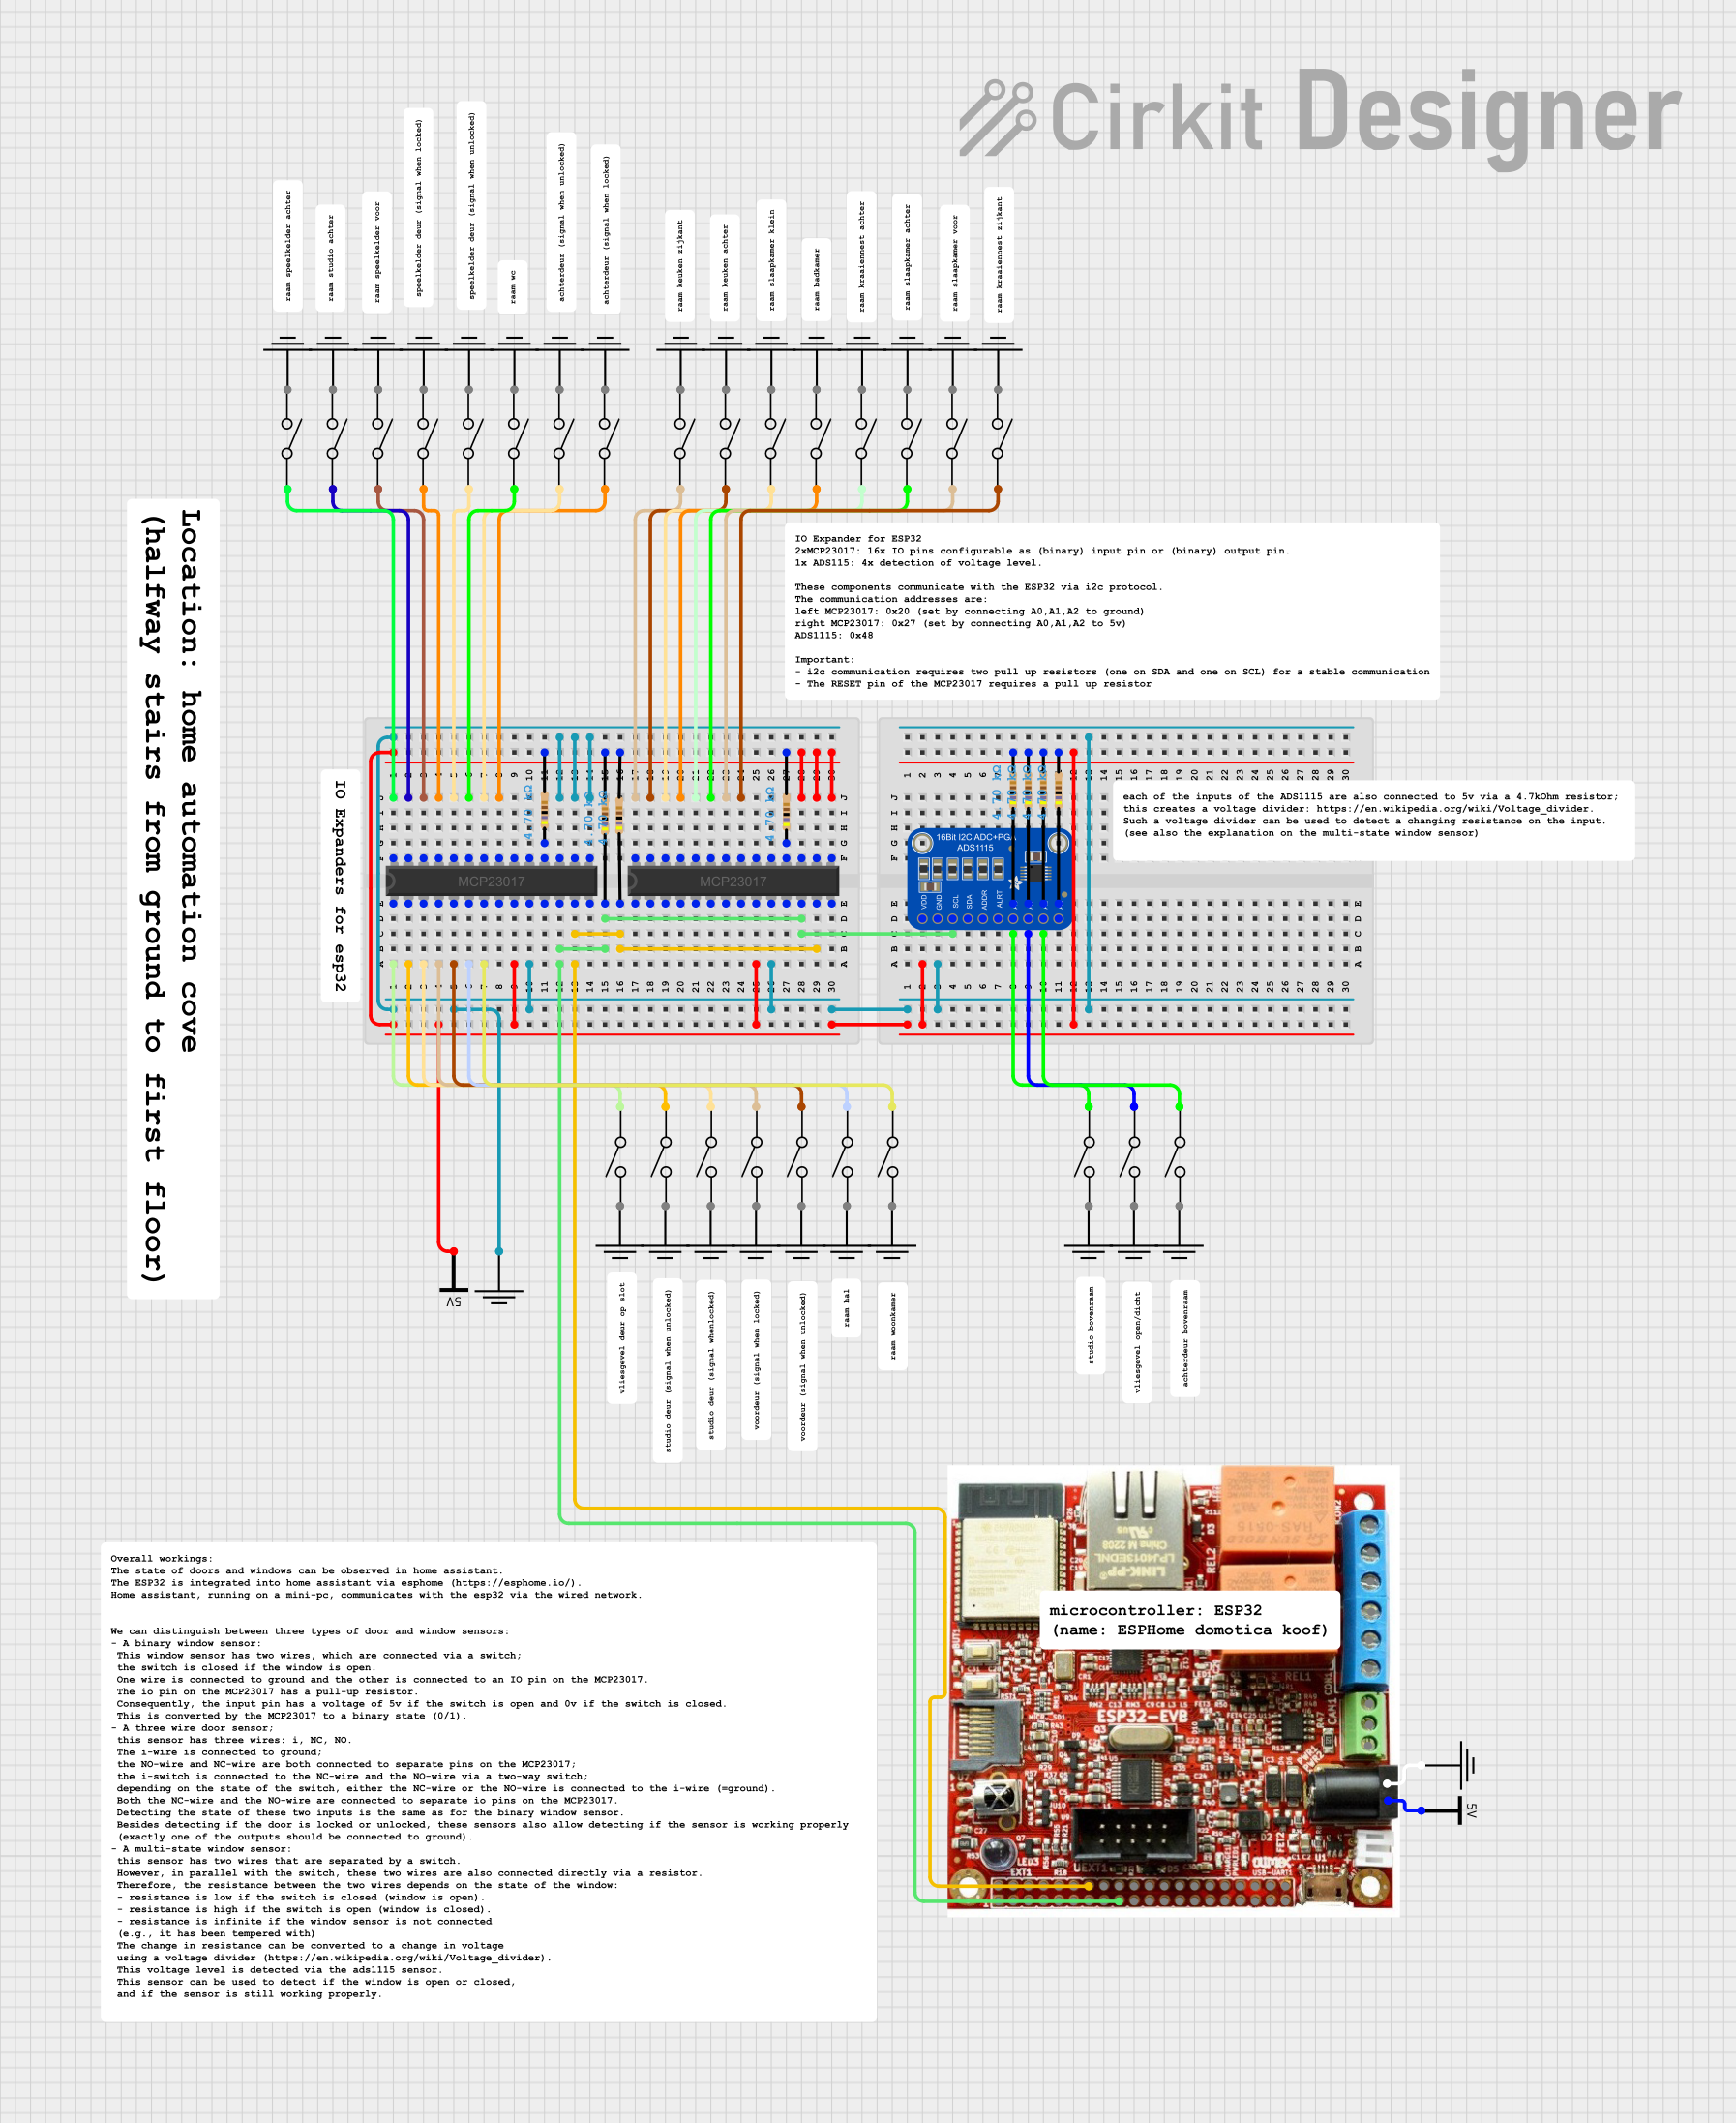
The I2C Port Expander is a versatile electronic component designed to increase the number of available input/output (I/O) pins on a microcontroller. It achieves this by utilizing the I2C (Inter-Integrated Circuit) communication protocol, which allows multiple devices to communicate over just two wires: SDA (data line) and SCL (clock line). This makes it an ideal solution for projects requiring additional I/O pins without increasing the complexity of wiring.
Explore Projects Built with I2C port expander


Explore Projects Built with I2C port expander
Common Applications and Use Cases
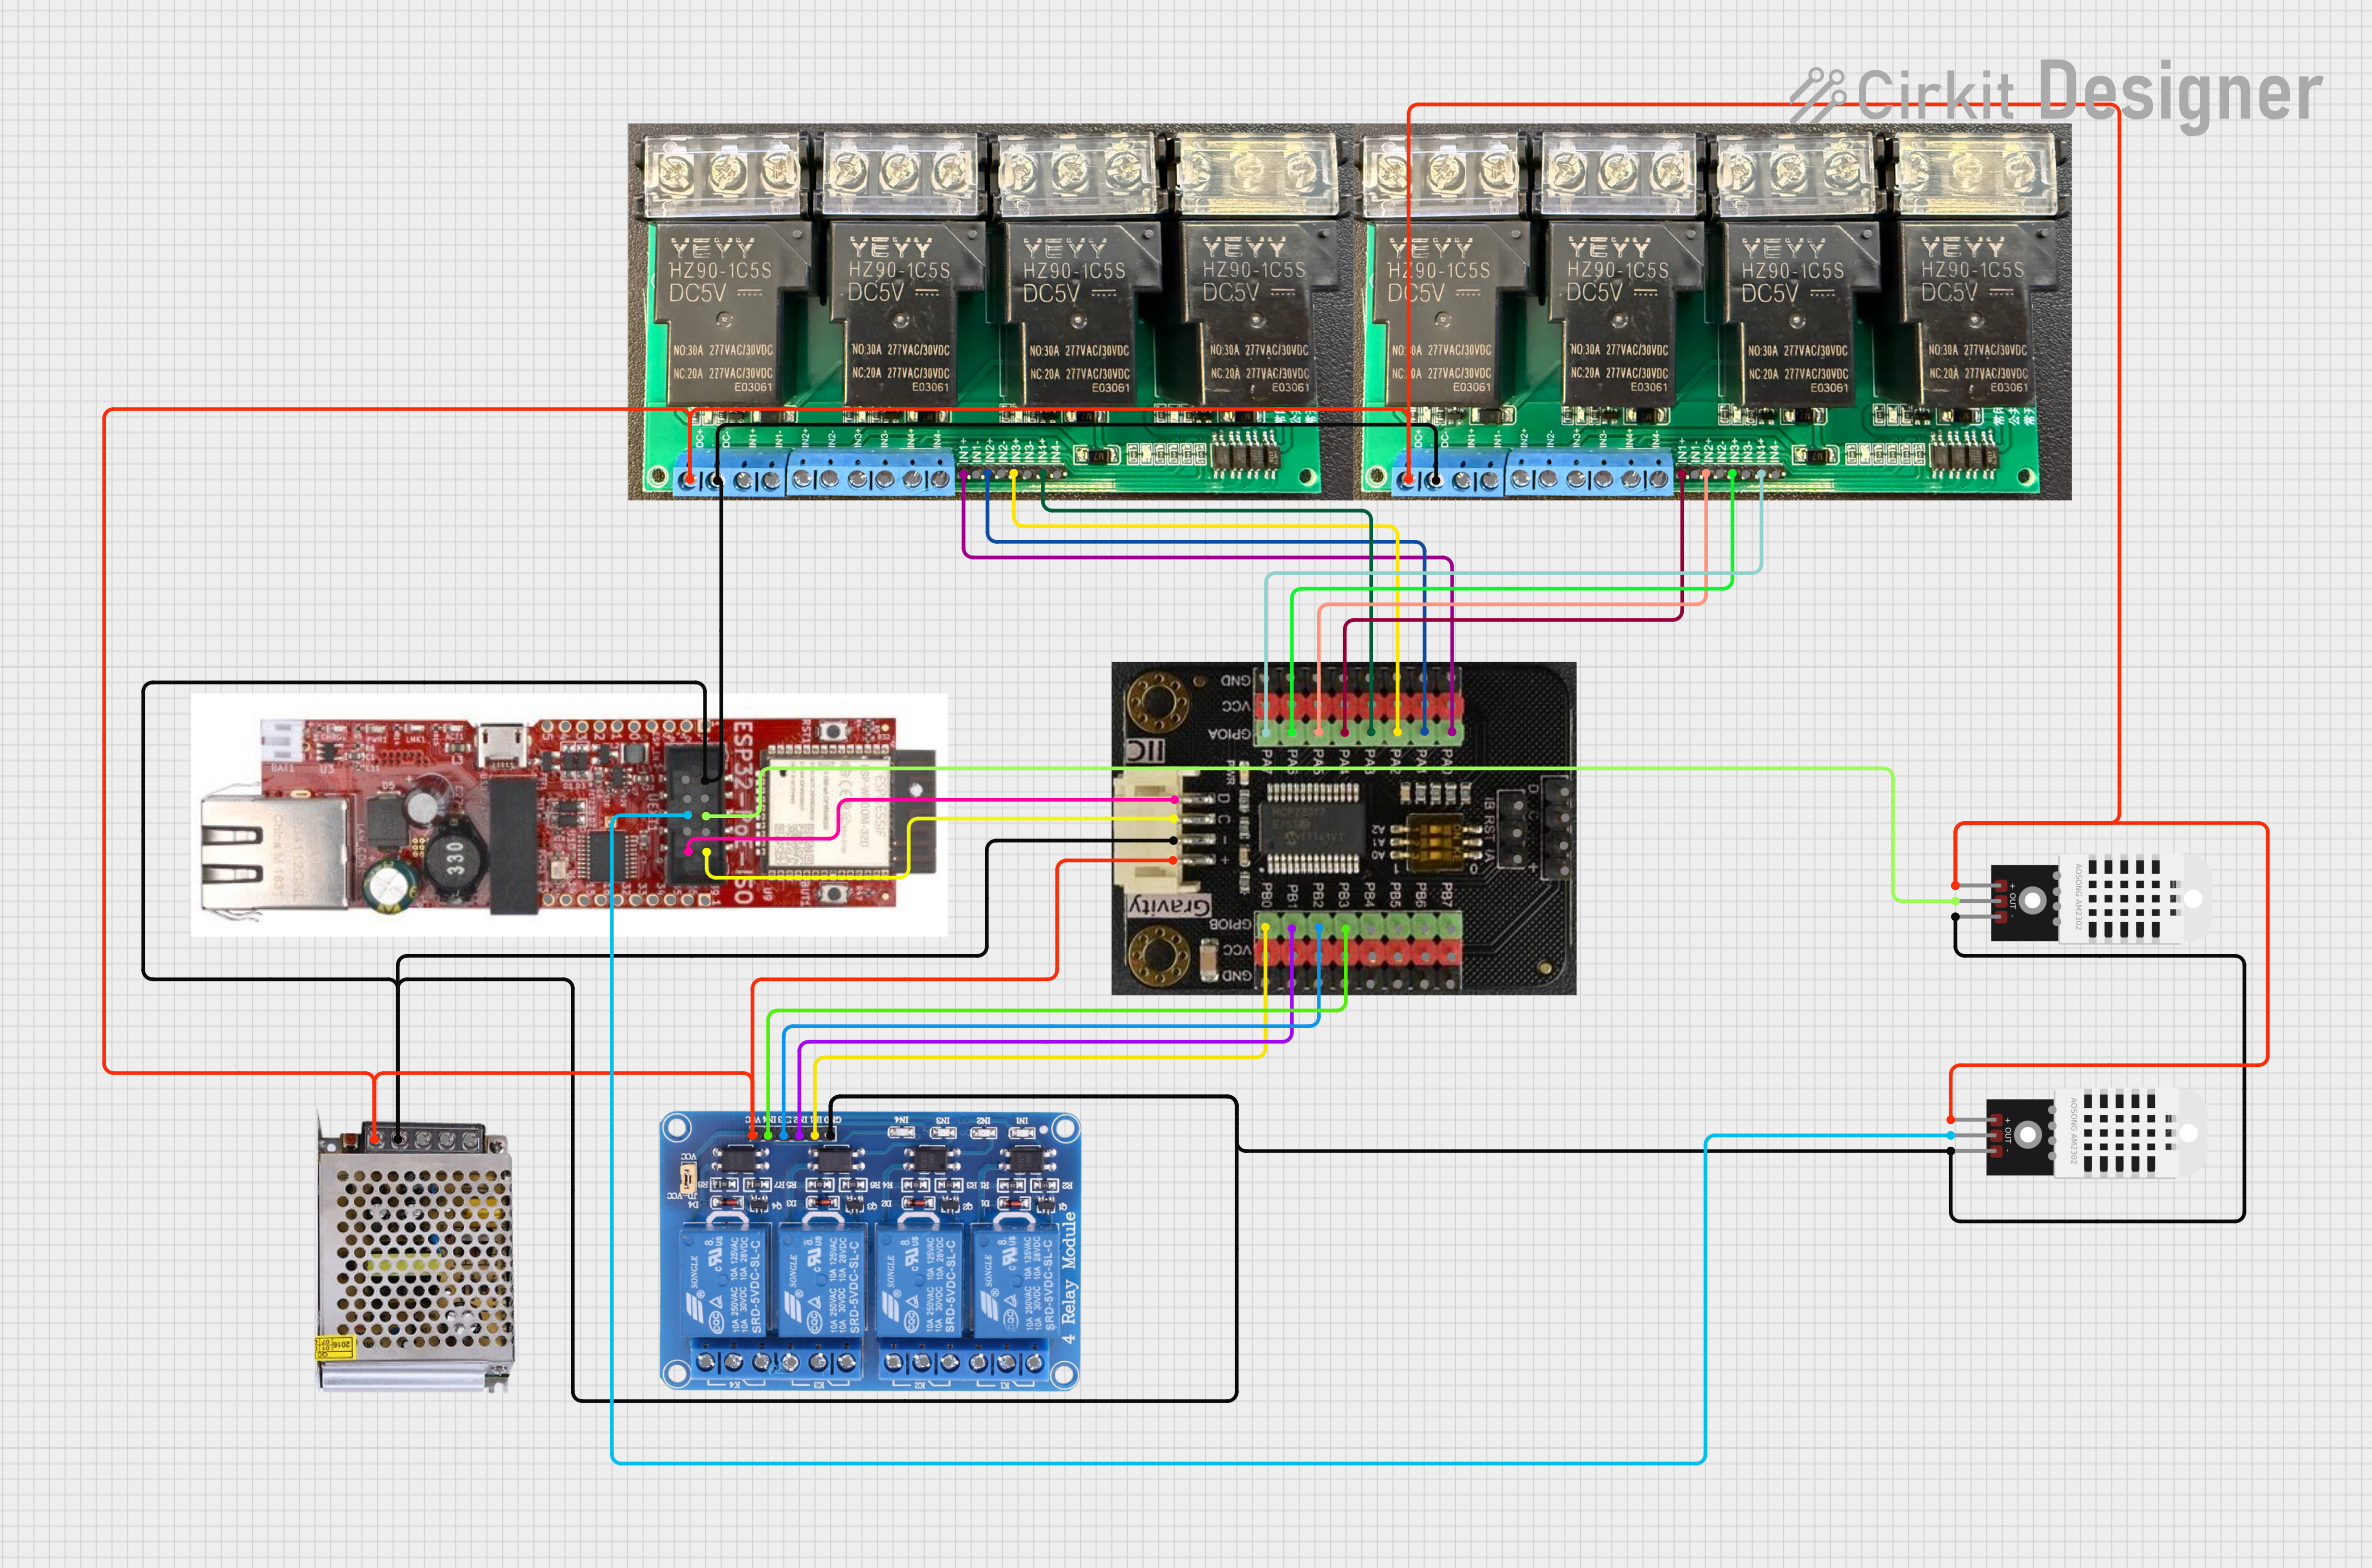
- Expanding the number of GPIO pins for microcontrollers like Arduino, Raspberry Pi, or ESP32.
- Controlling multiple LEDs, relays, or other output devices.
- Reading inputs from multiple buttons, switches, or sensors.
- Building modular systems with multiple I2C devices on the same bus.
- Reducing wiring complexity in large-scale projects.
Technical Specifications
Below are the general technical specifications for a typical I2C Port Expander, such as the popular PCF8574 or MCP23017:
Key Technical Details
- Operating Voltage: 2.5V to 5.5V (varies by model)
- I2C Address Range: Configurable via address pins (typically 0x20 to 0x27 for 3-bit addressing)
- Maximum I2C Clock Speed: 400 kHz (Fast Mode I2C)
- Number of I/O Pins: 8 (PCF8574) or 16 (MCP23017)
- Output Current: Typically 25 mA per pin (sink/source capability)
- Input Type: Digital (with optional pull-up resistors)
- Package Types: DIP, SOIC, or QFN
Pin Configuration and Descriptions
Example: PCF8574 (8-bit I2C Port Expander)
| Pin Number | Pin Name | Description |
|---|---|---|
| 1 | A0 | Address selection pin (LSB of I2C address) |
| 2 | A1 | Address selection pin |
| 3 | A2 | Address selection pin (MSB of I2C address) |
| 4 | GND | Ground connection |
| 5-12 | P0-P7 | General-purpose I/O pins |
| 13 | INT | Interrupt output (active low, triggered by input state change) |
| 14 | SDA | I2C data line |
| 15 | SCL | I2C clock line |
| 16 | VCC | Power supply (2.5V to 5.5V) |
Example: MCP23017 (16-bit I2C Port Expander)
| Pin Number | Pin Name | Description |
|---|---|---|
| 1-8 | GPA0-GPA7 | General-purpose I/O pins (Port A) |
| 9 | VDD | Power supply (2.5V to 5.5V) |
| 10 | INT A | Interrupt output for Port A (active low) |
| 11 | INT B | Interrupt output for Port B (active low) |
| 12 | SDA | I2C data line |
| 13 | SCL | I2C clock line |
| 14 | RESET | Active-low reset input |
| 15-22 | GPB0-GPB7 | General-purpose I/O pins (Port B) |
| 23 | A0 | Address selection pin (LSB of I2C address) |
| 24 | A1 | Address selection pin |
| 25 | A2 | Address selection pin (MSB of I2C address) |
| 26 | GND | Ground connection |
Usage Instructions
How to Use the Component in a Circuit
- Connect Power and Ground: Connect the VCC pin to the microcontroller's power supply (e.g., 3.3V or 5V) and the GND pin to ground.
- Connect I2C Lines: Connect the SDA and SCL pins to the corresponding I2C pins on the microcontroller. Use pull-up resistors (typically 4.7kΩ) on both lines if not already present.
- Set the I2C Address: Configure the address pins (A0, A1, A2) to set the I2C address. This allows multiple expanders to share the same I2C bus.
- Connect I/O Devices: Attach your input or output devices (e.g., LEDs, buttons, sensors) to the I/O pins (P0-P7 for PCF8574 or GPA0-GPB7 for MCP23017).
- Write Code: Use a microcontroller library (e.g., Wire.h for Arduino) to communicate with the expander and control the I/O pins.
Important Considerations and Best Practices
- I2C Address Conflicts: Ensure that no two devices on the same I2C bus share the same address.
- Interrupt Pin: Use the INT pin for efficient event-driven programming, especially when monitoring inputs.
- Voltage Compatibility: Verify that the expander's operating voltage matches the microcontroller's logic level.
- Pull-Up Resistors: If the I2C bus does not already have pull-up resistors, add them to SDA and SCL lines.
Example Code for Arduino UNO
Below is an example of using the PCF8574 to control LEDs and read button states:
#include <Wire.h> // Include the Wire library for I2C communication

#define I2C_ADDRESS 0x20 // I2C address of the PCF8574 (configured via A0, A1, A2)

void setup() {
  Wire.begin(); // Initialize I2C communication
  Serial.begin(9600); // Start serial communication for debugging

  // Set all pins as outputs (write 0x00 to the expander)
  Wire.beginTransmission(I2C_ADDRESS);
  Wire.write(0x00); // All pins low (outputs)
  Wire.endTransmission();
}

void loop() {
  // Example: Toggle an LED connected to P0
  Wire.beginTransmission(I2C_ADDRESS);
  Wire.write(0x01); // Set P0 high, others low
  Wire.endTransmission();
  delay(500); // Wait 500ms

  Wire.beginTransmission(I2C_ADDRESS);
  Wire.write(0x00); // Set all pins low
  Wire.endTransmission();
  delay(500); // Wait 500ms
}
Troubleshooting and FAQs
Common Issues and Solutions
I2C Device Not Detected:
- Ensure the SDA and SCL lines are correctly connected.
- Check for proper pull-up resistors on the I2C bus.
- Verify the I2C address configuration (A0, A1, A2 pins).
Incorrect Output Behavior:
- Confirm that the expander's operating voltage matches the microcontroller's logic level.
- Check for loose or incorrect wiring to the I/O pins.
Interrupt Pin Not Working:
- Ensure the INT pin is connected to a digital input pin on the microcontroller.
- Verify that the expander is configured to generate interrupts.
Multiple Devices on the Same Bus:
- Check for address conflicts and reconfigure the address pins if necessary.
FAQs
Q: Can I use multiple I2C Port Expanders on the same bus?
A: Yes, as long as each expander has a unique I2C address. Configure the address pins (A0, A1, A2) accordingly.
Q: Do I need external pull-up resistors for the I2C lines?
A: Yes, if your microcontroller or other devices on the bus do not already include them.
Q: Can the expander handle analog signals?
A: No, I2C Port Expanders are designed for digital I/O only. Use an ADC (Analog-to-Digital Converter) for analog signals.