Cirkit Designer Logo
Cirkit Designer
Your all-in-one circuit design IDE
Home / 
Component Documentation

How to Use Seeeduino XIAO: Examples, Pinouts, and Specs

Image of Seeeduino XIAO
Cirkit Designer LogoDesign with Seeeduino XIAO in Cirkit Designer

Introduction

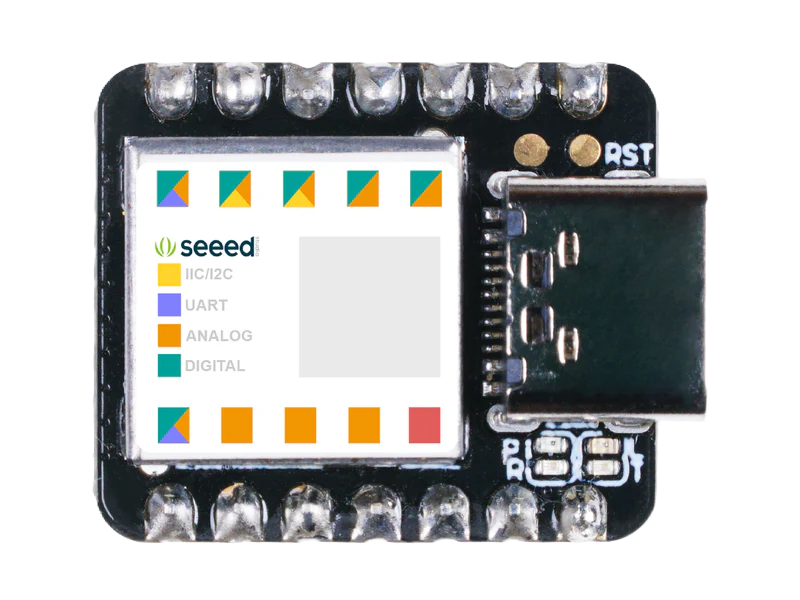
The Seeeduino XIAO (Manufacturer Part ID: 102010328) is a compact and powerful microcontroller board developed by Seeed Technology Co., Ltd. It is based on the Microchip SAMD21G18 ARM Cortex-M0+ 32-bit microcontroller, making it an excellent choice for IoT applications, wearable devices, and other embedded systems. Despite its small size (20mm x 17.5mm), the Seeeduino XIAO offers robust functionality, including multiple GPIO pins, USB-C connectivity, and compatibility with the Arduino IDE.

Explore Projects Built with Seeeduino XIAO

Use Cirkit Designer to design, explore, and prototype these projects online. Some projects support real-time simulation. Click "Open Project" to start designing instantly!
Solar-Powered GSM/GPRS+GPS Tracker with Seeeduino XIAO
Image of SOS System : A project utilizing Seeeduino XIAO in a practical application
This circuit features an Ai Thinker A9G development board for GSM/GPRS and GPS/BDS connectivity, interfaced with a Seeeduino XIAO microcontroller for control and data processing. A solar cell, coupled with a TP4056 charging module, charges a 3.3V battery, which powers the system through a 3.3V regulator ensuring stable operation. The circuit likely serves for remote data communication and location tracking, with the capability to be powered by renewable energy and interfaced with additional sensors or input devices via the Seeeduino XIAO.
Cirkit Designer LogoOpen Project in Cirkit Designer
ESP8266 and Arduino UNO Based Robotic Controller with Ultrasonic Sensing and GSM Communication
Image of automatic waste segregator: A project utilizing Seeeduino XIAO in a practical application
This circuit is designed for automated control and monitoring, featuring an ESP8266 for servo motor control and LCD interfacing, an ESP32 CAM for visual tasks, and an Arduino UNO for ultrasonic distance sensing and GSM communication via SIM900A. Power regulation is managed by XL6015 buck converters, stepping down from a 12V supply.
Cirkit Designer LogoOpen Project in Cirkit Designer
Arduino UNO Bluetooth-Controlled Audio Player with I2C LCD Display
Image of pookibot: A project utilizing Seeeduino XIAO in a practical application
This circuit features an Arduino UNO microcontroller powered by a lipo battery, interfaced with an HC-05 Bluetooth Module for wireless communication and a DFPlayer MINI for audio playback through a connected loudspeaker. An I2C LCD 16x2 Screen is included for display purposes, with the Arduino facilitating control and data exchange between the components. The provided code skeleton suggests that the Arduino is programmed using the Arduino IDE, but the specific functionality is not implemented in the given code.
Cirkit Designer LogoOpen Project in Cirkit Designer
ESP32C3-Based Environmental and Health Monitoring System with BME280 and MAX30102 Sensors
Image of Petora_protoboard_v1: A project utilizing Seeeduino XIAO in a practical application
This circuit features an XIAO ESP32C3 microcontroller interfaced with a BME/BMP280 sensor for environmental data and a MAX30102 sensor for heart rate and oxygen level monitoring. The microcontroller reads data from these sensors via I2C communication and includes a simple program to blink an LED and print a test message to the serial monitor.
Cirkit Designer LogoOpen Project in Cirkit Designer

Explore Projects Built with Seeeduino XIAO

Use Cirkit Designer to design, explore, and prototype these projects online. Some projects support real-time simulation. Click "Open Project" to start designing instantly!
Image of SOS System : A project utilizing Seeeduino XIAO in a practical application
Solar-Powered GSM/GPRS+GPS Tracker with Seeeduino XIAO
This circuit features an Ai Thinker A9G development board for GSM/GPRS and GPS/BDS connectivity, interfaced with a Seeeduino XIAO microcontroller for control and data processing. A solar cell, coupled with a TP4056 charging module, charges a 3.3V battery, which powers the system through a 3.3V regulator ensuring stable operation. The circuit likely serves for remote data communication and location tracking, with the capability to be powered by renewable energy and interfaced with additional sensors or input devices via the Seeeduino XIAO.
Cirkit Designer LogoOpen Project in Cirkit Designer
Image of automatic waste segregator: A project utilizing Seeeduino XIAO in a practical application
ESP8266 and Arduino UNO Based Robotic Controller with Ultrasonic Sensing and GSM Communication
This circuit is designed for automated control and monitoring, featuring an ESP8266 for servo motor control and LCD interfacing, an ESP32 CAM for visual tasks, and an Arduino UNO for ultrasonic distance sensing and GSM communication via SIM900A. Power regulation is managed by XL6015 buck converters, stepping down from a 12V supply.
Cirkit Designer LogoOpen Project in Cirkit Designer
Image of pookibot: A project utilizing Seeeduino XIAO in a practical application
Arduino UNO Bluetooth-Controlled Audio Player with I2C LCD Display
This circuit features an Arduino UNO microcontroller powered by a lipo battery, interfaced with an HC-05 Bluetooth Module for wireless communication and a DFPlayer MINI for audio playback through a connected loudspeaker. An I2C LCD 16x2 Screen is included for display purposes, with the Arduino facilitating control and data exchange between the components. The provided code skeleton suggests that the Arduino is programmed using the Arduino IDE, but the specific functionality is not implemented in the given code.
Cirkit Designer LogoOpen Project in Cirkit Designer
Image of Petora_protoboard_v1: A project utilizing Seeeduino XIAO in a practical application
ESP32C3-Based Environmental and Health Monitoring System with BME280 and MAX30102 Sensors
This circuit features an XIAO ESP32C3 microcontroller interfaced with a BME/BMP280 sensor for environmental data and a MAX30102 sensor for heart rate and oxygen level monitoring. The microcontroller reads data from these sensors via I2C communication and includes a simple program to blink an LED and print a test message to the serial monitor.
Cirkit Designer LogoOpen Project in Cirkit Designer

Common Applications and Use Cases

  • IoT (Internet of Things) devices
  • Wearable electronics
  • Prototyping for embedded systems
  • Robotics and automation
  • Sensor data acquisition and processing
  • Compact DIY projects requiring low power consumption

Technical Specifications

Key Technical Details

Parameter Specification
Microcontroller Microchip SAMD21G18 (ARM Cortex-M0+)
Operating Voltage 3.3V
Input Voltage (USB-C) 5V
Digital I/O Pins 11
PWM Pins 11
Analog Input Pins 6 (12-bit ADC)
Analog Output Pins 1 (10-bit DAC)
Flash Memory 256 KB
SRAM 32 KB
Clock Speed 48 MHz
USB Interface USB-C (supports programming and power)
Dimensions 20mm x 17.5mm
Weight 2g

Pin Configuration and Descriptions

The Seeeduino XIAO features 14 pins, including power, digital, and analog pins. Below is the pinout description:

Pin Number Pin Name Functionality
1 3.3V Power output (3.3V)
2 GND Ground
3 A0/D0 Analog input (A0) / Digital I/O (D0)
4 A1/D1 Analog input (A1) / Digital I/O (D1)
5 A2/D2 Analog input (A2) / Digital I/O (D2)
6 A3/D3 Analog input (A3) / Digital I/O (D3)
7 A4/D4 Analog input (A4) / Digital I/O (D4)
8 A5/D5 Analog input (A5) / Digital I/O (D5)
9 D6 Digital I/O (D6)
10 D7 Digital I/O (D7)
11 D8 Digital I/O (D8)
12 D9 Digital I/O (D9)
13 SWCLK Debugging (SWD Clock)
14 SWDIO Debugging (SWD I/O)

Usage Instructions

How to Use the Seeeduino XIAO in a Circuit

  1. Powering the Board:

    • Connect the Seeeduino XIAO to your computer or power source using a USB-C cable. The board operates at 3.3V internally, but the USB-C port accepts 5V input.
  2. Programming the Board:

    • Install the Arduino IDE and add the Seeeduino XIAO board package via the Arduino Boards Manager.
    • Select "Seeeduino XIAO" as the board type and the appropriate COM port.
    • Write your code and upload it to the board using the USB-C connection.
  3. Connecting Peripherals:

    • Use the GPIO pins for connecting sensors, actuators, or other peripherals.
    • Ensure that all connected components operate at 3.3V logic levels to avoid damaging the board.
  4. Using Analog and Digital Pins:

    • The analog pins (A0–A5) can read sensor data with a resolution of 12 bits.
    • The digital pins (D0–D9) can be used for input/output operations, including PWM.

Important Considerations and Best Practices

  • Voltage Levels: Ensure all connected devices operate at 3.3V logic levels. Use level shifters if interfacing with 5V devices.
  • Heat Management: Avoid overloading the GPIO pins to prevent overheating.
  • Debugging: Use the SWCLK and SWDIO pins for debugging with an SWD-compatible debugger.
  • USB-C Cable: Use a high-quality USB-C cable for reliable power and data transfer.

Example Code for Arduino IDE

The following example demonstrates how to blink an LED connected to pin D6:

// Define the pin number for the LED
const int ledPin = 6;

void setup() {
  // Set the LED pin as an output
  pinMode(ledPin, OUTPUT);
}

void loop() {
  // Turn the LED on
  digitalWrite(ledPin, HIGH);
  delay(1000); // Wait for 1 second
  
  // Turn the LED off
  digitalWrite(ledPin, LOW);
  delay(1000); // Wait for 1 second
}

Troubleshooting and FAQs

Common Issues and Solutions

  1. The board is not recognized by the computer:

    • Ensure the USB-C cable supports data transfer (not just charging).
    • Check if the correct COM port is selected in the Arduino IDE.
    • Try reinstalling the Seeeduino XIAO board package in the Arduino IDE.
  2. Upload error in Arduino IDE:

    • Double-check the selected board type and COM port.
    • Press the reset button twice quickly to enter bootloader mode, then try uploading again.
  3. Connected peripherals are not working:

    • Verify that the peripherals are compatible with 3.3V logic levels.
    • Check the wiring and connections for loose or incorrect setups.
  4. The board overheats:

    • Ensure that the GPIO pins are not overloaded.
    • Avoid drawing excessive current from the 3.3V power pin.

FAQs

  • Q: Can I power the Seeeduino XIAO with a battery?
    A: Yes, you can power the board using a 3.7V LiPo battery connected to the 3.3V and GND pins. Ensure proper voltage regulation.

  • Q: Is the Seeeduino XIAO compatible with Arduino libraries?
    A: Yes, the board is fully compatible with most Arduino libraries, thanks to its SAMD21 microcontroller.

  • Q: How do I reset the board?
    A: Press the reset button once to restart the board. Press it twice quickly to enter bootloader mode.

  • Q: Can I use the Seeeduino XIAO for low-power applications?
    A: Yes, the SAMD21 microcontroller supports low-power modes, making it suitable for battery-powered projects.


This concludes the documentation for the Seeeduino XIAO. For further details, refer to the official Seeed Technology Co., Ltd resources.