How to Use MPPT Solar Charger 12V Acid Lead: Examples, Pinouts, and Specs

Introduction
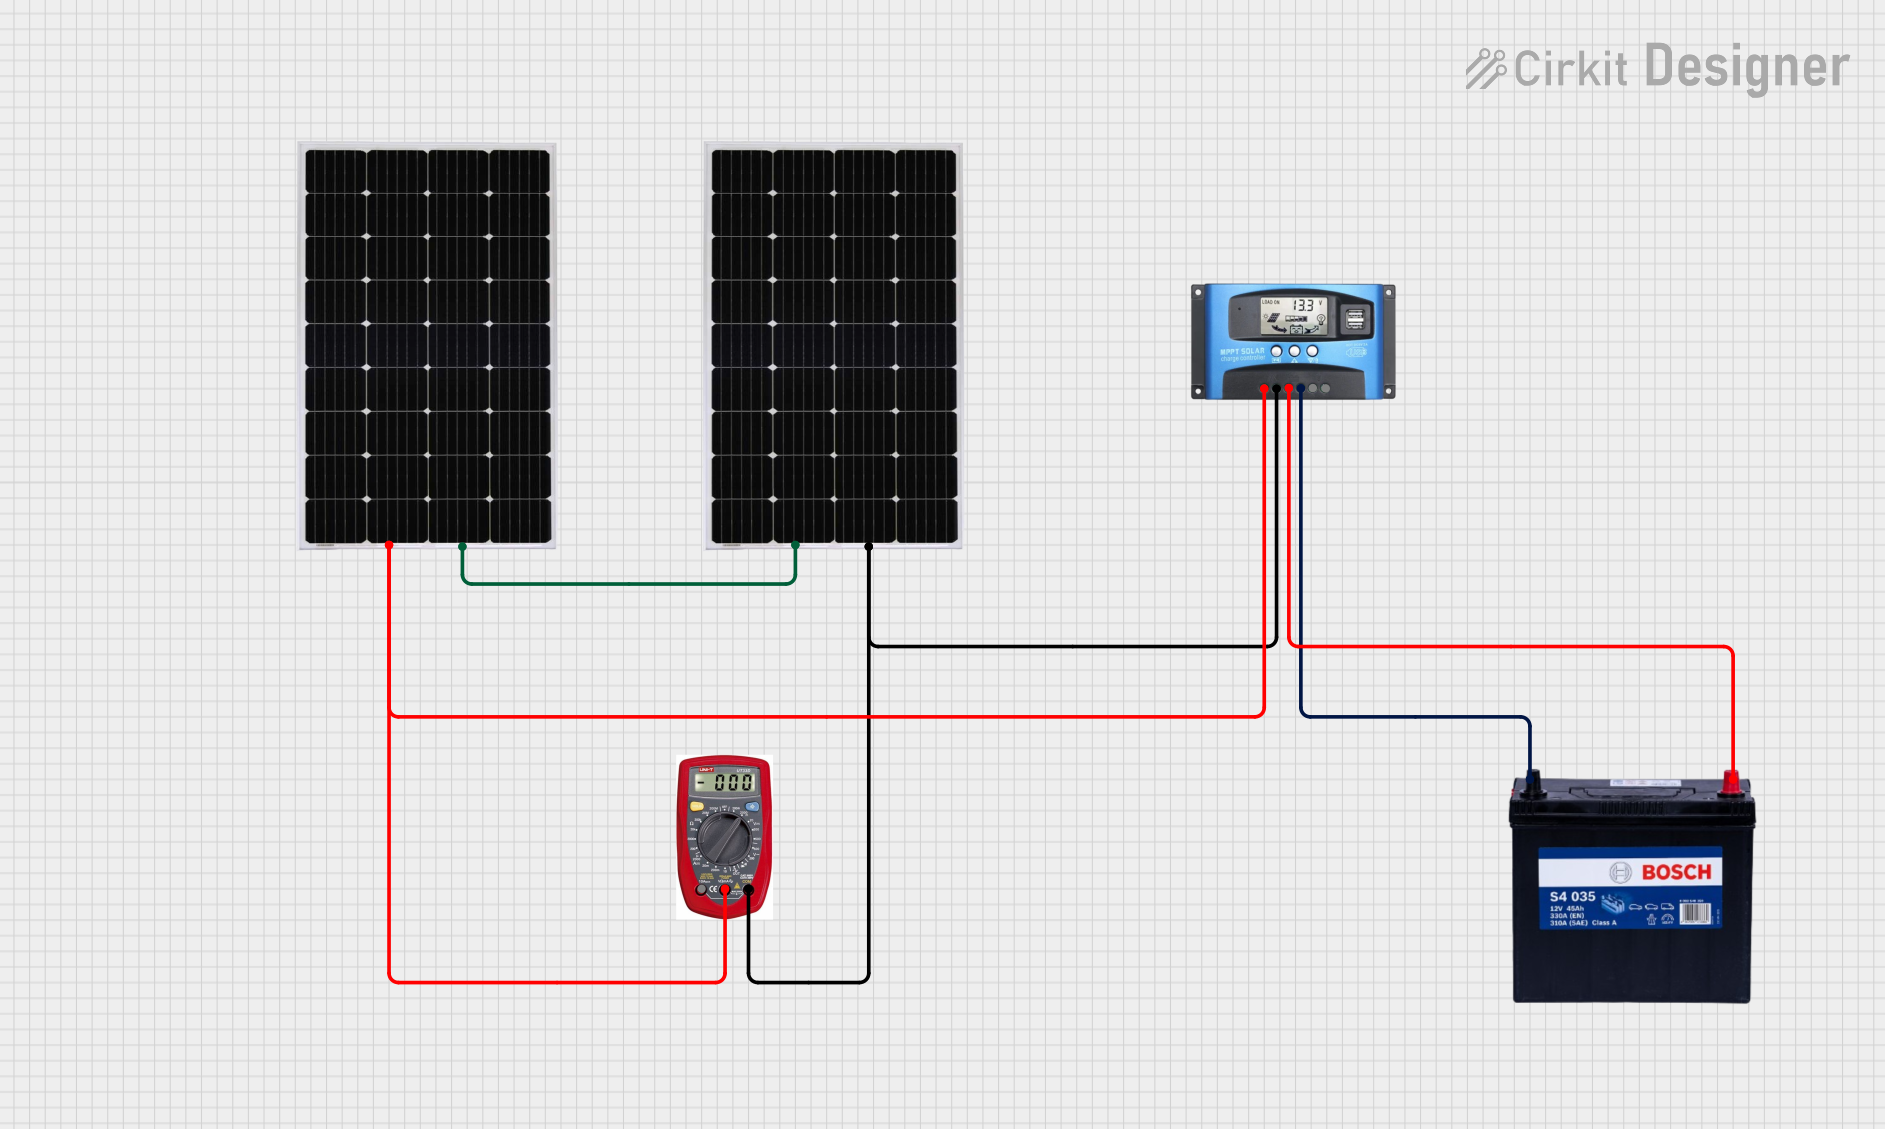
The MPPT Solar Charger 12V Lead-Acid is a high-efficiency charging device designed to optimize energy harvesting from solar panels. It uses Maximum Power Point Tracking (MPPT) technology to dynamically adjust the operating point of the solar panel, ensuring maximum power output under varying environmental conditions. This charger is specifically tailored for charging 12V lead-acid batteries, making it ideal for off-grid solar systems, RVs, boats, and backup power solutions.
Explore Projects Built with MPPT Solar Charger 12V Acid Lead


Explore Projects Built with MPPT Solar Charger 12V Acid Lead
Common Applications and Use Cases
- Off-grid solar power systems
- RV and camper solar setups
- Marine solar charging
- Backup power systems for homes and businesses
- Solar-powered lighting and small appliances
Technical Specifications
Key Technical Details
| Parameter | Value |
|---|---|
| Input Voltage Range | 15V to 50V |
| Output Voltage | 12V (optimized for lead-acid) |
| Maximum Charging Current | 20A |
| Efficiency | Up to 98% |
| Battery Type Supported | 12V Sealed, Gel, Flooded Lead-Acid |
| Operating Temperature Range | -20°C to 60°C |
| Protection Features | Overcharge, Overcurrent, Reverse Polarity, Overtemperature |
Pin Configuration and Descriptions
| Pin Name | Description |
|---|---|
| Solar Panel + | Positive terminal for connecting the solar panel |
| Solar Panel - | Negative terminal for connecting the solar panel |
| Battery + | Positive terminal for connecting the 12V lead-acid battery |
| Battery - | Negative terminal for connecting the 12V lead-acid battery |
| Load + | Positive terminal for connecting the load (optional, if supported) |
| Load - | Negative terminal for connecting the load (optional, if supported) |
| Ground (GND) | Common ground for the system |
| Communication | Optional pins for monitoring or configuring the charger (e.g., UART, I2C) |
Usage Instructions
How to Use the Component in a Circuit
Connect the Solar Panel:
- Attach the positive (+) and negative (-) terminals of the solar panel to the corresponding
Solar Panel +andSolar Panel -inputs on the MPPT charger. - Ensure the solar panel's voltage is within the input range (15V to 50V).
- Attach the positive (+) and negative (-) terminals of the solar panel to the corresponding
Connect the Battery:
- Attach the positive (+) and negative (-) terminals of the 12V lead-acid battery to the
Battery +andBattery -outputs on the charger. - Verify the battery type is compatible (sealed, gel, or flooded lead-acid).
- Attach the positive (+) and negative (-) terminals of the 12V lead-acid battery to the
Optional Load Connection:
- If the charger supports load output, connect the load's positive (+) and negative (-) terminals to the
Load +andLoad -pins.
- If the charger supports load output, connect the load's positive (+) and negative (-) terminals to the
Power On:
- Place the solar panel in sunlight to power the MPPT charger.
- The charger will automatically detect the battery and begin optimizing the charging process.
Important Considerations and Best Practices
- Battery Safety: Always use a compatible 12V lead-acid battery. Incorrect battery types may cause damage or reduce efficiency.
- Wire Sizing: Use appropriately sized wires to handle the maximum current (20A) without overheating.
- Ventilation: Ensure proper ventilation around the charger to prevent overheating, especially in high-temperature environments.
- Reverse Polarity: Double-check all connections to avoid reverse polarity, which could damage the charger or battery.
- Firmware Updates: If the charger supports firmware updates, periodically check for updates to improve performance and add features.
Arduino UNO Integration Example
If you want to monitor the MPPT charger using an Arduino UNO, you can use a communication interface (e.g., UART) if supported by the charger. Below is an example code snippet for reading data from the charger:
#include <SoftwareSerial.h>

// Define RX and TX pins for communication with the MPPT charger
SoftwareSerial mpptSerial(10, 11); // RX = pin 10, TX = pin 11

void setup() {
  Serial.begin(9600); // Initialize Serial Monitor
  mpptSerial.begin(9600); // Initialize communication with MPPT charger

  Serial.println("MPPT Solar Charger Monitoring Started");
}

void loop() {
  // Check if data is available from the MPPT charger
  if (mpptSerial.available()) {
    String data = mpptSerial.readStringUntil('\n'); // Read data until newline
    Serial.println("MPPT Data: " + data); // Print data to Serial Monitor
  }

  delay(1000); // Wait 1 second before checking again
}
Note: Refer to the charger's datasheet for specific communication protocols and data formats.
Troubleshooting and FAQs
Common Issues and Solutions
No Charging Detected:
- Cause: Solar panel voltage is too low.
- Solution: Ensure the solar panel is in direct sunlight and its voltage is within the input range (15V to 50V).
Overheating:
- Cause: Poor ventilation or excessive ambient temperature.
- Solution: Place the charger in a well-ventilated area and avoid direct exposure to sunlight.
Battery Not Charging:
- Cause: Incorrect battery connection or incompatible battery type.
- Solution: Verify the battery connections and ensure the battery is a 12V lead-acid type.
Reverse Polarity Error:
- Cause: Battery or solar panel connections are reversed.
- Solution: Disconnect and reconnect the terminals correctly. Check for polarity markings.
Low Efficiency:
- Cause: Shading on the solar panel or dirty panel surface.
- Solution: Clean the solar panel and ensure it is fully exposed to sunlight.
FAQs
Q: Can I use this charger for lithium-ion batteries?
A: No, this charger is specifically designed for 12V lead-acid batteries. Using it with lithium-ion batteries may cause damage.Q: What happens if the solar panel voltage exceeds 50V?
A: The charger may shut down or get damaged. Always ensure the solar panel voltage stays within the specified range.Q: Can I connect multiple batteries in parallel?
A: Yes, but ensure the batteries are of the same type, capacity, and charge level to avoid imbalances.Q: Does the charger work at night?
A: No, the charger requires sunlight to operate. At night, it will not charge the battery.Q: How do I monitor the charger's performance?
A: If the charger supports communication (e.g., UART), you can use an Arduino or similar device to monitor its data.
This concludes the documentation for the MPPT Solar Charger 12V Lead-Acid.