Cirkit Designer Logo
Cirkit Designer
Your all-in-one circuit design IDE
Home / 
Component Documentation

How to Use Adafruit Audio FX Mini Sound Board: Examples, Pinouts, and Specs

Image of Adafruit Audio FX Mini Sound Board
Cirkit Designer LogoDesign with Adafruit Audio FX Mini Sound Board in Cirkit Designer

Introduction

The Adafruit Audio FX Mini Sound Board is a versatile and easy-to-use audio playback device designed for makers and hobbyists. It is capable of playing a variety of audio file formats from a microSD card, making it ideal for adding sound effects, music, or voice to projects without the need for an additional microcontroller. Common applications include interactive art installations, custom alarms, greeting cards, and electronic toys.

Explore Projects Built with Adafruit Audio FX Mini Sound Board

Use Cirkit Designer to design, explore, and prototype these projects online. Some projects support real-time simulation. Click "Open Project" to start designing instantly!
Adafruit Audio FX Mini Sound Board Dual Loudspeaker Audio System
Image of Adafruit Audio FX Sound Board: A project utilizing Adafruit Audio FX Mini Sound Board in a practical application
This circuit features an Adafruit Audio FX Mini Sound Board connected to two loudspeakers. The sound board's left and right audio channels (L_AC and R_AC) are connected to the respective pins of the loudspeakers, enabling stereo audio output. The sound board is powered through its VIN pin, and all components share a common ground.
Cirkit Designer LogoOpen Project in Cirkit Designer
Arduino Nano Controlled Clap-Activated Sound and Light System
Image of Clap-Back: A project utilizing Adafruit Audio FX Mini Sound Board in a practical application
This circuit features an Arduino Nano interfaced with an Adafruit Audio FX Mini Sound Board, a SparkFun Electret Microphone Breakout, a TIP120 Darlington Transistor controlling a 12V Power LED, and a loudspeaker. The Arduino processes audio signals from the microphone to detect claps and toggles the LED accordingly, while also sending signals to the sound board to play audio tracks through the loudspeaker based on the clap pattern. The circuit is powered by a 12V power supply, with the Arduino and sound board receiving regulated voltage from the supply.
Cirkit Designer LogoOpen Project in Cirkit Designer
Arduino Nano-Controlled Sound and Motion-Activated MP3 Player
Image of swoo0: A project utilizing Adafruit Audio FX Mini Sound Board in a practical application
This circuit features an Arduino Nano microcontroller interfaced with an Adafruit MAX4466 microphone amplifier for audio input, a DFPlayer MINI module for audio playback through a connected loudspeaker, and an HC-SR505 Mini PIR motion sensor for detecting movement. The Arduino controls the DFPlayer MINI via serial communication, with a resistor in the TX-RX line likely for voltage level matching, and processes the microphone and motion sensor inputs to trigger audio playback based on detected sound and motion.
Cirkit Designer LogoOpen Project in Cirkit Designer
Arduino Nano-Controlled Motion-Activated Sound and Light System
Image of no led: A project utilizing Adafruit Audio FX Mini Sound Board in a practical application
This circuit is an interactive multimedia system featuring audio input via a microphone amplifier, audio output through a DFPlayer MINI and loudspeaker, motion detection using a PIR sensor, and visual feedback with an RGB LED strip. The Arduino Nano serves as the central controller, interfacing with the audio and motion modules, and driving the LED strip.
Cirkit Designer LogoOpen Project in Cirkit Designer

Explore Projects Built with Adafruit Audio FX Mini Sound Board

Use Cirkit Designer to design, explore, and prototype these projects online. Some projects support real-time simulation. Click "Open Project" to start designing instantly!
Image of Adafruit Audio FX Sound Board: A project utilizing Adafruit Audio FX Mini Sound Board in a practical application
Adafruit Audio FX Mini Sound Board Dual Loudspeaker Audio System
This circuit features an Adafruit Audio FX Mini Sound Board connected to two loudspeakers. The sound board's left and right audio channels (L_AC and R_AC) are connected to the respective pins of the loudspeakers, enabling stereo audio output. The sound board is powered through its VIN pin, and all components share a common ground.
Cirkit Designer LogoOpen Project in Cirkit Designer
Image of Clap-Back: A project utilizing Adafruit Audio FX Mini Sound Board in a practical application
Arduino Nano Controlled Clap-Activated Sound and Light System
This circuit features an Arduino Nano interfaced with an Adafruit Audio FX Mini Sound Board, a SparkFun Electret Microphone Breakout, a TIP120 Darlington Transistor controlling a 12V Power LED, and a loudspeaker. The Arduino processes audio signals from the microphone to detect claps and toggles the LED accordingly, while also sending signals to the sound board to play audio tracks through the loudspeaker based on the clap pattern. The circuit is powered by a 12V power supply, with the Arduino and sound board receiving regulated voltage from the supply.
Cirkit Designer LogoOpen Project in Cirkit Designer
Image of swoo0: A project utilizing Adafruit Audio FX Mini Sound Board in a practical application
Arduino Nano-Controlled Sound and Motion-Activated MP3 Player
This circuit features an Arduino Nano microcontroller interfaced with an Adafruit MAX4466 microphone amplifier for audio input, a DFPlayer MINI module for audio playback through a connected loudspeaker, and an HC-SR505 Mini PIR motion sensor for detecting movement. The Arduino controls the DFPlayer MINI via serial communication, with a resistor in the TX-RX line likely for voltage level matching, and processes the microphone and motion sensor inputs to trigger audio playback based on detected sound and motion.
Cirkit Designer LogoOpen Project in Cirkit Designer
Image of no led: A project utilizing Adafruit Audio FX Mini Sound Board in a practical application
Arduino Nano-Controlled Motion-Activated Sound and Light System
This circuit is an interactive multimedia system featuring audio input via a microphone amplifier, audio output through a DFPlayer MINI and loudspeaker, motion detection using a PIR sensor, and visual feedback with an RGB LED strip. The Arduino Nano serves as the central controller, interfacing with the audio and motion modules, and driving the LED strip.
Cirkit Designer LogoOpen Project in Cirkit Designer

Technical Specifications

Key Technical Details

  • Audio Output: Mono with a Class D amplifier on board
  • Supported Audio Formats: OGG Vorbis and WAV files
  • Storage: microSD card slot (FAT16 or FAT32 formatted cards)
  • Supply Voltage: 3.3V to 5.5V DC
  • Output Power: 2W into 4Ω at 5V
  • Current Consumption: 20mA idle, 50mA playing sound

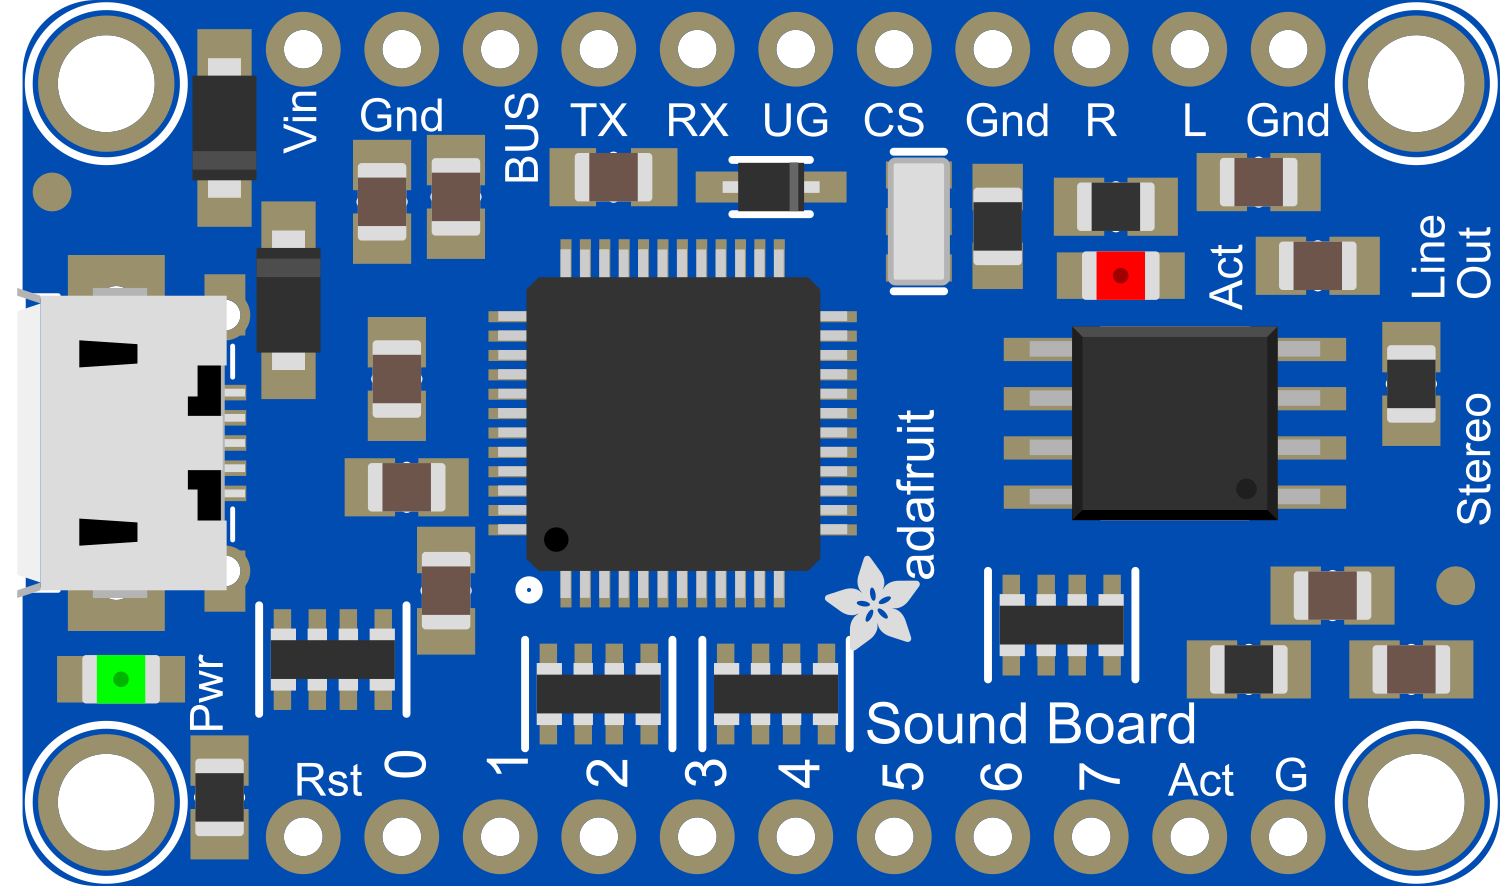
Pin Configuration and Descriptions

Pin Number Name Description
1 GND Ground connection
2 Vin Voltage input (3.3V to 5.5V DC)
3 Trigger 1 Trigger input for playing track T01
... ... ...
n Trigger n Trigger input for playing track Tnn
n+1 RX Serial receive pin for UART control
n+2 TX Serial transmit pin for UART feedback
n+3 Audio Out Audio output to speaker or amplifier
n+4 BUSY Output pin that goes low when audio is playing

Note: Replace 'n' with the actual pin number and 'Tnn' with the corresponding track number.

Usage Instructions

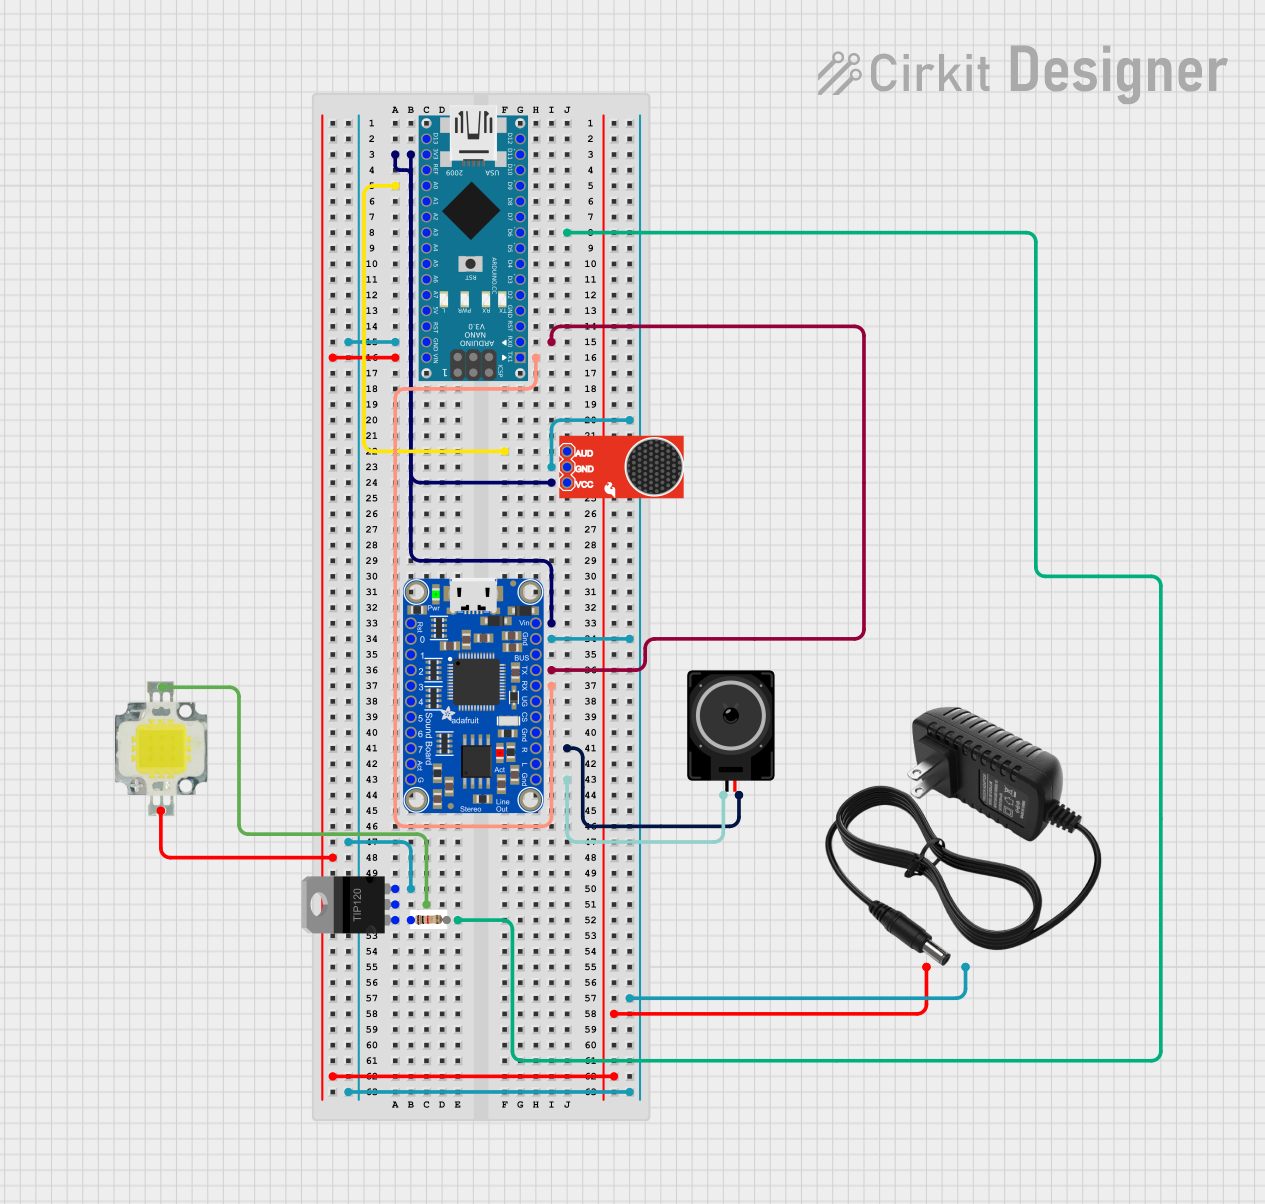
Integrating with a Circuit

  1. Power Supply: Connect the Vin pin to a 3.3V to 5.5V power source and GND to the ground.
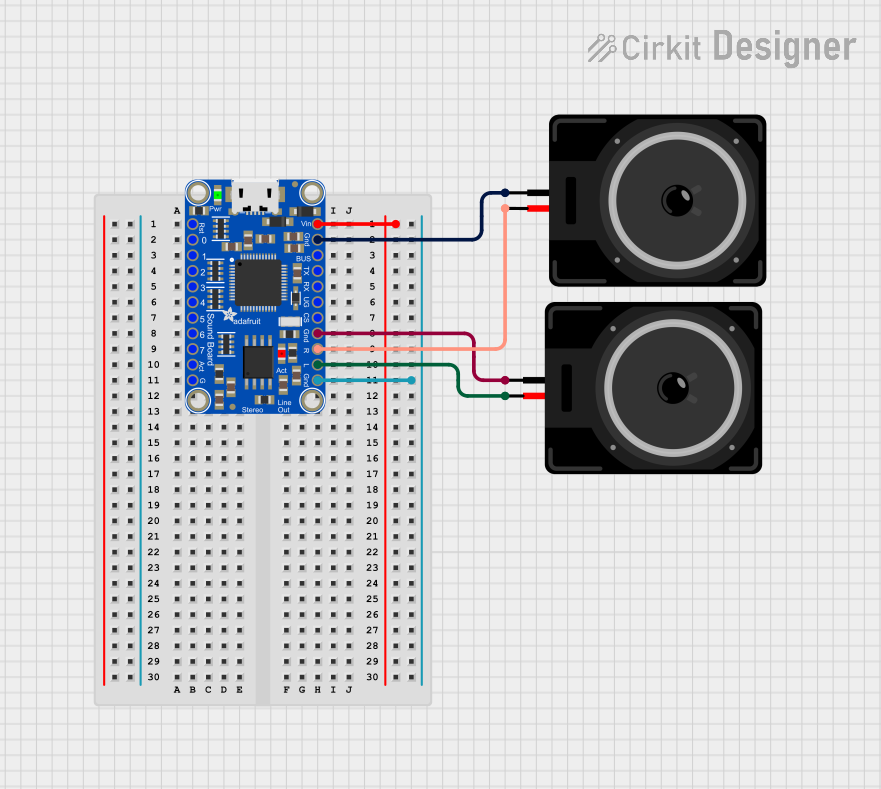
  2. Audio Output: Connect a speaker or amplifier to the Audio Out pin.
  3. Triggering Audio Playback: Connect a button or digital output from a microcontroller to one of the Trigger pins to play the corresponding audio track.
  4. Serial Control (Optional): Connect the RX and TX pins to a microcontroller if you wish to use serial commands for playback control.

Best Practices

  • Ensure that the audio files are named correctly (e.g., T01.ogg for Trigger 1) and placed in the root directory of a FAT16/FAT32 formatted microSD card.
  • Use a regulated power supply to prevent voltage spikes that could damage the board.
  • Keep the audio output volume at a reasonable level to avoid damaging the speaker.

Example Code for Arduino UNO

#include <SoftwareSerial.h>

SoftwareSerial mySerial(10, 11); // RX, TX

void setup() {
  mySerial.begin(9600);
  Serial.begin(9600);
  pinMode(3, OUTPUT); // Assuming Trigger 1 is connected to pin 3
}

void loop() {
  if (Serial.available()) {
    char command = Serial.read();
    if (command == 'p') { // 'p' command to play track T01
      digitalWrite(3, LOW); // Trigger pin LOW to start playback
      delay(10); // Wait for 10ms
      digitalWrite(3, HIGH); // Trigger pin HIGH to reset
    }
  }
}

Note: The above code is a simple example of how to trigger playback using an Arduino UNO. The SoftwareSerial library is included for potential serial communication.

Troubleshooting and FAQs

Common Issues

  • No Sound: Check the speaker connections and ensure the audio file is correctly named and formatted.
  • Distorted Sound: Lower the volume or check if the speaker's impedance matches the board's specifications.
  • Board Not Responding: Verify the power supply and ensure the microSD card is properly inserted and formatted.

Solutions and Tips

  • If the board does not play a track when triggered, ensure that the trigger pin is momentarily pulled low and then returned high.
  • For serial communication issues, confirm that the baud rate of the board and microcontroller match.
  • Always safely eject the microSD card from your computer to prevent file corruption.

FAQs

Q: Can I play multiple tracks simultaneously? A: No, the Adafruit Audio FX Mini Sound Board can only play one track at a time.

Q: How many audio files can I store on the microSD card? A: The number of audio files is limited by the capacity of the microSD card and the size of the audio files.

Q: Can I use this board without an additional microcontroller? A: Yes, the board can be used standalone with trigger pins to play specific tracks.

For further assistance, refer to the Adafruit Audio FX Mini Sound Board forums and support channels.