How to Use Gravity HUSKYLENS: Examples, Pinouts, and Specs
Introduction
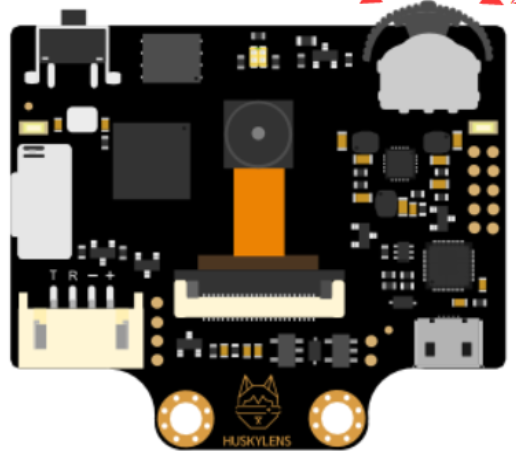
The Gravity HUSKYLENS is a smart camera module designed for image processing and computer vision applications. It features advanced object recognition capabilities, enabling users to integrate visual recognition into their projects with ease. The module supports multiple functions, including face recognition, object tracking, line following, and more. Its user-friendly interface and compatibility with popular microcontrollers make it an excellent choice for robotics, automation, and AI-based projects.
Explore Projects Built with Gravity HUSKYLENS


Explore Projects Built with Gravity HUSKYLENS
Common Applications and Use Cases
- Robotics: Object tracking, line following, and gesture recognition.
- Automation: Detecting and identifying objects in industrial or home automation systems.
- Education: Teaching computer vision concepts in STEM projects.
- AI Prototyping: Developing AI-based systems with visual recognition capabilities.
Technical Specifications
The Gravity HUSKYLENS is equipped with powerful hardware and software features to support a wide range of applications. Below are its key technical details:
Key Technical Details
| Specification | Value |
|---|---|
| Processor | Kendryte K210 AI chip |
| Image Sensor | OV2640 (2MP) |
| Communication Interfaces | UART, I2C |
| Input Voltage | 3.3V - 5V |
| Power Consumption | 0.5W (typical) |
| Display | 2-inch IPS screen (320x240 resolution) |
| Recognition Capabilities | Face, object, line, color, tag, QR code |
| Dimensions | 52mm x 44mm |
| Weight | 30g |
Pin Configuration and Descriptions
The Gravity HUSKYLENS module has a simple pinout for easy integration with microcontrollers like Arduino.
| Pin Name | Type | Description |
|---|---|---|
| VCC | Power | Power input (3.3V - 5V) |
| GND | Ground | Ground connection |
| TX | Output | UART transmit pin |
| RX | Input | UART receive pin |
| SCL | Input | I2C clock line |
| SDA | Input/Output | I2C data line |
Usage Instructions
The Gravity HUSKYLENS is designed to be user-friendly and can be used with minimal setup. Below are the steps to get started and important considerations for using the module.
How to Use the Component in a Circuit
- Power the Module: Connect the VCC and GND pins to a 3.3V or 5V power source.
- Choose Communication Protocol: Decide whether to use UART or I2C for communication with your microcontroller.
- For UART: Connect the TX pin of the HUSKYLENS to the RX pin of the microcontroller, and the RX pin of the HUSKYLENS to the TX pin of the microcontroller.
- For I2C: Connect the SCL and SDA pins to the corresponding I2C pins on the microcontroller.
- Initialize the Module: Use the HUSKYLENS interface to select the desired recognition mode (e.g., face recognition, object tracking).
- Integrate with Code: Use the provided libraries or write custom code to communicate with the module and process the data.
Important Considerations and Best Practices
- Power Supply: Ensure a stable power supply to avoid performance issues.
- Lighting Conditions: The module performs best in well-lit environments. Avoid extreme lighting conditions (e.g., direct sunlight or complete darkness).
- Distance and Angle: For optimal recognition, maintain an appropriate distance and angle between the module and the target object.
- Firmware Updates: Regularly check for firmware updates to access new features and improvements.
Example Code for Arduino UNO
Below is an example of how to use the Gravity HUSKYLENS with an Arduino UNO via I2C communication.
#include "HUSKYLENS.h" // Include the HUSKYLENS library
#include <Wire.h>      // Include the Wire library for I2C communication

HUSKYLENS huskylens;   // Create a HUSKYLENS object

void setup() {
  Serial.begin(9600);  // Initialize serial communication for debugging
  Wire.begin();        // Initialize I2C communication

  // Begin communication with the HUSKYLENS module
  if (!huskylens.begin(Wire)) {
    Serial.println("HUSKYLENS initialization failed!");
    while (1); // Halt the program if initialization fails
  }
  Serial.println("HUSKYLENS initialized successfully!");

  // Set the HUSKYLENS to object tracking mode
  if (!huskylens.writeAlgorithm(ALGORITHM_OBJECT_TRACKING)) {
    Serial.println("Failed to set algorithm!");
  } else {
    Serial.println("Object tracking mode activated.");
  }
}

void loop() {
  // Request data from the HUSKYLENS
  if (huskylens.request()) {
    if (huskylens.isLearned()) {
      Serial.println("Object detected!");
      // Retrieve the first recognized object
      HUSKYLENSResult result = huskylens.read();
      Serial.print("X: ");
      Serial.print(result.xCenter);
      Serial.print(", Y: ");
      Serial.println(result.yCenter);
    } else {
      Serial.println("No object detected.");
    }
  } else {
    Serial.println("Failed to communicate with HUSKYLENS.");
  }
  delay(500); // Wait for 500ms before the next loop
}
Troubleshooting and FAQs
Common Issues and Solutions
HUSKYLENS Not Initializing
- Cause: Incorrect wiring or communication protocol mismatch.
- Solution: Double-check the wiring and ensure the correct protocol (UART or I2C) is selected in the code.
No Object Detected
- Cause: Poor lighting conditions or incorrect recognition mode.
- Solution: Improve lighting conditions and verify the selected recognition mode on the HUSKYLENS interface.
Unstable Performance
- Cause: Insufficient power supply or interference.
- Solution: Use a stable power source and avoid placing the module near sources of electromagnetic interference.
FAQs
Q: Can the HUSKYLENS recognize multiple objects simultaneously?
A: Yes, the HUSKYLENS can recognize and track multiple objects depending on the selected mode.Q: Is the HUSKYLENS compatible with Raspberry Pi?
A: Yes, the HUSKYLENS can be used with Raspberry Pi via UART or I2C communication.Q: How do I update the firmware?
A: Connect the HUSKYLENS to a computer via the USB port and use the official firmware update tool provided by the manufacturer.Q: What is the maximum detection range?
A: The detection range depends on the object size and lighting conditions but typically ranges from 0.5m to 2m.
By following this documentation, you can effectively integrate the Gravity HUSKYLENS into your projects and leverage its powerful computer vision capabilities.