How to Use sparkfun-battery-babysitter: Examples, Pinouts, and Specs
Introduction
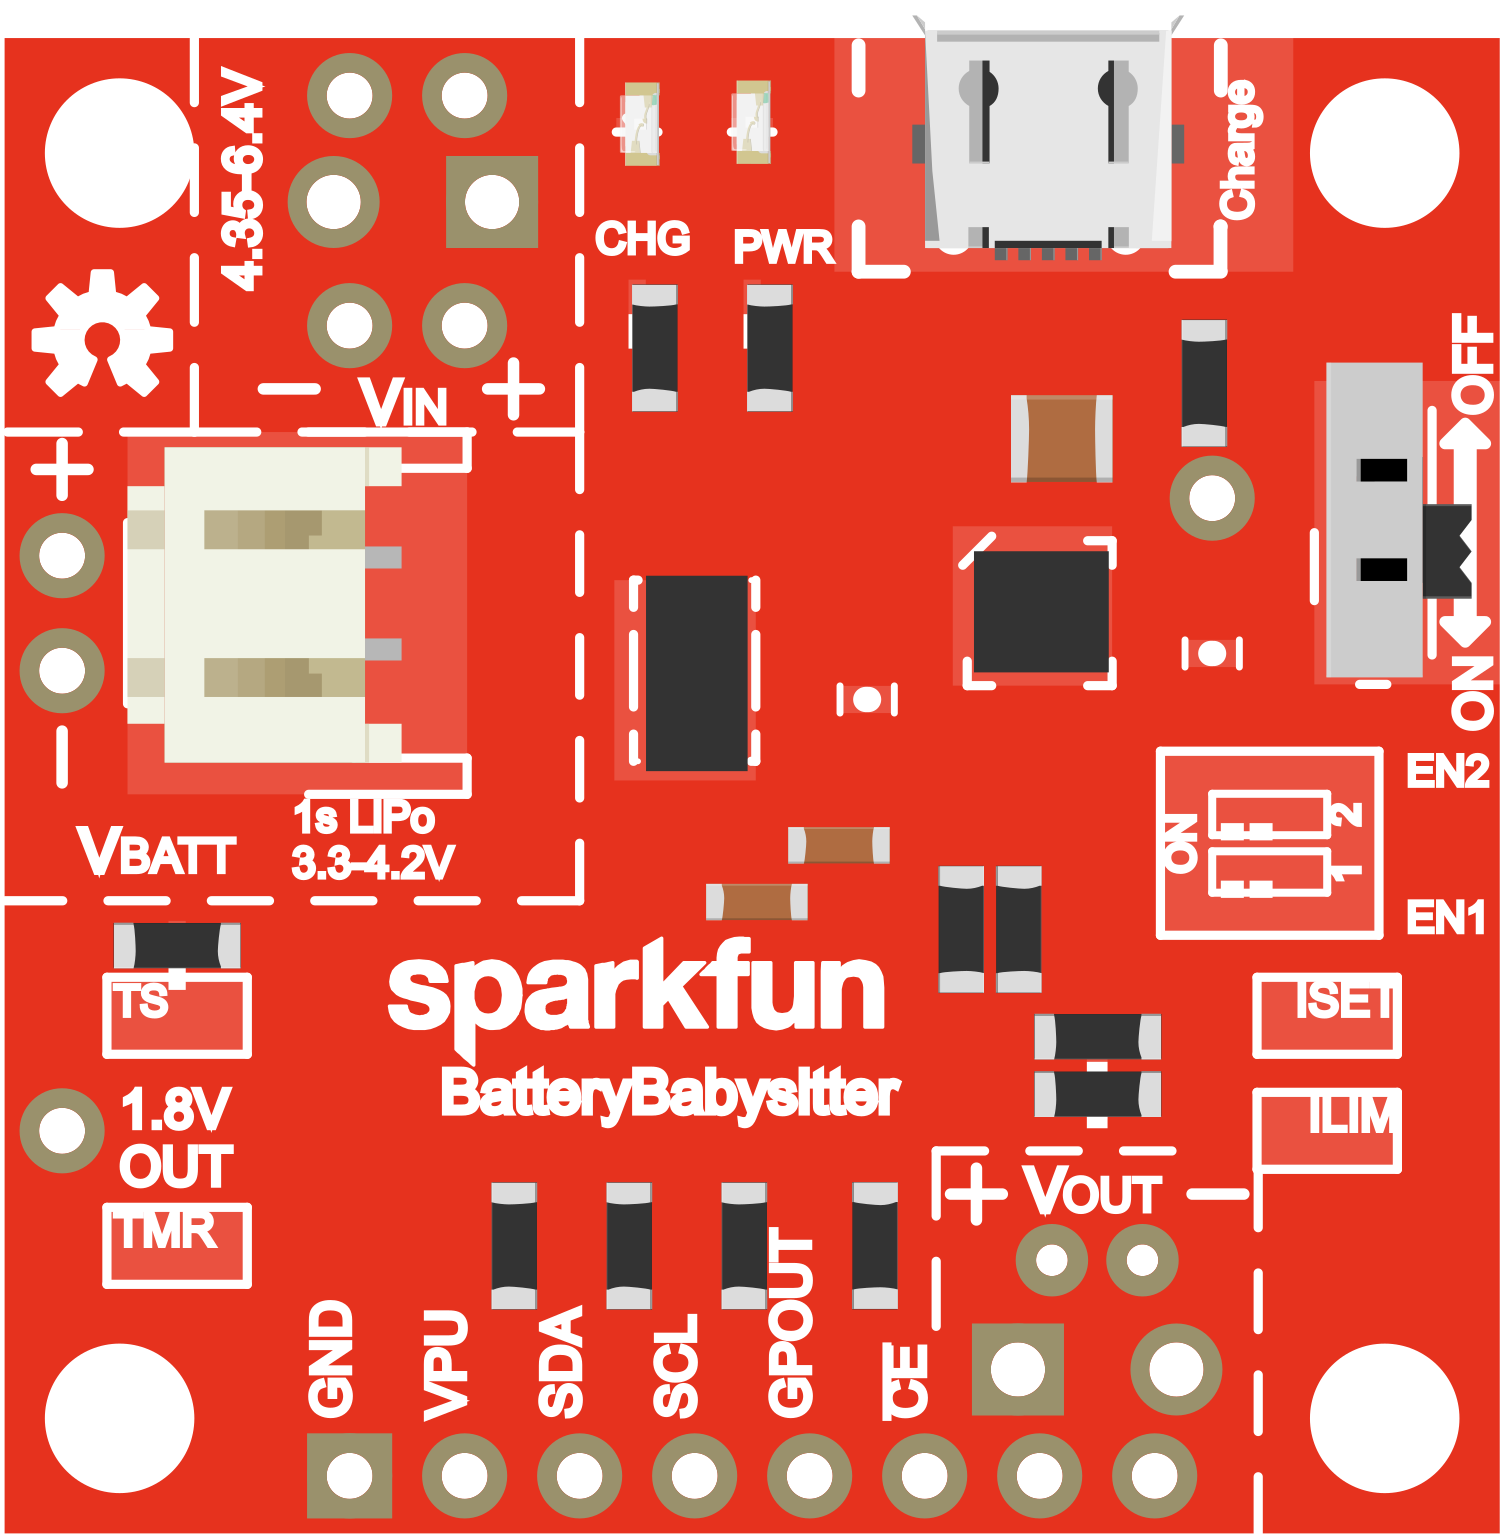
The SparkFun Battery Babysitter is an all-in-one battery management solution designed for single-cell lithium polymer (LiPo) batteries. It integrates protection circuits, charging capabilities, and a fuel gauge system to ensure that your battery operates safely and efficiently. This module is ideal for portable electronics, hobbyist projects, and any application where battery health and longevity are a concern.
Explore Projects Built with sparkfun-battery-babysitter

Explore Projects Built with sparkfun-battery-babysitter
Common Applications and Use Cases
- Portable electronic devices
- DIY electronics projects
- Remote sensors and IoT devices
- Robotics and unmanned vehicles
- Wearable technology
Technical Specifications
Key Technical Details
- Battery Chemistry: Lithium Polymer (LiPo)
- Charge Voltage: 4.2V (default)
- Charge Current: Programmable up to 500mA
- Operating Voltage: 3.0V to 5.5V
- Quiescent Current: <100µA
- Protection: Overcharge, overdischarge, overcurrent
Pin Configuration and Descriptions
| Pin Name | Description |
|---|---|
| BAT | Battery connection (+) |
| GND | Ground |
| STAT1 | Status indication pin 1 |
| STAT2 | Status indication pin 2 |
| PROG | Charge current programming |
| SDA | I2C data line for fuel gauge communication |
| SCL | I2C clock line for fuel gauge communication |
| SYS | System power output from battery or USB |
Usage Instructions
How to Use the Component in a Circuit
Connecting the Battery:
- Connect the positive terminal of the LiPo battery to the
BATpin. - Connect the negative terminal of the battery to the
GNDpin.
- Connect the positive terminal of the LiPo battery to the
Setting the Charge Current:
- The charge current can be set by connecting a resistor to the
PROGpin. Refer to the datasheet for the appropriate resistor values.
- The charge current can be set by connecting a resistor to the
Monitoring Battery Status:
- The
STAT1andSTAT2pins can be used to monitor the charging status and battery health.
- The
Interfacing with a Microcontroller:
- Use the
SDAandSCLpins to communicate with the fuel gauge via I2C.
- Use the
Powering the System:
- The
SYSpin provides power to the system, which can be from the battery or USB, depending on the charging state.
- The
Important Considerations and Best Practices
- Ensure that the battery voltage and capacity are compatible with the Battery Babysitter.
- Avoid exposing the module to extreme temperatures and physical stress.
- Always disconnect the battery if the module will not be used for an extended period.
- Follow proper ESD precautions when handling the module to prevent damage.
Troubleshooting and FAQs
Common Issues Users Might Face
Battery Not Charging:
- Check the battery connections and ensure the polarity is correct.
- Verify that the charge current is set appropriately for your battery.
No Power Output on SYS:
- Ensure that the battery is charged and in good health.
- Check for any signs of damage to the module or battery.
Inaccurate Fuel Gauge Readings:
- Calibrate the fuel gauge according to the battery's capacity and chemistry.
- Allow the battery to go through a few charge/discharge cycles for better accuracy.
Solutions and Tips for Troubleshooting
- Double-check all connections and solder joints for continuity and proper contact.
- Consult the datasheet for detailed information on setting up and calibrating the fuel gauge.
- Use a multimeter to measure the voltage at the
BATandSYSpins to ensure proper operation.
FAQs
Q: Can I use the Battery Babysitter with batteries other than LiPo?
- A: The Battery Babysitter is designed specifically for single-cell LiPo batteries. Using other battery chemistries is not recommended.
Q: How do I program the charge current?
- A: The charge current is set by connecting a resistor to the
PROGpin. The datasheet provides a table of resistor values for different charge currents.
- A: The charge current is set by connecting a resistor to the
Q: What should I do if the module gets hot during operation?
- A: If the module is overheating, immediately disconnect the battery and check for any issues with the charge current setting or battery condition.
Example Code for Arduino UNO
#include <Wire.h>

// Define the I2C address for the Battery Babysitter
#define BATTERY_BABYSITTER_I2C_ADDRESS 0x76

void setup() {
  Wire.begin(); // Initialize I2C communication
  Serial.begin(9600); // Start serial communication at 9600 baud rate
}

void loop() {
  // Read battery voltage and state of charge from the Battery Babysitter
  Wire.beginTransmission(BATTERY_BABYSITTER_I2C_ADDRESS);
  // Request 2 bytes from the fuel gauge
  Wire.requestFrom(BATTERY_BABYSITTER_I2C_ADDRESS, 2);
  while (Wire.available()) {
    byte highByte = Wire.read(); // Read the high byte
    byte lowByte = Wire.read(); // Read the low byte
    // Combine the two bytes to form the raw voltage value
    int rawVoltage = (int)highByte << 8 | lowByte;
    // Convert the raw voltage to actual voltage (mV)
    float voltage = rawVoltage * 0.00125;
    Serial.print("Battery Voltage: ");
    Serial.print(voltage);
    Serial.println(" V");
  }
  Wire.endTransmission();

  delay(1000); // Wait for 1 second before reading again
}
Note: The example code provided is a simple demonstration of how to read the battery voltage using the I2C communication protocol. For a complete implementation, including reading the state of charge and interfacing with the protection circuits, refer to the Battery Babysitter datasheet and example code provided by SparkFun.