How to Use MP3 player: Examples, Pinouts, and Specs
Introduction
The MP3 player is a portable digital audio device designed to store and play music files in MP3 format, as well as other supported audio formats such as WAV and AAC. It is widely used for personal entertainment, allowing users to enjoy high-quality audio on the go. MP3 players are compact, lightweight, and often include features such as playlists, equalizers, and support for external storage.
Explore Projects Built with MP3 player


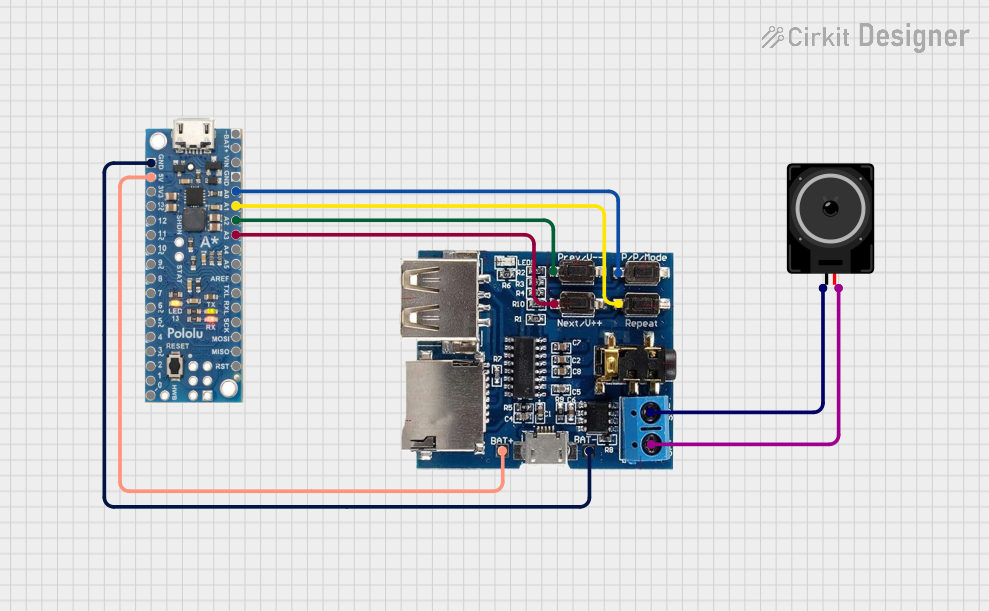
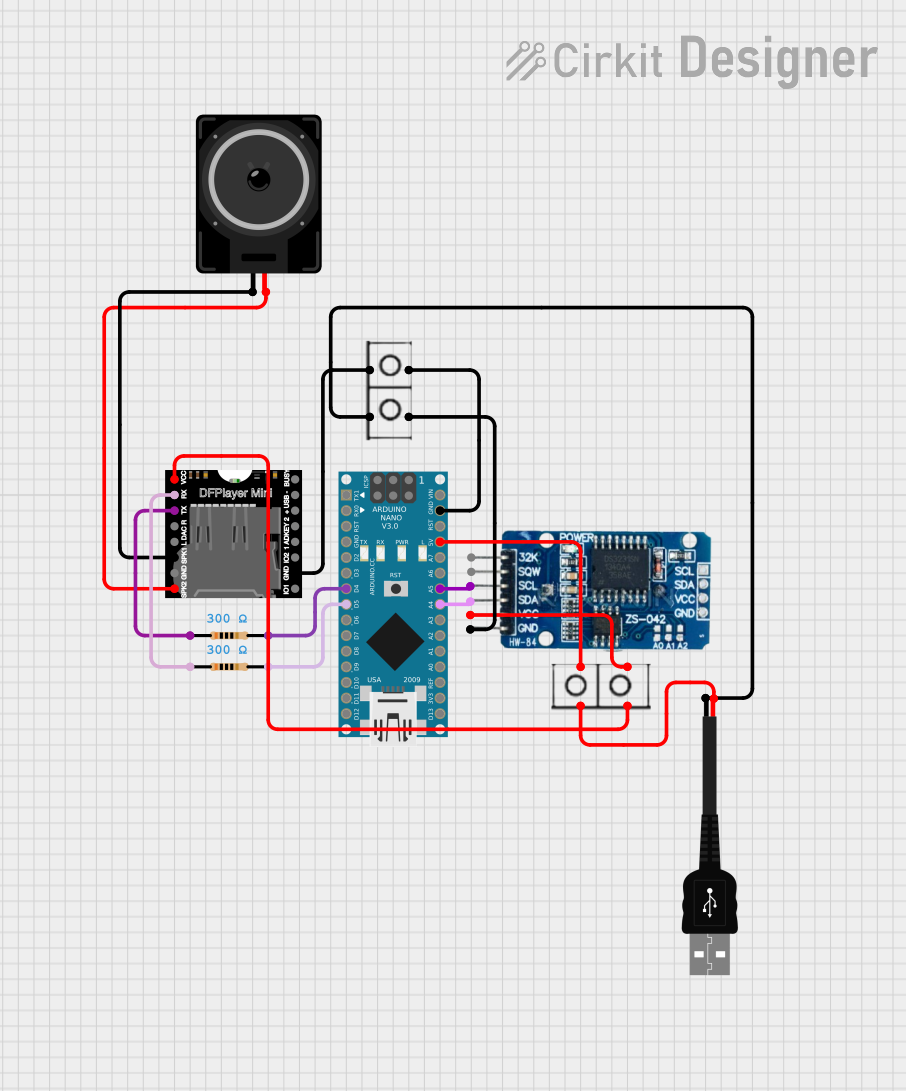
Explore Projects Built with MP3 player
Common Applications and Use Cases
- Personal music playback for entertainment
- Audio playback in embedded systems or DIY projects
- Integration into portable speaker systems
- Educational tools for language learning or audio lessons
- Background music in retail or public spaces
Technical Specifications
Below are the general technical specifications for a typical MP3 player module used in electronics projects:
| Specification | Details |
|---|---|
| Power Supply Voltage | 3.3V to 5V |
| Audio Formats Supported | MP3, WAV, AAC |
| Storage Options | MicroSD card (up to 32GB) or onboard flash memory |
| Audio Output | Stereo output via 3.5mm headphone jack or speaker terminals |
| Control Interface | UART, SPI, or GPIO for play, pause, next, previous, and volume control |
| Dimensions | Varies by model, typically compact (e.g., 40mm x 20mm x 5mm) |
| Operating Temperature | -10°C to 60°C |
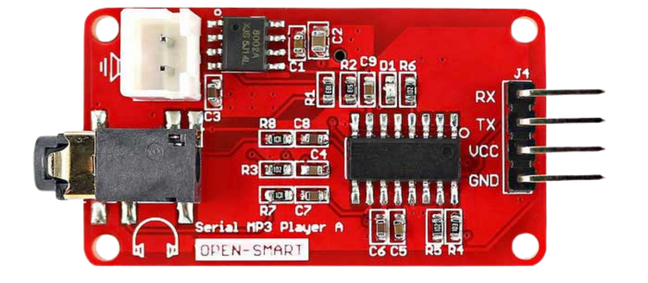
Pin Configuration and Descriptions
The following table describes the pin configuration for a typical MP3 player module (e.g., DFPlayer Mini):
| Pin Name | Type | Description |
|---|---|---|
| VCC | Power Input | Connect to 3.3V or 5V power supply. |
| GND | Ground | Connect to the ground of the power supply. |
| RX | UART Input | Receive pin for serial communication (connect to TX of microcontroller). |
| TX | UART Output | Transmit pin for serial communication (connect to RX of microcontroller). |
| SPK_1 | Audio Output | Positive terminal for speaker connection. |
| SPK_2 | Audio Output | Negative terminal for speaker connection. |
| DAC_R | Audio Output | Right channel audio output for external amplifier or headphones. |
| DAC_L | Audio Output | Left channel audio output for external amplifier or headphones. |
| IO_1, IO_2 | GPIO | General-purpose input/output pins for control functions. |
Usage Instructions
How to Use the MP3 Player in a Circuit
- Power Supply: Connect the VCC pin to a 3.3V or 5V power source and the GND pin to ground.
- Audio Output:
- For headphones or external amplifiers, use the DAC_R and DAC_L pins.
- For direct speaker output, connect a small speaker to SPK_1 and SPK_2.
- Control Interface:
- Use UART communication for advanced control (e.g., play, pause, volume adjustment).
- Alternatively, use GPIO pins for basic control functions.
- Storage: Insert a MicroSD card with MP3 files into the module's card slot.
Important Considerations and Best Practices
- Ensure the power supply voltage matches the module's requirements to avoid damage.
- Use decoupling capacitors near the power pins to reduce noise and improve stability.
- For UART communication, ensure the baud rate matches the module's default (typically 9600 bps).
- Avoid connecting speakers with impedance lower than the module's specifications to prevent overheating.
Example: Connecting to an Arduino UNO
Below is an example of how to control the MP3 player module using an Arduino UNO:
Circuit Connections
- Connect the MP3 player's VCC to the Arduino's 5V pin.
- Connect the MP3 player's GND to the Arduino's GND.
- Connect the MP3 player's RX pin to the Arduino's TX pin (pin 1).
- Connect the MP3 player's TX pin to the Arduino's RX pin (pin 0).
Arduino Code
#include <SoftwareSerial.h>

// Define RX and TX pins for SoftwareSerial
SoftwareSerial mp3Serial(10, 11); // RX = pin 10, TX = pin 11

void setup() {
  mp3Serial.begin(9600); // Initialize serial communication with MP3 module
  Serial.begin(9600);    // Initialize serial monitor for debugging

  // Send initialization commands to MP3 player
  sendCommand(0x3F, 0, 0); // Reset the module
  delay(500);
  sendCommand(0x06, 0, 15); // Set volume to 15 (range: 0-30)
  delay(500);
  sendCommand(0x0F, 0, 1); // Play the first track
}

void loop() {
  // Add code here to control playback (e.g., play, pause, next track)
}

// Function to send commands to the MP3 player
void sendCommand(byte command, byte param1, byte param2) {
  byte checksum = 0xFF - (0xFF + command + param1 + param2) + 1;

  // Construct and send the command packet
  byte packet[] = {0x7E, 0xFF, 0x06, command, 0x00, param1, param2, checksum, 0xEF};
  for (byte i = 0; i < sizeof(packet); i++) {
    mp3Serial.write(packet[i]);
  }
}
Troubleshooting and FAQs
Common Issues and Solutions
No Sound Output:
- Ensure the audio files are in a supported format (e.g., MP3, WAV).
- Check the speaker or headphone connections.
- Verify the volume level is not set to zero.
Module Not Responding:
- Confirm the power supply voltage is within the specified range.
- Check the UART connections and ensure the baud rate is correct.
- Reset the module by cycling the power.
Playback Stutters or Stops:
- Use a high-quality MicroSD card with a fast read speed.
- Avoid using excessively large audio files.
FAQs
Q: Can I use the MP3 player module with a 3.3V microcontroller?
A: Yes, the module supports 3.3V operation. Ensure the logic levels of the UART pins are compatible.
Q: How many tracks can the module handle?
A: The module can typically handle thousands of tracks, limited by the storage capacity of the MicroSD card.
Q: Can I control the module without a microcontroller?
A: Yes, you can use GPIO pins or physical buttons for basic control functions like play, pause, and next track.