Cirkit Designer Logo
Cirkit Designer
Your all-in-one circuit design IDE
Home / 
Component Documentation

How to Use Adafruit White 15x7 CharliePlex FeatherWing: Examples, Pinouts, and Specs

Image of Adafruit White 15x7 CharliePlex FeatherWing
Cirkit Designer LogoDesign with Adafruit White 15x7 CharliePlex FeatherWing in Cirkit Designer

Introduction

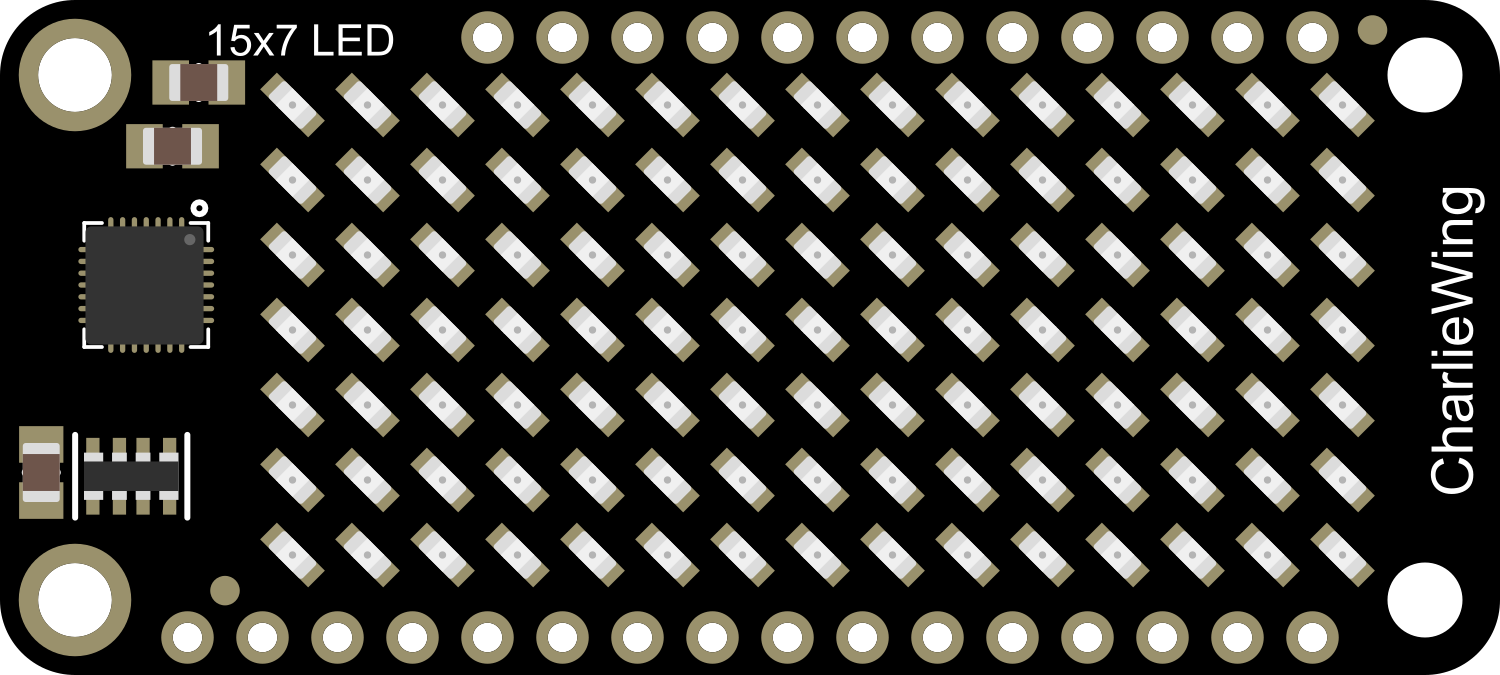
The Adafruit White 15x7 CharliePlex FeatherWing is an innovative LED matrix display designed for use with the Adafruit Feather development boards. It features a 15x7 grid of 105 individually addressable white LEDs, which are controlled using the Charlieplexing technique to minimize pin usage. This component is ideal for creating custom graphics, text, and animation displays in a compact form factor.

Explore Projects Built with Adafruit White 15x7 CharliePlex FeatherWing

Use Cirkit Designer to design, explore, and prototype these projects online. Some projects support real-time simulation. Click "Open Project" to start designing instantly!
ESP32-Based Vibration Feedback System with Quad Alphanumeric Display and ADXL343 Accelerometer
Image of EC444 - Quest 3: A project utilizing Adafruit White 15x7 CharliePlex FeatherWing in a practical application
This circuit features an Adafruit HUZZAH32 ESP32 Feather board as the central microcontroller, which is connected to an Adafruit Quad AlphaNumeric Featherwing display and an Adafruit ADXL343 accelerometer via I2C communication (SCL and SDA lines). The ESP32 controls a vibration motor connected to one of its GPIO pins (A5_IO4) and shares a common power supply (3.3V) and ground (GND) with the other components. The purpose of this circuit is likely to read acceleration data, display information on the alphanumeric display, and provide haptic feedback through the vibration motor.
Cirkit Designer LogoOpen Project in Cirkit Designer
Arduino UNO and OLED FeatherWing Display: Battery-Powered Hello World Project
Image of ARDUINO_SSD1306: A project utilizing Adafruit White 15x7 CharliePlex FeatherWing in a practical application
This circuit consists of an Arduino UNO connected to an Adafruit OLED FeatherWing display via I2C communication (SDA and SCL lines). The Arduino is powered through a Vcc source and provides 3.3V and GND connections to the OLED display. The Arduino runs a program to display 'Hello, World!' on the OLED screen.
Cirkit Designer LogoOpen Project in Cirkit Designer
Touch-Sensitive Interface with Adafruit MPR121 and Feather 32u4 Bluefruit
Image of MPR121: A project utilizing Adafruit White 15x7 CharliePlex FeatherWing in a practical application
This circuit integrates an Adafruit MPR121 capacitive touch sensor with an Adafruit Feather 32u4 Bluefruit microcontroller. The MPR121 is powered by the Feather and communicates via I2C (SCL and SDA) to detect touch inputs, which can be processed or transmitted wirelessly by the Feather.
Cirkit Designer LogoOpen Project in Cirkit Designer
Arduino Mega 2560 and Raspberry Pi 4B Controlled WS2812 RGB LED Strip
Image of circuit_image: A project utilizing Adafruit White 15x7 CharliePlex FeatherWing in a practical application
This circuit features an Arduino Mega 2560 microcontroller programmed to control a WS2812 RGB LED strip and a white LED, indicating status or providing user feedback. The Arduino and the LED strip are powered by a common 5V supply, and the circuit includes interfacing with a Raspberry Pi 4B for potential communication or coordination between the two boards.
Cirkit Designer LogoOpen Project in Cirkit Designer

Explore Projects Built with Adafruit White 15x7 CharliePlex FeatherWing

Use Cirkit Designer to design, explore, and prototype these projects online. Some projects support real-time simulation. Click "Open Project" to start designing instantly!
Image of EC444 - Quest 3: A project utilizing Adafruit White 15x7 CharliePlex FeatherWing in a practical application
ESP32-Based Vibration Feedback System with Quad Alphanumeric Display and ADXL343 Accelerometer
This circuit features an Adafruit HUZZAH32 ESP32 Feather board as the central microcontroller, which is connected to an Adafruit Quad AlphaNumeric Featherwing display and an Adafruit ADXL343 accelerometer via I2C communication (SCL and SDA lines). The ESP32 controls a vibration motor connected to one of its GPIO pins (A5_IO4) and shares a common power supply (3.3V) and ground (GND) with the other components. The purpose of this circuit is likely to read acceleration data, display information on the alphanumeric display, and provide haptic feedback through the vibration motor.
Cirkit Designer LogoOpen Project in Cirkit Designer
Image of ARDUINO_SSD1306: A project utilizing Adafruit White 15x7 CharliePlex FeatherWing in a practical application
Arduino UNO and OLED FeatherWing Display: Battery-Powered Hello World Project
This circuit consists of an Arduino UNO connected to an Adafruit OLED FeatherWing display via I2C communication (SDA and SCL lines). The Arduino is powered through a Vcc source and provides 3.3V and GND connections to the OLED display. The Arduino runs a program to display 'Hello, World!' on the OLED screen.
Cirkit Designer LogoOpen Project in Cirkit Designer
Image of MPR121: A project utilizing Adafruit White 15x7 CharliePlex FeatherWing in a practical application
Touch-Sensitive Interface with Adafruit MPR121 and Feather 32u4 Bluefruit
This circuit integrates an Adafruit MPR121 capacitive touch sensor with an Adafruit Feather 32u4 Bluefruit microcontroller. The MPR121 is powered by the Feather and communicates via I2C (SCL and SDA) to detect touch inputs, which can be processed or transmitted wirelessly by the Feather.
Cirkit Designer LogoOpen Project in Cirkit Designer
Image of circuit_image: A project utilizing Adafruit White 15x7 CharliePlex FeatherWing in a practical application
Arduino Mega 2560 and Raspberry Pi 4B Controlled WS2812 RGB LED Strip
This circuit features an Arduino Mega 2560 microcontroller programmed to control a WS2812 RGB LED strip and a white LED, indicating status or providing user feedback. The Arduino and the LED strip are powered by a common 5V supply, and the circuit includes interfacing with a Raspberry Pi 4B for potential communication or coordination between the two boards.
Cirkit Designer LogoOpen Project in Cirkit Designer

Common Applications and Use Cases

  • Wearable electronics
  • Custom clocks and timers
  • Data visualization
  • Notification displays
  • Interactive art installations

Technical Specifications

Key Technical Details

  • Operating Voltage: 3.3V to 5V
  • Max Current (all LEDs on): 500mA
  • Dimensions: 51mm x 23mm x 2.5mm
  • Weight: 4.8 grams

Pin Configuration and Descriptions

Pin Description
GND Ground connection
VCC Power supply (3.3V to 5V)
SDA I2C Data line
SCL I2C Clock line
ADDR I2C Address selection (optional)

Usage Instructions

How to Use the Component in a Circuit

  1. Power Connections: Connect the VCC pin to the 3.3V or 5V output on your Feather board and the GND pin to a ground pin on the Feather board.
  2. Data Connections: Connect the SDA and SCL pins to the corresponding I2C data and clock lines on your Feather board.
  3. Address Selection (Optional): If using multiple CharliePlex FeatherWings, you can set different I2C addresses by connecting the ADDR pin to GND or VCC.

Important Considerations and Best Practices

  • Ensure that your power supply can handle the maximum current draw if all LEDs are turned on simultaneously.
  • Use pull-up resistors on the I2C lines if your Feather board does not have them built-in.
  • When stacking multiple FeatherWings, ensure proper address configuration to avoid I2C address conflicts.
  • Avoid looking directly at the LEDs when they are powered on, as the brightness can be intense.

Example Code for Arduino UNO

#include <Wire.h>
#include <Adafruit_IS31FL3731.h>

// Create the LED driver object
Adafruit_IS31FL3731 ledDriver;

void setup() {
  Wire.begin(); // Start I2C
  if (!ledDriver.begin()) {
    Serial.println("IS31FL3731 not found");
    while (1);
  }
  Serial.println("IS31FL3731 found!");
}

void loop() {
  // Clear the frame buffer
  ledDriver.clear();
  
  // Draw a simple pattern
  for (int i = 0; i < 15; i++) {
    ledDriver.drawPixel(i, i % 7, 127); // Draw diagonal line
  }
  
  // Display the frame buffer on the LEDs
  ledDriver.displayFrame();
  
  delay(100); // Small delay to see the changes
}

Troubleshooting and FAQs

Common Issues

  • LEDs Not Lighting Up: Ensure that the power connections are secure and the I2C lines are properly connected. Check that the correct I2C address is being used in your code.
  • Dim or Flickering LEDs: This may indicate insufficient power supply or a high current draw. Verify that your power supply can provide enough current.
  • I2C Communication Errors: Ensure that there are pull-up resistors on the I2C lines if needed, and check for loose connections or shorts.

Solutions and Tips for Troubleshooting

  • Double-check wiring against the pin configuration table.
  • Use a multimeter to verify that the correct voltage is present at the VCC pin.
  • If using multiple CharliePlex FeatherWings, ensure that each has a unique I2C address.
  • Consult the Adafruit IS31FL3731 library documentation for additional functions and features.

FAQs

Q: Can I use this FeatherWing with a 5V microcontroller? A: Yes, the CharliePlex FeatherWing can operate with a 5V microcontroller, as long as the VCC pin is connected to a 5V source.

Q: How many of these FeatherWings can I chain together? A: You can chain multiple FeatherWings together by ensuring each has a unique I2C address. The exact number depends on the I2C address range and your microcontroller's capabilities.

Q: Can I control the brightness of individual LEDs? A: Yes, the IS31FL3731 driver allows for individual LED brightness control using PWM.

Q: Is there a library available for easier programming? A: Yes, Adafruit provides the IS31FL3731 library for Arduino, which simplifies programming the CharliePlex FeatherWing.

Remember to always refer to the official Adafruit documentation and datasheets for the most accurate and detailed information about the Adafruit White 15x7 CharliePlex FeatherWing.