How to Use Nicla vision: Examples, Pinouts, and Specs
Introduction
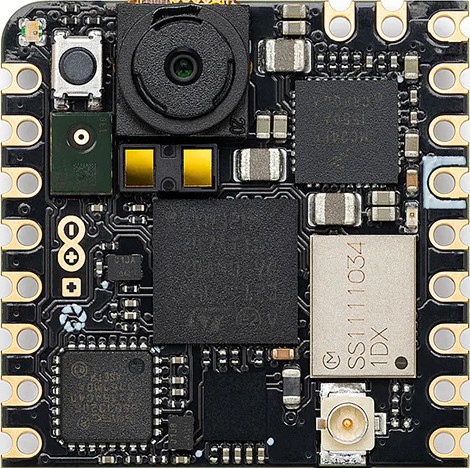
The Nicla Vision is a compact, high-performance vision sensor designed for embedded applications. It features advanced image processing capabilities, making it ideal for edge computing and IoT projects. With its small form factor and powerful onboard processing, the Nicla Vision is perfect for applications such as object detection, facial recognition, barcode scanning, and environmental monitoring. Its versatile connectivity options allow seamless integration into a wide range of systems.
Explore Projects Built with Nicla vision


Explore Projects Built with Nicla vision
Technical Specifications
The Nicla Vision is equipped with cutting-edge hardware to support demanding vision-based tasks. Below are its key technical details:
Key Features
- Processor: STM32H747 dual-core microcontroller (Cortex-M7 at 480 MHz and Cortex-M4 at 240 MHz)
- Camera: 2 MP OV5640 image sensor with autofocus
- Memory: 8 MB SDRAM, 16 MB NOR Flash
- Connectivity: Wi-Fi, Bluetooth Low Energy (BLE), and USB-C
- Power Supply: 3.7V Li-Po battery or USB-C (5V)
- Interfaces: I2C, SPI, UART, GPIO, and ADC
- Operating Voltage: 3.3V
- Dimensions: 22.86 mm x 22.86 mm
Pin Configuration and Descriptions
The Nicla Vision features a 16-pin header for interfacing with external devices. Below is the pinout:
| Pin | Name | Type | Description |
|---|---|---|---|
| 1 | VIN | Power Input | Input voltage (3.7V Li-Po or 5V USB-C) |
| 2 | GND | Ground | Ground connection |
| 3 | SDA | I2C Data | I2C data line |
| 4 | SCL | I2C Clock | I2C clock line |
| 5 | TX | UART Transmit | UART transmit line |
| 6 | RX | UART Receive | UART receive line |
| 7 | SPI_MOSI | SPI Data Out | SPI Master Out, Slave In |
| 8 | SPI_MISO | SPI Data In | SPI Master In, Slave Out |
| 9 | SPI_SCK | SPI Clock | SPI clock line |
| 10 | SPI_CS | SPI Chip Select | SPI chip select |
| 11 | GPIO1 | Digital I/O | General-purpose input/output |
| 12 | GPIO2 | Digital I/O | General-purpose input/output |
| 13 | ADC | Analog Input | Analog-to-digital converter input |
| 14 | PWM | PWM Output | Pulse-width modulation output |
| 15 | INT | Interrupt | External interrupt input |
| 16 | RST | Reset | Reset pin |
Usage Instructions
The Nicla Vision is designed for easy integration into embedded systems. Follow these steps to use it in your project:
Basic Setup
- Power the Device: Connect a 3.7V Li-Po battery or use a USB-C cable to supply 5V power.
- Connect to a Host: Use the I2C, SPI, or UART interface to communicate with a microcontroller or computer.
- Install Libraries: If using an Arduino IDE, install the required libraries for Nicla Vision from the Arduino Library Manager.
Example: Connecting Nicla Vision to Arduino UNO
Below is an example of interfacing the Nicla Vision with an Arduino UNO via I2C:
Wiring
- Connect
SDAon Nicla Vision toA4on Arduino UNO. - Connect
SCLon Nicla Vision toA5on Arduino UNO. - Connect
GNDon Nicla Vision toGNDon Arduino UNO. - Power the Nicla Vision using a USB-C cable or a Li-Po battery.
Code Example
#include <Wire.h>

// I2C address of Nicla Vision
#define NICLA_VISION_ADDR 0x3C

void setup() {
  Wire.begin(); // Initialize I2C communication
  Serial.begin(9600); // Start serial communication for debugging

  // Check if Nicla Vision is connected
  Wire.beginTransmission(NICLA_VISION_ADDR);
  if (Wire.endTransmission() == 0) {
    Serial.println("Nicla Vision connected!");
  } else {
    Serial.println("Failed to connect to Nicla Vision.");
  }
}

void loop() {
  // Example: Request data from Nicla Vision
  Wire.requestFrom(NICLA_VISION_ADDR, 6); // Request 6 bytes of data
  while (Wire.available()) {
    char c = Wire.read(); // Read each byte
    Serial.print(c); // Print received data
  }
  delay(1000); // Wait 1 second before next request
}
Important Considerations
- Ensure the Nicla Vision is powered correctly to avoid damage.
- Use appropriate pull-up resistors for I2C lines if not already included in your setup.
- Avoid exposing the camera lens to direct sunlight for extended periods to prevent damage.
Troubleshooting and FAQs
Common Issues
- Device Not Detected via I2C:
- Solution: Check the wiring and ensure the correct I2C address is used. Verify pull-up resistors are in place.
- No Image Data Received:
- Solution: Ensure the camera is initialized correctly in your code. Check the power supply and connections.
- Overheating:
- Solution: Verify the power supply voltage and current are within the specified range. Avoid prolonged operation in high-temperature environments.
FAQs
Q: Can the Nicla Vision operate standalone without a host microcontroller?
A: Yes, the onboard STM32H747 microcontroller allows standalone operation with custom firmware.Q: What is the maximum frame rate of the camera?
A: The OV5640 sensor supports up to 30 FPS at full resolution.Q: How do I update the firmware?
A: Use the Arduino IDE or STM32CubeProgrammer to upload new firmware via USB-C.
By following this documentation, you can effectively integrate the Nicla Vision into your projects and leverage its powerful vision capabilities.