Cirkit Designer Logo
Cirkit Designer
Your all-in-one circuit design IDE
Home / 
Component Documentation

How to Use Light Sensor: Examples, Pinouts, and Specs

Image of Light Sensor
Cirkit Designer LogoDesign with Light Sensor in Cirkit Designer

Introduction

The Light Sensor module is an electronic component designed to detect the presence and intensity of light in the surrounding environment. It is commonly used in applications such as automatic lighting control, security systems, and environmental monitoring. By measuring the amount of light, the sensor can trigger actions or send signals to other components in a system.

Explore Projects Built with Light Sensor

Use Cirkit Designer to design, explore, and prototype these projects online. Some projects support real-time simulation. Click "Open Project" to start designing instantly!
Arduino UNO-Based Smart Street Light Control with PIR and LDR Sensors
Image of street light: A project utilizing Light Sensor in a practical application
This circuit is a street light control system using an Arduino UNO, LDR sensor, and two PIR sensors. The LDR sensor determines day or night, turning on three LEDs at night via a transistor switch, while the PIR sensors detect motion to activate an additional LED.
Cirkit Designer LogoOpen Project in Cirkit Designer
Arduino UNO-Based Smart Street Light Control with LDR and PIR Sensors
Image of Copy of street light: A project utilizing Light Sensor in a practical application
This circuit is a street light control system using an Arduino UNO, LDR sensor, and two PIR sensors. The LDR sensor detects day or night to control three LEDs via a transistor switch, while the PIR sensors detect motion to turn on an additional LED for enhanced illumination.
Cirkit Designer LogoOpen Project in Cirkit Designer
Arduino UNO-Based Smart Street Light Control with LDR and PIR Sensors
Image of street light: A project utilizing Light Sensor in a practical application
This circuit is a street light control system using an Arduino UNO, LDR sensor, and two PIR sensors. The LDR sensor determines day or night to control three LEDs via a transistor switch, while the PIR sensors detect motion to turn on an additional LED for enhanced illumination.
Cirkit Designer LogoOpen Project in Cirkit Designer
Arduino UNO-Based Smart Street Light Control with LDR and PIR Sensors
Image of street light: A project utilizing Light Sensor in a practical application
This circuit is a street light control system using an Arduino UNO, LDR sensor, PIR sensors, and LEDs. The LDR sensor detects day or night to control three LEDs via a transistor switch, while the PIR sensors detect motion to turn on an additional LED for enhanced illumination.
Cirkit Designer LogoOpen Project in Cirkit Designer

Explore Projects Built with Light Sensor

Use Cirkit Designer to design, explore, and prototype these projects online. Some projects support real-time simulation. Click "Open Project" to start designing instantly!
Image of street light: A project utilizing Light Sensor in a practical application
Arduino UNO-Based Smart Street Light Control with PIR and LDR Sensors
This circuit is a street light control system using an Arduino UNO, LDR sensor, and two PIR sensors. The LDR sensor determines day or night, turning on three LEDs at night via a transistor switch, while the PIR sensors detect motion to activate an additional LED.
Cirkit Designer LogoOpen Project in Cirkit Designer
Image of Copy of street light: A project utilizing Light Sensor in a practical application
Arduino UNO-Based Smart Street Light Control with LDR and PIR Sensors
This circuit is a street light control system using an Arduino UNO, LDR sensor, and two PIR sensors. The LDR sensor detects day or night to control three LEDs via a transistor switch, while the PIR sensors detect motion to turn on an additional LED for enhanced illumination.
Cirkit Designer LogoOpen Project in Cirkit Designer
Image of street light: A project utilizing Light Sensor in a practical application
Arduino UNO-Based Smart Street Light Control with LDR and PIR Sensors
This circuit is a street light control system using an Arduino UNO, LDR sensor, and two PIR sensors. The LDR sensor determines day or night to control three LEDs via a transistor switch, while the PIR sensors detect motion to turn on an additional LED for enhanced illumination.
Cirkit Designer LogoOpen Project in Cirkit Designer
Image of street light: A project utilizing Light Sensor in a practical application
Arduino UNO-Based Smart Street Light Control with LDR and PIR Sensors
This circuit is a street light control system using an Arduino UNO, LDR sensor, PIR sensors, and LEDs. The LDR sensor detects day or night to control three LEDs via a transistor switch, while the PIR sensors detect motion to turn on an additional LED for enhanced illumination.
Cirkit Designer LogoOpen Project in Cirkit Designer

Technical Specifications

Key Technical Details

  • Operating Voltage: 3.3V to 5V
  • Output Type: Analog voltage corresponding to light intensity
  • Sensitivity: Adjustable via onboard potentiometer
  • Response Time: <1ms
  • Spectral Response: Similar to the human eye (peak sensitivity around 550nm)
  • Operating Temperature: -20°C to 70°C

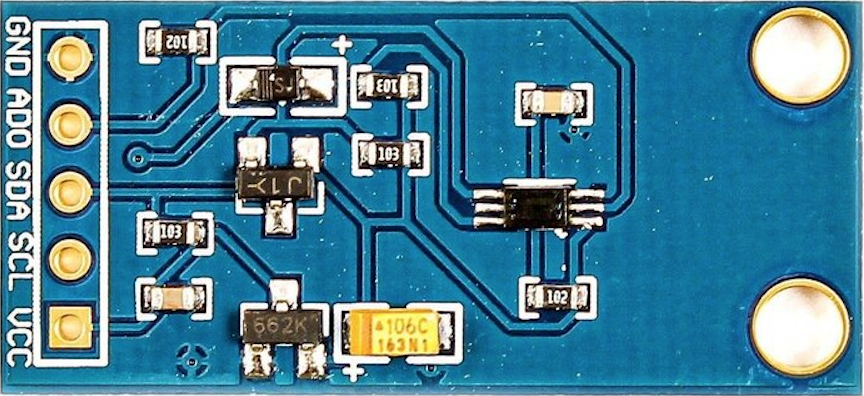
Pin Configuration and Descriptions

Pin Number Name Description
1 VCC Power supply (3.3V to 5V)
2 GND Ground connection
3 OUT Analog output signal

Usage Instructions

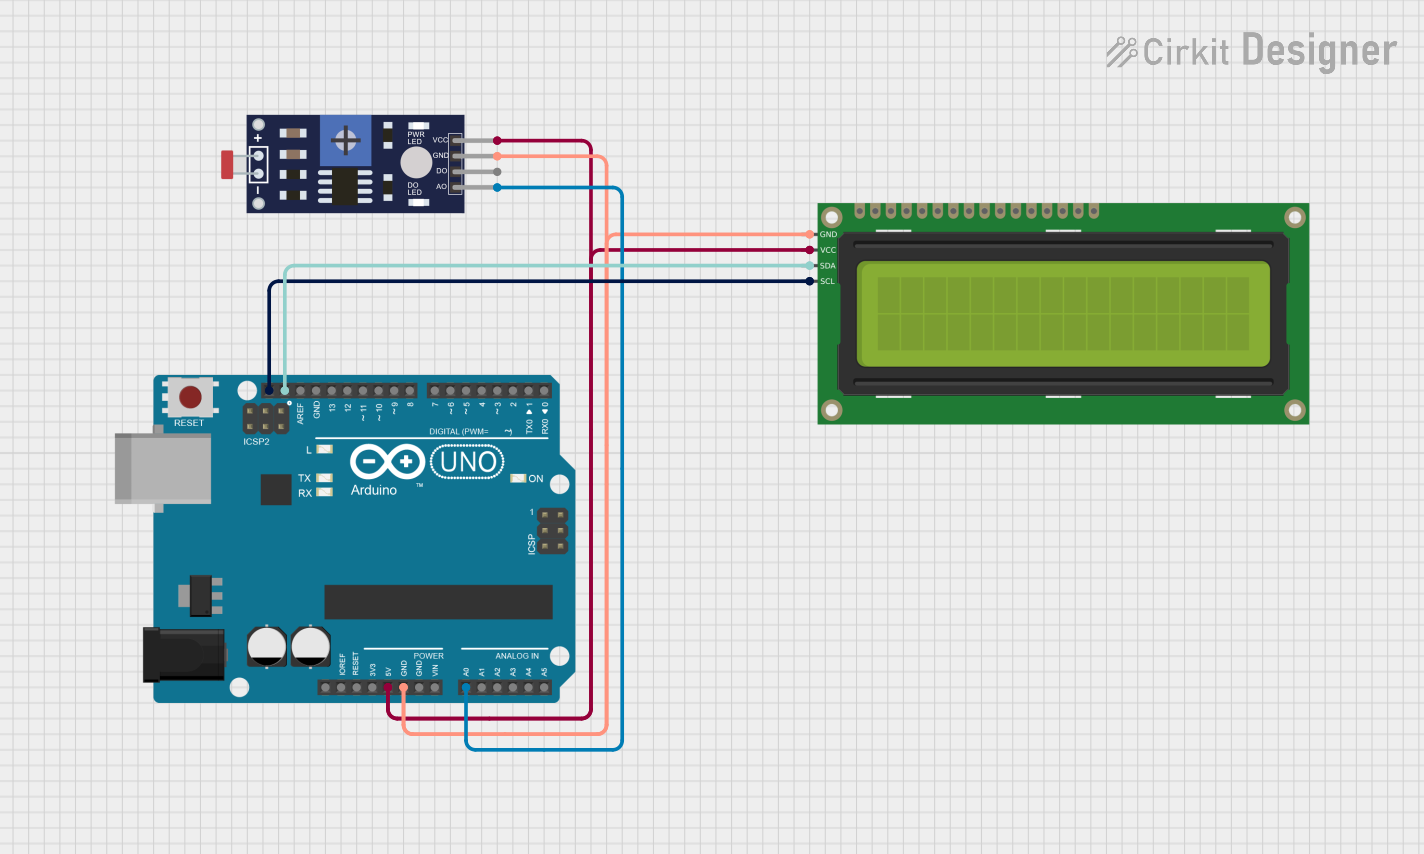
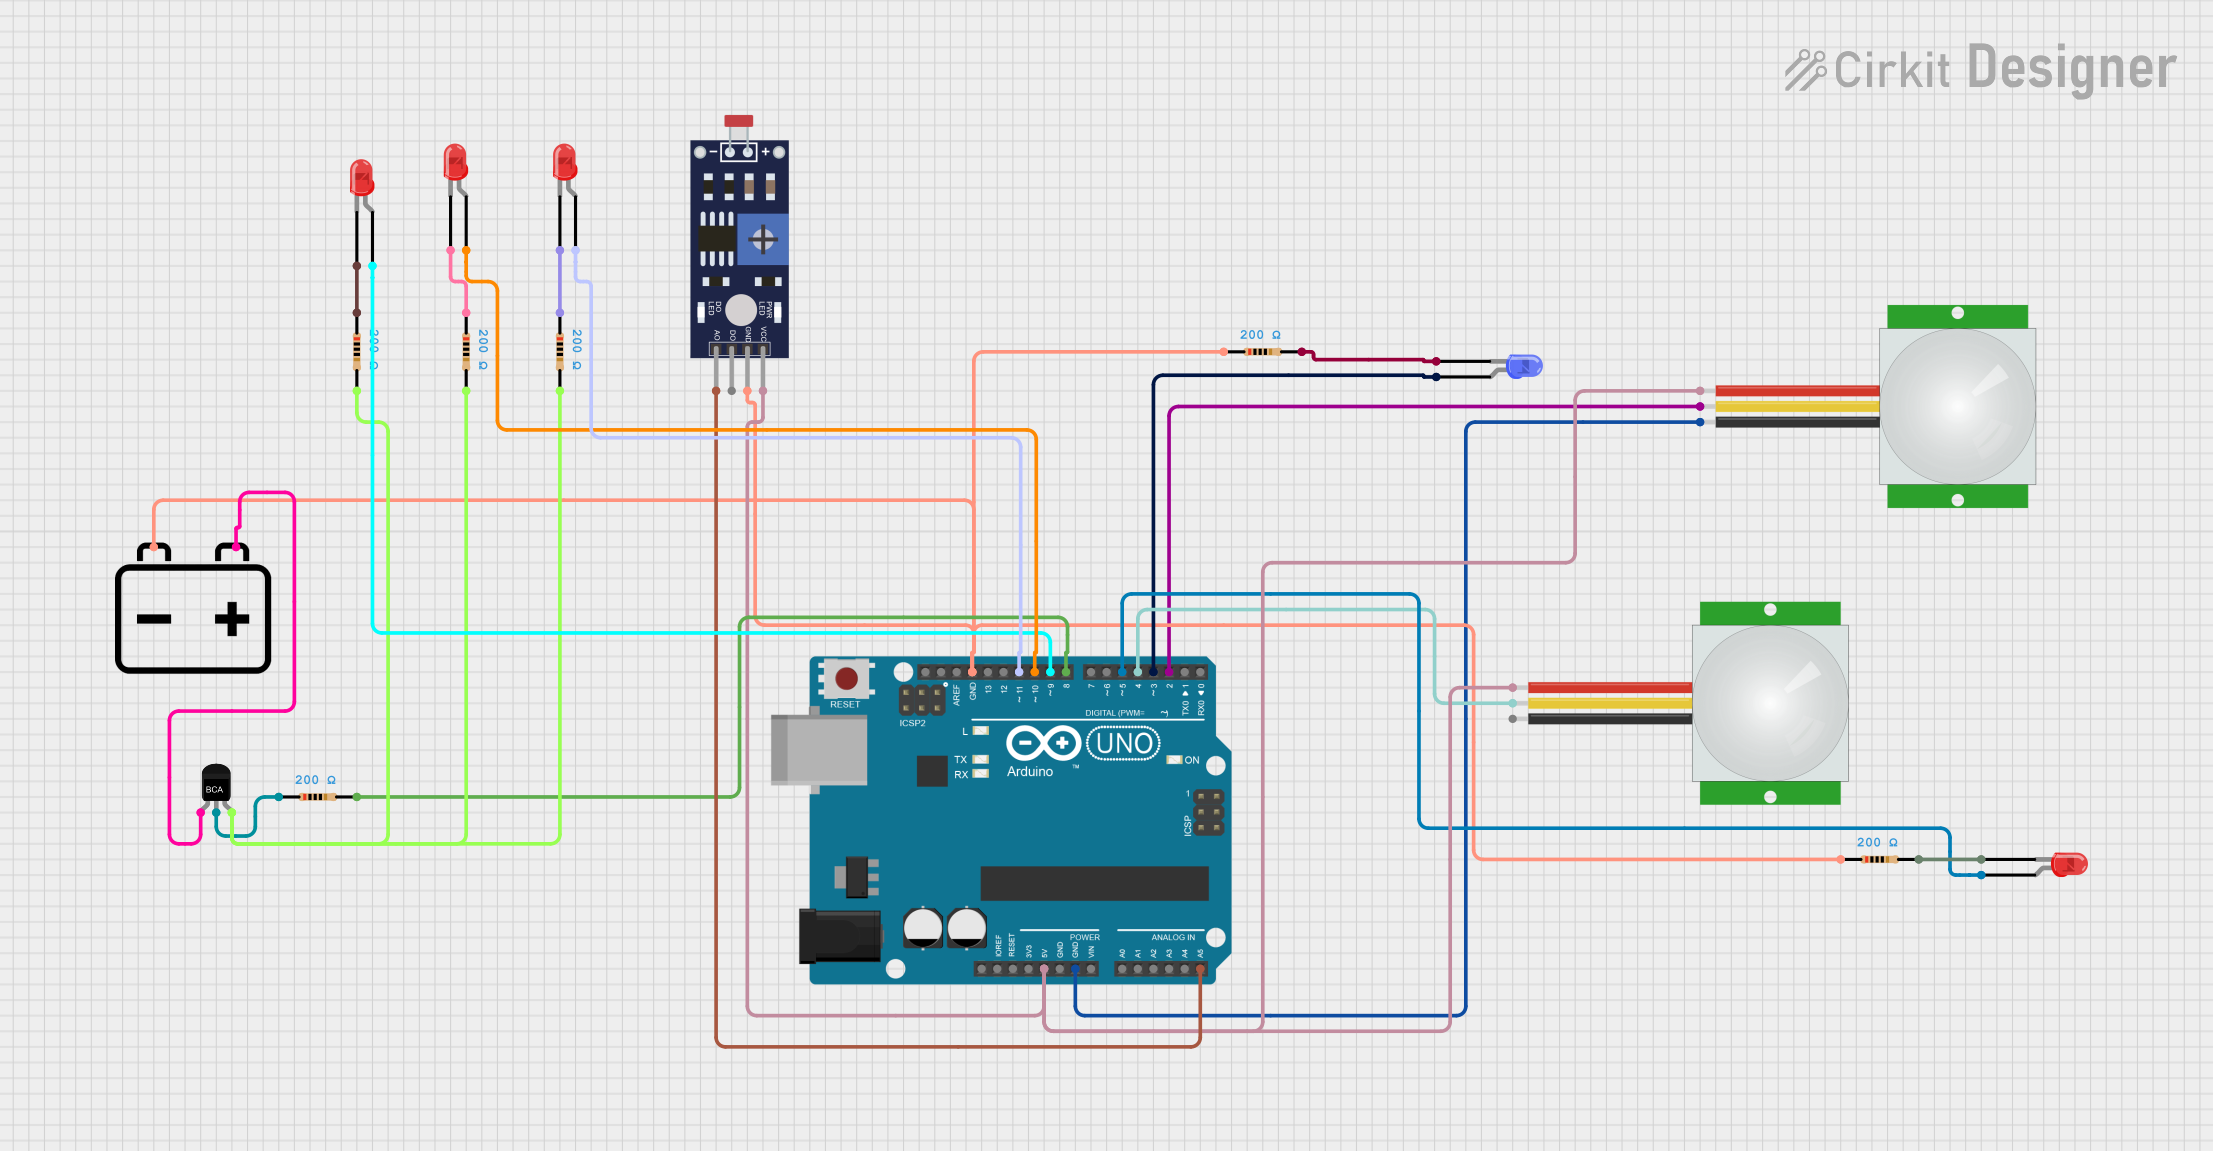
Connecting to a Circuit

  1. Connect the VCC pin to the 5V output on the Arduino UNO.
  2. Connect the GND pin to one of the GND pins on the Arduino UNO.
  3. Connect the OUT pin to any of the analog input pins (A0 to A5) on the Arduino UNO.

Important Considerations and Best Practices

  • Ensure that the operating voltage does not exceed the specified range to prevent damage.
  • Adjust the onboard potentiometer to calibrate the sensor's sensitivity to light.
  • Use a pull-down resistor if you experience floating values when the light intensity is low.
  • Avoid exposing the sensor to direct sunlight or high-intensity light that could saturate the sensor.

Example Arduino Code

// Define the pin connected to the light sensor
const int lightSensorPin = A0;

void setup() {
  // Initialize serial communication at 9600 bits per second
  Serial.begin(9600);
}

void loop() {
  // Read the input on analog pin A0
  int sensorValue = analogRead(lightSensorPin);
  // Convert the analog reading to a voltage
  float voltage = sensorValue * (5.0 / 1023.0);
  // Print out the value in volts
  Serial.println(voltage);
  // Wait for 100 milliseconds before the next loop
  delay(100);
}

Troubleshooting and FAQs

Common Issues

  • Inconsistent Readings: Ensure that the sensor is not exposed to fluctuating light sources and that the connections are secure.
  • No Output: Verify that the VCC and GND pins are correctly connected and that the Arduino UNO is supplying power.
  • Saturated Sensor: If the sensor is always at maximum reading, adjust the sensitivity or shield the sensor from direct light.

Solutions and Tips for Troubleshooting

  • If the sensor provides erratic readings, add a capacitor between VCC and GND near the sensor to stabilize the power supply.
  • Use the map() function in Arduino to convert the analog reading to a more meaningful range, such as 0 to 100 for percentage of light intensity.
  • For applications requiring more precision, consider using a digital light sensor with I2C or SPI interface.

FAQs

Q: Can the light sensor detect colors? A: No, this light sensor module only measures light intensity and does not differentiate between colors.

Q: Is it possible to use this sensor with a 3.3V system? A: Yes, the sensor can operate at 3.3V, but the output range will be lower, affecting the resolution.

Q: How do I calibrate the sensor for consistent readings? A: Use a known light source and adjust the onboard potentiometer until the sensor outputs the expected value.

Q: Can this sensor be used outdoors? A: The sensor can be used outdoors but should be protected from direct sunlight and harsh weather conditions to ensure accurate readings.