How to Use MPPT Wind Controller: Examples, Pinouts, and Specs
Introduction
A Maximum Power Point Tracking (MPPT) Wind Controller is a specialized electronic device designed to optimize the power output from wind turbines. By dynamically adjusting the electrical load, the MPPT Wind Controller ensures that the turbine operates at its maximum efficiency, even under varying wind conditions. This technology is essential for maximizing energy harvest and improving the overall performance of wind energy systems.
Explore Projects Built with MPPT Wind Controller


Explore Projects Built with MPPT Wind Controller
Common Applications and Use Cases
- Small-Scale Wind Energy Systems: Used in residential or off-grid wind power setups.
- Hybrid Renewable Energy Systems: Integrated with solar panels and batteries for efficient energy management.
- Remote Power Systems: Ideal for powering remote installations like communication towers or weather stations.
- Research and Development: Used in testing and optimizing wind turbine designs.
Technical Specifications
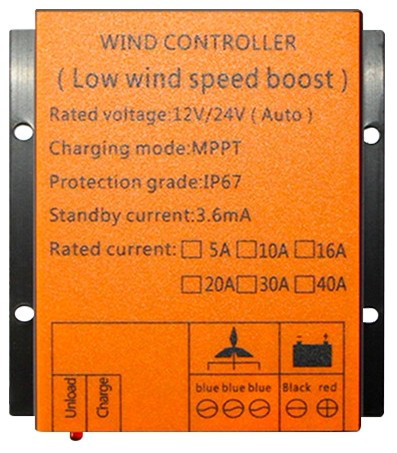
Below are the key technical details and pin configurations for a typical MPPT Wind Controller:
Key Technical Details
| Parameter | Value |
|---|---|
| Input Voltage Range | 12V - 48V DC |
| Maximum Input Current | 30A |
| Output Voltage Range | 12V - 48V DC (adjustable) |
| Maximum Output Power | 1.5 kW |
| Efficiency | ≥ 95% |
| Operating Temperature | -20°C to 60°C |
| Communication Interface | RS485 or UART (optional) |
| Protection Features | Overvoltage, overcurrent, short circuit, reverse polarity |
Pin Configuration and Descriptions
| Pin Number | Label | Description |
|---|---|---|
| 1 | Wind+ | Positive input terminal for wind turbine |
| 2 | Wind- | Negative input terminal for wind turbine |
| 3 | Batt+ | Positive output terminal for battery connection |
| 4 | Batt- | Negative output terminal for battery connection |
| 5 | Load+ | Positive terminal for DC load connection |
| 6 | Load- | Negative terminal for DC load connection |
| 7 | RS485 A | RS485 communication line A (optional) |
| 8 | RS485 B | RS485 communication line B (optional) |
Usage Instructions
How to Use the MPPT Wind Controller in a Circuit
- Connect the Wind Turbine:
- Attach the wind turbine's positive and negative output wires to the
Wind+andWind-terminals of the MPPT controller.
- Attach the wind turbine's positive and negative output wires to the
- Connect the Battery:
- Connect the battery's positive and negative terminals to the
Batt+andBatt-terminals. Ensure the battery voltage matches the controller's output voltage range.
- Connect the battery's positive and negative terminals to the
- Connect the Load (Optional):
- If you wish to power a DC load directly, connect the load's positive and negative terminals to the
Load+andLoad-terminals.
- If you wish to power a DC load directly, connect the load's positive and negative terminals to the
- Configure the Controller:
- Use the onboard buttons or a connected interface (e.g., RS485) to set the output voltage and other parameters.
- Power On:
- Once all connections are secure, power on the system. The controller will automatically adjust the load to maximize power output from the wind turbine.
Important Considerations and Best Practices
- Match Voltage Ratings: Ensure the wind turbine and battery voltage ratings are compatible with the MPPT controller.
- Use Proper Wiring: Use appropriately rated wires to handle the current and minimize power losses.
- Monitor System Performance: Regularly check the system's performance using the controller's display or communication interface.
- Avoid Overloading: Do not exceed the controller's maximum input current or power rating.
- Install in a Safe Location: Place the controller in a dry, well-ventilated area to prevent overheating or damage.
Arduino UNO Integration Example
If you want to monitor the MPPT Wind Controller's performance using an Arduino UNO via RS485 communication, you can use the following example code:
#include <SoftwareSerial.h>

// Define RS485 communication pins
#define RS485_RX 10  // Arduino pin connected to RS485 A
#define RS485_TX 11  // Arduino pin connected to RS485 B

// Create a SoftwareSerial object for RS485 communication
SoftwareSerial rs485(RS485_RX, RS485_TX);

void setup() {
  Serial.begin(9600);       // Initialize Serial Monitor
  rs485.begin(9600);        // Initialize RS485 communication
  pinMode(RS485_RX, INPUT); // Set RX pin as input
  pinMode(RS485_TX, OUTPUT);// Set TX pin as output
  Serial.println("MPPT Wind Controller Monitoring Started");
}

void loop() {
  // Request data from MPPT controller
  rs485.write("READ"); // Replace with the actual command for your controller

  // Wait for a response
  delay(100);

  // Check if data is available
  if (rs485.available()) {
    String data = "";
    while (rs485.available()) {
      data += (char)rs485.read(); // Read incoming data
    }
    Serial.println("MPPT Data: " + data); // Print data to Serial Monitor
  }

  delay(1000); // Wait 1 second before the next request
}
Notes:
- Replace
"READ"with the actual command supported by your MPPT Wind Controller. - Ensure you use an RS485-to-TTL module to interface the Arduino with the MPPT controller.
Troubleshooting and FAQs
Common Issues and Solutions
| Issue | Possible Cause | Solution |
|---|---|---|
| No power output from the controller | Incorrect wiring or loose connections | Verify all connections and wiring polarity. |
| Controller overheating | Poor ventilation or excessive load | Ensure proper ventilation and reduce load. |
| Battery not charging | Mismatched voltage or faulty battery | Check battery voltage and replace if needed. |
| Communication failure (RS485) | Incorrect wiring or baud rate mismatch | Verify RS485 connections and baud rate settings. |
FAQs
Can I use the MPPT Wind Controller with solar panels?
- No, this controller is specifically designed for wind turbines. Use a dedicated MPPT solar charge controller for solar panels.
What happens if the wind speed is too high?
- The controller will limit the power output to protect the system. Ensure your wind turbine has a braking mechanism for high wind speeds.
Can I connect multiple wind turbines to one controller?
- No, each wind turbine requires its own MPPT controller for optimal performance.
How do I update the firmware of the controller?
- Refer to the manufacturer's instructions for firmware updates, typically done via the RS485 interface.
By following this documentation, you can effectively integrate and operate an MPPT Wind Controller in your wind energy system.