
How to Use Moteur 25GA370 12V: Examples, Pinouts, and Specs
 Design with Moteur 25GA370 12V in Cirkit Designer
Introduction
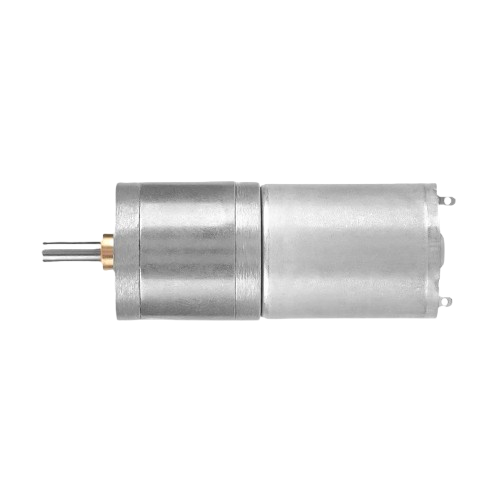
The Moteur 25GA370 12V is a compact and efficient DC motor designed for a wide range of applications. Operating at 12 volts, this motor is known for its reliability and durability, making it an excellent choice for driving small mechanical systems. Its compact size and robust performance make it suitable for robotics, automation, and other motion control projects.
Explore Projects Built with Moteur 25GA370 12V
 Open Project in Cirkit Designer
 Open Project in Cirkit Designer
 Open Project in Cirkit Designer
 Open Project in Cirkit Designer
Explore Projects Built with Moteur 25GA370 12V
Open Project in Cirkit DesignerOpen Project in Cirkit DesignerOpen Project in Cirkit DesignerOpen Project in Cirkit DesignerCommon Applications
- Robotics: Driving wheels or actuators in small robots.
- Automation: Used in conveyor belts, small lifts, or automated systems.
- DIY Projects: Ideal for hobbyists building mechanical systems.
- Educational Use: Demonstrating DC motor principles in academic settings.
Technical Specifications
Key Technical Details
| Parameter | Value |
|---|---|
| Operating Voltage | 12V DC |
| No-Load Speed | ~6000 RPM |
| No-Load Current | ~0.12 A |
| Stall Current | ~2.5 A |
| Stall Torque | ~1.5 kg.cm |
| Gearbox Ratio | 1:30 (varies by model) |
| Shaft Diameter | 6 mm |
| Motor Dimensions | 25 mm (diameter) x 37 mm (length) |
| Weight | ~100 g |
Pin Configuration and Descriptions
The Moteur 25GA370 12V has two terminals for electrical connections:
| Pin/Terminal | Description |
|---|---|
| Terminal 1 | Positive terminal (+12V input) |
| Terminal 2 | Negative terminal (Ground or -12V) |
Note: Reversing the polarity of the terminals will reverse the motor's rotation direction.
Usage Instructions
How to Use the Moteur 25GA370 12V in a Circuit
- Power Supply: Connect the motor to a 12V DC power source. Ensure the power supply can handle the stall current (~2.5 A) to avoid voltage drops or damage.
- Polarity: Connect Terminal 1 to the positive terminal of the power supply and Terminal 2 to the ground. Reversing these connections will change the motor's rotation direction.
- Motor Driver: For precise control (e.g., speed or direction), use a motor driver such as the L298N or an H-bridge circuit. This allows integration with microcontrollers like Arduino.
- Load Considerations: Avoid overloading the motor beyond its rated torque to prevent overheating or damage.
Important Considerations and Best Practices
- Heat Management: Prolonged operation at high loads may cause the motor to heat up. Ensure proper ventilation or cooling if necessary.
- Power Supply: Use a regulated 12V DC power supply to avoid voltage fluctuations.
- Noise Suppression: Add capacitors (e.g., 0.1 µF) across the terminals to reduce electrical noise.
- Mounting: Secure the motor using appropriate brackets to minimize vibrations and ensure stable operation.
Example: Controlling the Motor with Arduino UNO
Below is an example of controlling the Moteur 25GA370 12V using an Arduino UNO and an L298N motor driver.
// Example: Controlling Moteur 25GA370 12V with Arduino UNO
// Ensure the L298N motor driver is connected properly to the motor and Arduino

// Define motor control pins
const int motorPin1 = 9; // IN1 on L298N
const int motorPin2 = 10; // IN2 on L298N
const int enablePin = 11; // ENA on L298N (PWM for speed control)

void setup() {
  // Set motor control pins as outputs
  pinMode(motorPin1, OUTPUT);
  pinMode(motorPin2, OUTPUT);
  pinMode(enablePin, OUTPUT);
}

void loop() {
  // Rotate motor in one direction
  digitalWrite(motorPin1, HIGH); // Set IN1 high
  digitalWrite(motorPin2, LOW);  // Set IN2 low
  analogWrite(enablePin, 128);   // Set speed (0-255, 128 = ~50% speed)
  delay(2000);                   // Run for 2 seconds

  // Stop the motor
  digitalWrite(motorPin1, LOW);
  digitalWrite(motorPin2, LOW);
  delay(1000);                   // Pause for 1 second

  // Rotate motor in the opposite direction
  digitalWrite(motorPin1, LOW);  // Set IN1 low
  digitalWrite(motorPin2, HIGH); // Set IN2 high
  analogWrite(enablePin, 200);   // Set speed (~78% speed)
  delay(2000);                   // Run for 2 seconds

  // Stop the motor
  digitalWrite(motorPin1, LOW);
  digitalWrite(motorPin2, LOW);
  delay(1000);                   // Pause for 1 second
}
Notes:
- Adjust the
analogWritevalue to control the motor speed. - Ensure the L298N motor driver is powered with a 12V supply and properly grounded.
Troubleshooting and FAQs
Common Issues and Solutions
Motor Does Not Spin
- Cause: Insufficient power supply or loose connections.
- Solution: Verify the power supply voltage and current rating. Check all connections.
Motor Spins in the Wrong Direction
- Cause: Polarity of the terminals is reversed.
- Solution: Swap the connections of Terminal 1 and Terminal 2.
Motor Overheats
- Cause: Prolonged operation at high loads or insufficient ventilation.
- Solution: Reduce the load or provide adequate cooling.
Electrical Noise Interference
- Cause: Motor generates noise that affects nearby circuits.
- Solution: Add capacitors (e.g., 0.1 µF) across the motor terminals.
FAQs
- Can I use a lower voltage to power the motor?
- Yes, but the motor's speed and torque will decrease proportionally.
- What happens if I exceed the stall torque?
- The motor may overheat or become damaged. Always operate within the rated torque.
- Can I control this motor without a motor driver?
- Yes, but a motor driver is recommended for precise speed and direction control.
This concludes the documentation for the Moteur 25GA370 12V.