Cirkit Designer Logo
Cirkit Designer
Your all-in-one circuit design IDE
Home / 
Component Documentation

How to Use Adafruit SPI Flash SD Card - XTSD 4 GB: Examples, Pinouts, and Specs

Image of Adafruit SPI Flash SD Card - XTSD 4 GB
Cirkit Designer LogoDesign with Adafruit SPI Flash SD Card - XTSD 4 GB in Cirkit Designer

Introduction

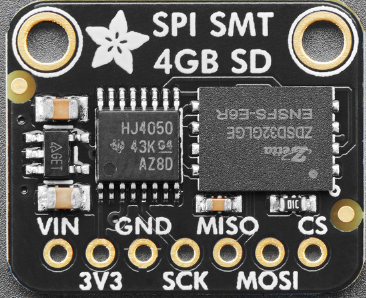
The Adafruit SPI Flash SD Card - XTSD 4 GB (Manufacturer Part ID: 6039) is a compact and reliable storage solution designed for use with microcontrollers and embedded systems. This 4 GB SPI flash SD card provides a robust platform for data logging, file storage, and other applications requiring non-volatile memory. Its SPI interface ensures compatibility with a wide range of microcontrollers, making it an excellent choice for projects requiring efficient and reliable data storage.

Explore Projects Built with Adafruit SPI Flash SD Card - XTSD 4 GB

Use Cirkit Designer to design, explore, and prototype these projects online. Some projects support real-time simulation. Click "Open Project" to start designing instantly!
Arduino UNO SD Card Data Logger
Image of sd card: A project utilizing Adafruit SPI Flash SD Card - XTSD 4 GB in a practical application
This circuit consists of an Arduino UNO connected to an SD card module. The Arduino provides power and ground to the SD module and interfaces with it using SPI communication through digital pins D10 (CS), D11 (MOSI), D12 (MISO), and D13 (SCK). The setup is intended for reading from or writing to an SD card using the Arduino.
Cirkit Designer LogoOpen Project in Cirkit Designer
ESP32-C3 and Micro SD Card Module for Data Logging
Image of Esp 32 super mini with MicroSd module: A project utilizing Adafruit SPI Flash SD Card - XTSD 4 GB in a practical application
This circuit features an ESP32-C3 microcontroller interfaced with a Micro SD Card Module. The ESP32-C3 handles SPI communication with the SD card for data storage and retrieval, with specific GPIO pins assigned for MOSI, MISO, SCK, and CS signals.
Cirkit Designer LogoOpen Project in Cirkit Designer
Arduino UNO R4 WiFi Controlled Data Logger with BNO055 Sensor and Micro SD Storage
Image of Main Telemetry R4: A project utilizing Adafruit SPI Flash SD Card - XTSD 4 GB in a practical application
This circuit features an Arduino UNO R4 WiFi microcontroller connected to a Micro SD Card Module for data storage, a BNO055 sensor for orientation data, and three red LEDs for indication purposes. The LEDs are controlled by digital pins D2, D3, and D4, and can be turned on or off using a single-pole single-throw (SPST) toggle switch connected to their common cathodes and ground. The BNO055 sensor interfaces with the Arduino via I2C communication using the SDA and SCL pins, and the Micro SD Card Module is interfaced using SPI with chip select on pin D10 and data lines on pins D11 (MOSI), D12 (MISO), and D13 (SCK).
Cirkit Designer LogoOpen Project in Cirkit Designer
Arduino UNO Battery-Powered Data Logger with Micro SD Card Storage
Image of arduino sd: A project utilizing Adafruit SPI Flash SD Card - XTSD 4 GB in a practical application
This circuit is designed to interface an Arduino UNO with a Micro SD Card Module for data storage, powered by two 18650 Li-ion batteries through a USB plug and controlled by a rocker switch. The Arduino communicates with the SD card module via SPI protocol and is also connected to the USB plug for potential data transfer or power supply.
Cirkit Designer LogoOpen Project in Cirkit Designer

Explore Projects Built with Adafruit SPI Flash SD Card - XTSD 4 GB

Use Cirkit Designer to design, explore, and prototype these projects online. Some projects support real-time simulation. Click "Open Project" to start designing instantly!
Image of sd card: A project utilizing Adafruit SPI Flash SD Card - XTSD 4 GB in a practical application
Arduino UNO SD Card Data Logger
This circuit consists of an Arduino UNO connected to an SD card module. The Arduino provides power and ground to the SD module and interfaces with it using SPI communication through digital pins D10 (CS), D11 (MOSI), D12 (MISO), and D13 (SCK). The setup is intended for reading from or writing to an SD card using the Arduino.
Cirkit Designer LogoOpen Project in Cirkit Designer
Image of Esp 32 super mini with MicroSd module: A project utilizing Adafruit SPI Flash SD Card - XTSD 4 GB in a practical application
ESP32-C3 and Micro SD Card Module for Data Logging
This circuit features an ESP32-C3 microcontroller interfaced with a Micro SD Card Module. The ESP32-C3 handles SPI communication with the SD card for data storage and retrieval, with specific GPIO pins assigned for MOSI, MISO, SCK, and CS signals.
Cirkit Designer LogoOpen Project in Cirkit Designer
Image of Main Telemetry R4: A project utilizing Adafruit SPI Flash SD Card - XTSD 4 GB in a practical application
Arduino UNO R4 WiFi Controlled Data Logger with BNO055 Sensor and Micro SD Storage
This circuit features an Arduino UNO R4 WiFi microcontroller connected to a Micro SD Card Module for data storage, a BNO055 sensor for orientation data, and three red LEDs for indication purposes. The LEDs are controlled by digital pins D2, D3, and D4, and can be turned on or off using a single-pole single-throw (SPST) toggle switch connected to their common cathodes and ground. The BNO055 sensor interfaces with the Arduino via I2C communication using the SDA and SCL pins, and the Micro SD Card Module is interfaced using SPI with chip select on pin D10 and data lines on pins D11 (MOSI), D12 (MISO), and D13 (SCK).
Cirkit Designer LogoOpen Project in Cirkit Designer
Image of arduino sd: A project utilizing Adafruit SPI Flash SD Card - XTSD 4 GB in a practical application
Arduino UNO Battery-Powered Data Logger with Micro SD Card Storage
This circuit is designed to interface an Arduino UNO with a Micro SD Card Module for data storage, powered by two 18650 Li-ion batteries through a USB plug and controlled by a rocker switch. The Arduino communicates with the SD card module via SPI protocol and is also connected to the USB plug for potential data transfer or power supply.
Cirkit Designer LogoOpen Project in Cirkit Designer

Common Applications and Use Cases

  • Data logging for IoT devices and sensors
  • File storage for embedded systems
  • Storing configuration files and firmware updates
  • Use in portable devices requiring lightweight storage solutions
  • Projects involving Arduino, Raspberry Pi, or other microcontroller platforms

Technical Specifications

The following table outlines the key technical details of the Adafruit SPI Flash SD Card - XTSD 4 GB:

Specification Details
Manufacturer Adafruit
Part ID 6039
Storage Capacity 4 GB
Interface SPI (Serial Peripheral Interface)
Operating Voltage 3.3V
Maximum Clock Speed 50 MHz
Write/Erase Cycles 100,000 cycles (typical)
Data Retention 20 years (typical)
Operating Temperature -40°C to +85°C
Dimensions 24 mm x 32 mm x 2.1 mm

Pin Configuration and Descriptions

The Adafruit SPI Flash SD Card uses a standard SPI interface with the following pin configuration:

Pin Name Pin Number Description
CS 1 Chip Select: Activates the SPI communication.
SCK 2 Serial Clock: Synchronizes data transfer.
MOSI 3 Master Out Slave In: Data sent from the master.
MISO 4 Master In Slave Out: Data sent to the master.
VCC 5 Power Supply: Connect to 3.3V.
GND 6 Ground: Connect to the system ground.

Usage Instructions

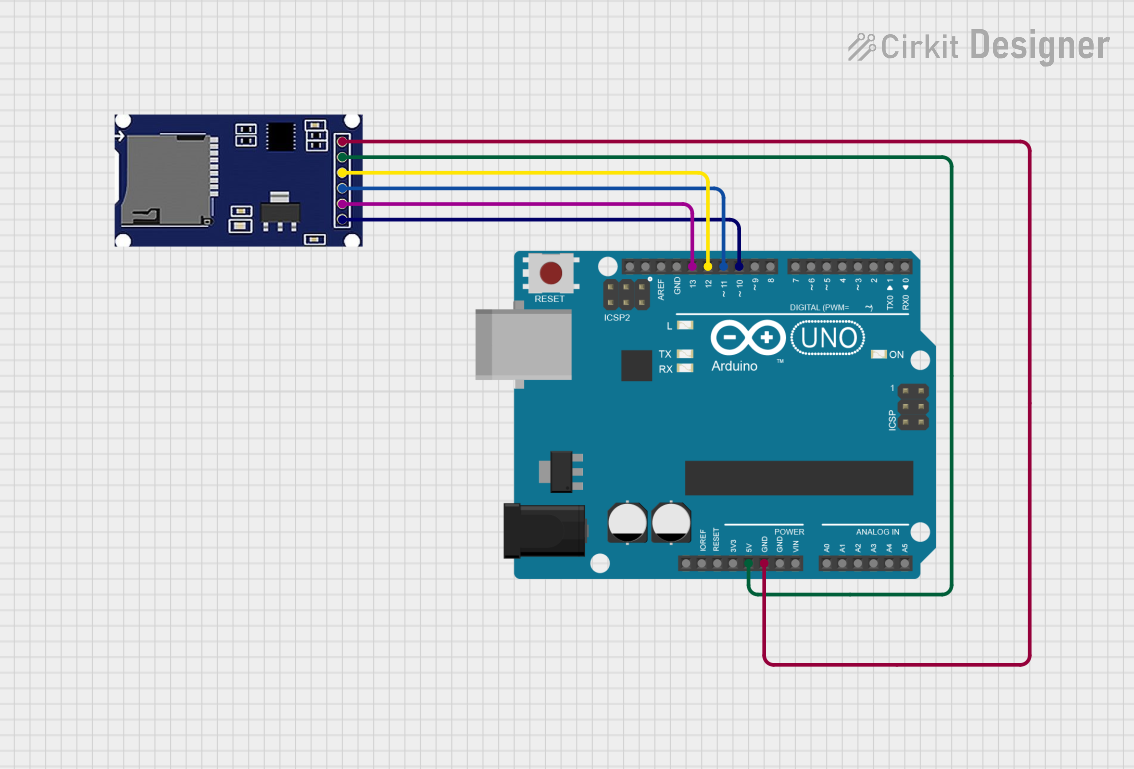
How to Use the Component in a Circuit

  1. Power Supply: Connect the VCC pin to a 3.3V power source and the GND pin to the ground.
  2. SPI Connections: Connect the CS, SCK, MOSI, and MISO pins to the corresponding SPI pins on your microcontroller.
  3. Pull-Up Resistors: Ensure proper pull-up resistors are used on the SPI lines if required by your microcontroller.
  4. Software Setup: Use an appropriate library (e.g., Adafruit SPIFlash or SD library) to initialize and communicate with the SD card.

Important Considerations and Best Practices

  • Voltage Levels: Ensure the SPI lines operate at 3.3V logic levels. Use a level shifter if your microcontroller operates at 5V.
  • Clock Speed: Do not exceed the maximum clock speed of 50 MHz for reliable operation.
  • File System: Format the SD card with a FAT16 or FAT32 file system for compatibility with most libraries.
  • ESD Protection: Handle the SD card with care to avoid electrostatic discharge damage.

Example Code for Arduino UNO

Below is an example of how to use the Adafruit SPI Flash SD Card with an Arduino UNO:

#include <SPI.h>
#include <SdFat.h>

// Define the chip select pin for the SD card
const int chipSelect = 10;

// Create an SdFat object
SdFat SD;

void setup() {
  // Initialize serial communication for debugging
  Serial.begin(9600);
  while (!Serial) {
    // Wait for the serial port to connect
  }

  Serial.println("Initializing SD card...");

  // Initialize the SD card
  if (!SD.begin(chipSelect, SPI_HALF_SPEED)) {
    Serial.println("SD card initialization failed!");
    return;
  }

  Serial.println("SD card initialized successfully.");
}

void loop() {
  // Example: Write a file to the SD card
  File dataFile = SD.open("example.txt", FILE_WRITE);

  if (dataFile) {
    dataFile.println("Hello, Adafruit SPI Flash SD Card!");
    dataFile.close();
    Serial.println("Data written to example.txt.");
  } else {
    Serial.println("Error opening example.txt for writing.");
  }

  delay(5000); // Wait 5 seconds before repeating
}

Troubleshooting and FAQs

Common Issues Users Might Face

  1. SD Card Initialization Fails:

    • Ensure the chip select (CS) pin is correctly defined and connected.
    • Verify that the SD card is formatted with a FAT16 or FAT32 file system.
    • Check the wiring for loose or incorrect connections.
  2. Data Corruption:

    • Avoid removing the SD card while the system is powered on.
    • Ensure proper shutdown procedures to prevent incomplete writes.
  3. SPI Communication Errors:

    • Verify that the SPI clock speed does not exceed 50 MHz.
    • Check for proper pull-up resistors on the SPI lines if required.

Solutions and Tips for Troubleshooting

  • Use a multimeter to verify voltage levels on the VCC and SPI lines.
  • Test the SD card with a different microcontroller or development board to rule out hardware issues.
  • Update the library used for SD card communication to the latest version.
  • If using an Arduino UNO, ensure the SPI pins (10, 11, 12, 13) are not used for other peripherals.

By following this documentation, users can effectively integrate the Adafruit SPI Flash SD Card - XTSD 4 GB into their projects and troubleshoot common issues with ease.