Cirkit Designer Logo
Cirkit Designer
Your all-in-one circuit design IDE
Home / 
Component Documentation

How to Use Gravity Analog Sound Level Meter: Examples, Pinouts, and Specs

Image of Gravity Analog Sound Level Meter
Cirkit Designer LogoDesign with Gravity Analog Sound Level Meter in Cirkit Designer

Introduction

The Gravity Analog Sound Level Meter (Manufacturer Part ID: SEN0232) by DFRobot is a device designed to measure sound levels in decibels (dB). It provides an analog output that corresponds to the intensity of the surrounding sound. This component is ideal for applications requiring sound level monitoring, such as environmental noise measurement, audio system testing, and interactive sound-based projects.

Explore Projects Built with Gravity Analog Sound Level Meter

Use Cirkit Designer to design, explore, and prototype these projects online. Some projects support real-time simulation. Click "Open Project" to start designing instantly!
Arduino UNO Sound Level Meter with MAX4466 Microphone Amplifier
Image of Interfacing MAX4466 Microphone Amplifier with Arduino UNO: A project utilizing Gravity Analog Sound Level Meter in a practical application
This circuit is designed to measure sound levels using an Adafruit MAX4466 Electret Microphone Amplifier connected to an Arduino UNO. The microphone amplifier's output is fed into the Arduino's A0 analog input for signal processing. The embedded code on the Arduino samples the audio signal to determine its peak-to-peak amplitude, which is indicative of the ambient sound level, and outputs the measurement to the serial monitor.
Cirkit Designer LogoOpen Project in Cirkit Designer
Arduino UNO Sound Level Meter with LCD Display
Image of soundsensorrsdsadadadawd: A project utilizing Gravity Analog Sound Level Meter in a practical application
This circuit uses an Arduino UNO to read sound levels from a sound sensor and display the measured sound intensity on a 16x2 I2C LCD screen. The Arduino processes the analog signal from the sound sensor, calculates the average sound level, and categorizes the intensity as low, medium, or high, which is then shown on the LCD.
Cirkit Designer LogoOpen Project in Cirkit Designer
Arduino UNO Sound Level Meter with LED Indicators and LCD Display
Image of acoustique : A project utilizing Gravity Analog Sound Level Meter in a practical application
This circuit uses an Arduino UNO to measure sound levels with a sound sensor and display the loudness in decibels on a 16x2 I2C LCD. Depending on the sound level, it lights up one of three LEDs (red, yellow, green) to indicate 'Quiet', 'Moderate', or 'Loud' sound levels.
Cirkit Designer LogoOpen Project in Cirkit Designer
Arduino Uno R3 Multi-Sensor Monitoring System with Data Logging and Audio Alerts
Image of sound2: A project utilizing Gravity Analog Sound Level Meter in a practical application
This circuit is designed for environmental monitoring and data logging. It features an Arduino Uno R3 as the central controller, interfaced with multiple sensors including sound sensors, MQ135 gas sensors for air quality, and an HC-SR04 ultrasonic sensor for distance measurement. The data from these sensors can be displayed on an I2C LCD screen and logged onto a micro SD card, while the speakers are likely used for audible alerts or feedback.
Cirkit Designer LogoOpen Project in Cirkit Designer

Explore Projects Built with Gravity Analog Sound Level Meter

Use Cirkit Designer to design, explore, and prototype these projects online. Some projects support real-time simulation. Click "Open Project" to start designing instantly!
Image of Interfacing MAX4466 Microphone Amplifier with Arduino UNO: A project utilizing Gravity Analog Sound Level Meter in a practical application
Arduino UNO Sound Level Meter with MAX4466 Microphone Amplifier
This circuit is designed to measure sound levels using an Adafruit MAX4466 Electret Microphone Amplifier connected to an Arduino UNO. The microphone amplifier's output is fed into the Arduino's A0 analog input for signal processing. The embedded code on the Arduino samples the audio signal to determine its peak-to-peak amplitude, which is indicative of the ambient sound level, and outputs the measurement to the serial monitor.
Cirkit Designer LogoOpen Project in Cirkit Designer
Image of soundsensorrsdsadadadawd: A project utilizing Gravity Analog Sound Level Meter in a practical application
Arduino UNO Sound Level Meter with LCD Display
This circuit uses an Arduino UNO to read sound levels from a sound sensor and display the measured sound intensity on a 16x2 I2C LCD screen. The Arduino processes the analog signal from the sound sensor, calculates the average sound level, and categorizes the intensity as low, medium, or high, which is then shown on the LCD.
Cirkit Designer LogoOpen Project in Cirkit Designer
Image of acoustique : A project utilizing Gravity Analog Sound Level Meter in a practical application
Arduino UNO Sound Level Meter with LED Indicators and LCD Display
This circuit uses an Arduino UNO to measure sound levels with a sound sensor and display the loudness in decibels on a 16x2 I2C LCD. Depending on the sound level, it lights up one of three LEDs (red, yellow, green) to indicate 'Quiet', 'Moderate', or 'Loud' sound levels.
Cirkit Designer LogoOpen Project in Cirkit Designer
Image of sound2: A project utilizing Gravity Analog Sound Level Meter in a practical application
Arduino Uno R3 Multi-Sensor Monitoring System with Data Logging and Audio Alerts
This circuit is designed for environmental monitoring and data logging. It features an Arduino Uno R3 as the central controller, interfaced with multiple sensors including sound sensors, MQ135 gas sensors for air quality, and an HC-SR04 ultrasonic sensor for distance measurement. The data from these sensors can be displayed on an I2C LCD screen and logged onto a micro SD card, while the speakers are likely used for audible alerts or feedback.
Cirkit Designer LogoOpen Project in Cirkit Designer

Common Applications and Use Cases

  • Environmental noise monitoring
  • Audio system calibration
  • Sound-activated projects
  • Interactive art installations
  • Educational experiments in acoustics

Technical Specifications

The following table outlines the key technical details of the Gravity Analog Sound Level Meter:

Parameter Value
Operating Voltage 3.3V to 5.5V
Output Signal Analog voltage (0.6V to 2.6V)
Measurement Range 30dB to 130dB
Sensitivity Adjustable via onboard potentiometer
Frequency Response 50Hz to 4kHz
Dimensions 44mm x 30mm
Weight 10g

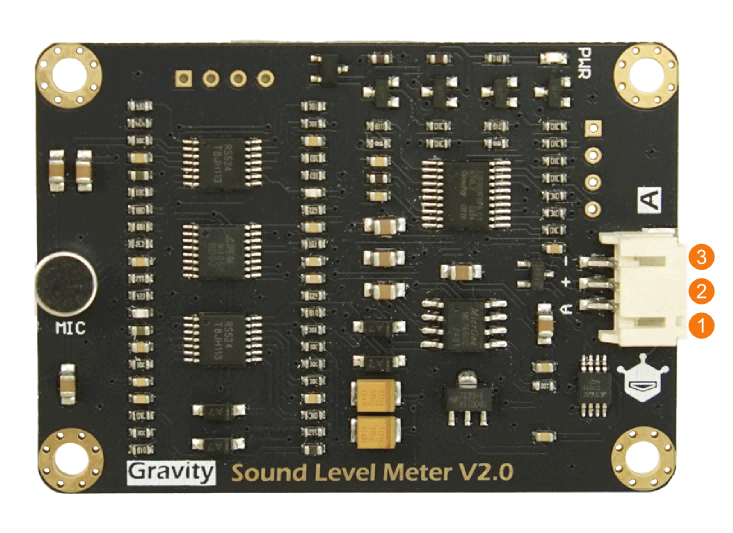
Pin Configuration and Descriptions

The Gravity Analog Sound Level Meter has a 3-pin interface. The pin configuration is as follows:

Pin Label Description
1 VCC Power supply input (3.3V to 5.5V)
2 GND Ground connection
3 AOUT Analog output signal proportional to sound intensity

Usage Instructions

How to Use the Component in a Circuit

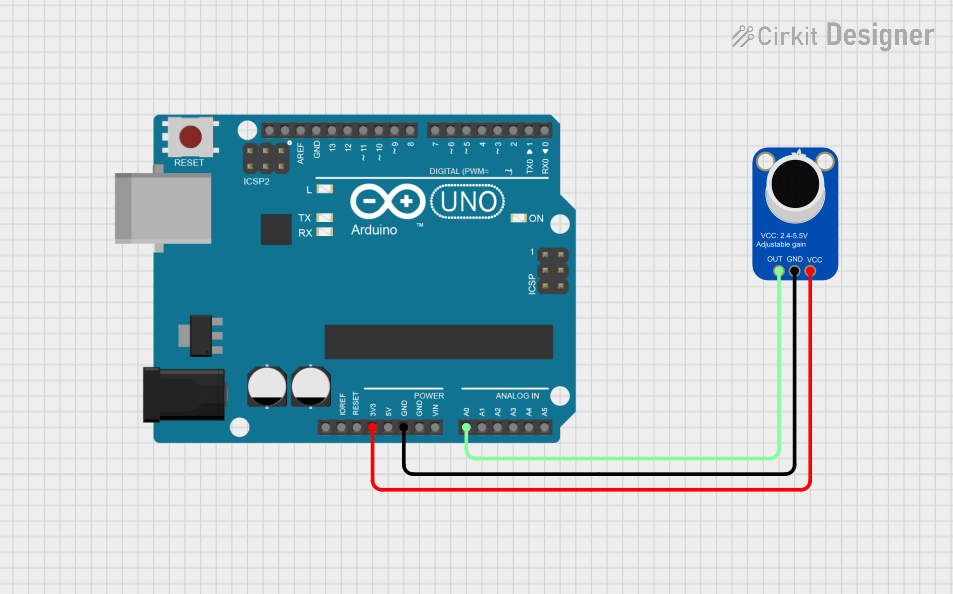
  1. Power the Module: Connect the VCC pin to a 3.3V or 5V power source and the GND pin to the ground of your circuit.
  2. Read the Analog Output: Connect the AOUT pin to an analog input pin of a microcontroller (e.g., Arduino UNO) to read the sound level as a voltage signal.
  3. Adjust Sensitivity: Use the onboard potentiometer to fine-tune the sensitivity of the sound level meter for your specific application.

Important Considerations and Best Practices

  • Power Supply: Ensure a stable power supply to avoid noise in the analog output signal.
  • Placement: Place the module away from sources of electrical noise or vibrations to ensure accurate readings.
  • Calibration: Adjust the potentiometer to calibrate the module for the desired sensitivity range.
  • Frequency Response: Note that the module is optimized for frequencies between 50Hz and 4kHz, which covers most human speech and common sounds.

Example: Connecting to an Arduino UNO

Below is an example of how to use the Gravity Analog Sound Level Meter with an Arduino UNO to measure sound levels:

// Example code for using the Gravity Analog Sound Level Meter (SEN0232)
// with an Arduino UNO to read and display sound levels.

const int soundPin = A0; // Connect AOUT pin of the module to Arduino A0
int soundLevel = 0;      // Variable to store the analog reading

void setup() {
  Serial.begin(9600); // Initialize serial communication at 9600 baud
  pinMode(soundPin, INPUT); // Set the soundPin as an input
}

void loop() {
  soundLevel = analogRead(soundPin); // Read the analog value from the module
  float voltage = soundLevel * (5.0 / 1023.0); // Convert to voltage (5V system)
  
  // Print the raw analog value and corresponding voltage
  Serial.print("Analog Value: ");
  Serial.print(soundLevel);
  Serial.print(" | Voltage: ");
  Serial.print(voltage);
  Serial.println(" V");
  
  delay(500); // Wait for 500ms before the next reading
}

Notes:

  • The analog output voltage ranges from approximately 0.6V (low sound level) to 2.6V (high sound level).
  • You can map the analog readings to dB values if needed, based on the module's sensitivity and calibration.

Troubleshooting and FAQs

Common Issues and Solutions

  1. No Output Signal:

    • Cause: Incorrect wiring or insufficient power supply.
    • Solution: Verify the connections and ensure the power supply voltage is within the specified range (3.3V to 5.5V).
  2. Inconsistent Readings:

    • Cause: Electrical noise or vibrations affecting the module.
    • Solution: Place the module away from noisy components and ensure a stable power source.
  3. Output Signal Stuck at a Fixed Value:

    • Cause: Potentiometer not adjusted correctly.
    • Solution: Rotate the onboard potentiometer to adjust the sensitivity.
  4. Output Voltage Exceeds Expected Range:

    • Cause: Incorrect power supply voltage.
    • Solution: Ensure the power supply voltage does not exceed 5.5V.

FAQs

Q1: Can this module measure sound levels above 130dB?
A1: No, the module is designed to measure sound levels within the range of 30dB to 130dB. Sound levels outside this range may not be accurately represented.

Q2: Can I use this module with a 3.3V microcontroller?
A2: Yes, the module is compatible with both 3.3V and 5V systems.

Q3: How do I map the analog output to decibel values?
A3: The analog output is proportional to the sound intensity. You can calibrate the module using a known sound source and map the analog readings to dB values accordingly.

Q4: Is this module suitable for measuring ultrasonic frequencies?
A4: No, the module is optimized for frequencies between 50Hz and 4kHz, which covers most audible sounds but not ultrasonic frequencies.

By following this documentation, you can effectively integrate the Gravity Analog Sound Level Meter into your projects and achieve accurate sound level measurements.