
How to Use MPR121: Examples, Pinouts, and Specs
 Design with MPR121 in Cirkit Designer
Introduction
The MPR121 is a capacitive touch sensor controller capable of detecting touch inputs on up to 12 electrodes. It is designed to simplify the creation of touch-sensitive interfaces, eliminating the need for mechanical buttons. The MPR121 communicates via the I2C protocol, making it easy to integrate with microcontrollers such as Arduino, Raspberry Pi, and other embedded systems.
Explore Projects Built with MPR121
 Open Project in Cirkit Designer
 Open Project in Cirkit Designer
 Open Project in Cirkit Designer
 Open Project in Cirkit Designer
Explore Projects Built with MPR121
Open Project in Cirkit DesignerOpen Project in Cirkit DesignerOpen Project in Cirkit DesignerOpen Project in Cirkit DesignerCommon Applications
- Touch-sensitive control panels
- Interactive displays
- Wearable devices
- Home automation systems
- Musical instruments and toys
- Proximity sensing applications
Technical Specifications
The MPR121 offers robust functionality for capacitive touch sensing. Below are its key technical details:
| Parameter | Value |
|---|---|
| Operating Voltage | 1.71V to 3.6V |
| Communication Interface | I2C (up to 400 kHz) |
| Number of Touch Inputs | 12 electrodes |
| Maximum Current Consumption | 29 µA (typical, in run mode) |
| Electrode Sensitivity | Configurable via registers |
| Operating Temperature | -40°C to +85°C |
| Interrupt Output | Active-low interrupt pin (IRQ) |
Pin Configuration
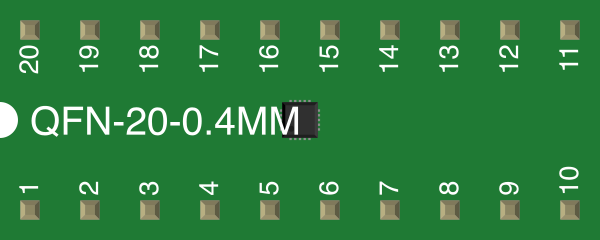
The MPR121 is typically available in a 20-pin QFN package. Below is the pinout description:
| Pin | Name | Description |
|---|---|---|
| 1 | VDD | Power supply input (1.71V to 3.6V). |
| 2 | GND | Ground connection. |
| 3 | SDA | I2C data line. |
| 4 | SCL | I2C clock line. |
| 5 | IRQ | Interrupt output (active low). |
| 6-17 | ELE0-ELE11 | Electrode inputs for touch sensing. |
| 18 | RST | Reset pin (active low). |
| 19 | ADDR | I2C address selection pin (connect to GND or VDD to set address). |
| 20 | NC | No connection (leave unconnected). |
Usage Instructions
Connecting the MPR121 to an Arduino UNO
To use the MPR121 with an Arduino UNO, follow these steps:
Wiring:
- Connect the
VDDpin to the Arduino's 3.3V pin. - Connect the
GNDpin to the Arduino's GND. - Connect the
SDApin to the Arduino's A4 pin (I2C data line). - Connect the
SCLpin to the Arduino's A5 pin (I2C clock line). - Connect the
IRQpin to any digital pin on the Arduino (e.g., D2). - Optionally, connect the
ADDRpin to GND or VDD to set the I2C address.
- Connect the
Install the MPR121 Library:
- Open the Arduino IDE.
- Go to Sketch > Include Library > Manage Libraries.
- Search for "Adafruit MPR121" and install the library.
Example Code: Use the following example code to detect touch inputs:
#include <Wire.h>
#include <Adafruit_MPR121.h>

// Create an MPR121 object
Adafruit_MPR121 cap = Adafruit_MPR121();

void setup() {
  Serial.begin(9600);
  while (!Serial) {
    // Wait for the serial monitor to open
  }

  // Initialize the MPR121
  if (!cap.begin(0x5A)) { // Default I2C address is 0x5A
    Serial.println("MPR121 not found. Check wiring!");
    while (1);
  }
  Serial.println("MPR121 initialized.");
}

void loop() {
  // Read touch status
  uint16_t touched = cap.touched();

  for (uint8_t i = 0; i < 12; i++) {
    // Check if electrode i is touched
    if (touched & (1 << i)) {
      Serial.print("Electrode ");
      Serial.print(i);
      Serial.println(" is touched.");
    }
  }
  delay(100); // Small delay to avoid flooding the serial monitor
}
Important Considerations
- Power Supply: The MPR121 operates at 3.3V. If using a 5V microcontroller, use a level shifter for the I2C lines.
- Electrode Design: Ensure proper electrode design and layout for optimal touch sensitivity.
- Pull-up Resistors: Use appropriate pull-up resistors (typically 4.7kΩ) on the SDA and SCL lines if not already present.
- Interrupt Pin: The IRQ pin can be used to detect touch events without continuously polling the sensor.
Troubleshooting and FAQs
Common Issues
MPR121 Not Detected:
- Cause: Incorrect wiring or I2C address mismatch.
- Solution: Verify connections and ensure the
ADDRpin is set correctly. Use an I2C scanner sketch to confirm the address.
Touch Inputs Not Detected:
- Cause: Poor electrode design or improper grounding.
- Solution: Check electrode connections and ensure they are properly grounded.
Random Touch Events:
- Cause: Electrical noise or improper sensitivity settings.
- Solution: Adjust sensitivity registers in the MPR121 configuration.
IRQ Pin Not Responding:
- Cause: IRQ pin not connected or misconfigured.
- Solution: Ensure the IRQ pin is connected to the correct Arduino pin and configured as an input.
FAQs
Q: Can the MPR121 detect proximity in addition to touch?
A: Yes, the MPR121 can detect proximity by combining multiple electrodes into a single sensing area.
Q: What is the maximum cable length for electrodes?
A: The maximum cable length depends on the environment and noise levels but is typically limited to a few centimeters for reliable operation.
Q: Can I use fewer than 12 electrodes?
A: Yes, unused electrode pins can be left unconnected or disabled in the configuration.
Q: How do I change the I2C address of the MPR121?
A: Connect the ADDR pin to GND (0x5A), VDD (0x5B), SDA (0x5C), or SCL (0x5D) to select one of four possible addresses.
By following this documentation, you can effectively integrate the MPR121 into your projects and create innovative touch-sensitive interfaces.