Cirkit Designer Logo
Cirkit Designer
Your all-in-one circuit design IDE
Home / 
Component Documentation

How to Use SD CARD MODULE: Examples, Pinouts, and Specs

Image of SD CARD MODULE
Cirkit Designer LogoDesign with SD CARD MODULE in Cirkit Designer

Introduction

The SD Card Module is a versatile component used to interface with SD cards, enabling data storage and retrieval in various electronic projects. This module is particularly useful in applications where large amounts of data need to be logged, such as in data logging systems, multimedia projects, and portable devices. It is commonly used with microcontrollers like the Arduino UNO to expand their storage capabilities.

Explore Projects Built with SD CARD MODULE

Use Cirkit Designer to design, explore, and prototype these projects online. Some projects support real-time simulation. Click "Open Project" to start designing instantly!
Arduino UNO SD Card Data Logger
Image of sd card: A project utilizing SD CARD MODULE in a practical application
This circuit consists of an Arduino UNO connected to an SD card module. The Arduino provides power and ground to the SD module and interfaces with it using SPI communication through digital pins D10 (CS), D11 (MOSI), D12 (MISO), and D13 (SCK). The setup is intended for reading from or writing to an SD card using the Arduino.
Cirkit Designer LogoOpen Project in Cirkit Designer
Heltec LoRa V2 with SD Card Data Logging
Image of LoRa SD: A project utilizing SD CARD MODULE in a practical application
This circuit connects an SD card module to a Heltec LoRa V2 microcontroller for data storage and retrieval. The SD module is interfaced with the microcontroller via SPI communication, utilizing the CS, SCK, MOSI, and MISO pins. Power is supplied to the SD module from the microcontroller's 5V output, and both modules share a common ground.
Cirkit Designer LogoOpen Project in Cirkit Designer
ESP32-C3 and Micro SD Card Module for Data Logging
Image of Esp 32 super mini with MicroSd module: A project utilizing SD CARD MODULE in a practical application
This circuit features an ESP32-C3 microcontroller interfaced with a Micro SD Card Module. The ESP32-C3 handles SPI communication with the SD card for data storage and retrieval, with specific GPIO pins assigned for MOSI, MISO, SCK, and CS signals.
Cirkit Designer LogoOpen Project in Cirkit Designer
Arduino UNO Battery-Powered Data Logger with Micro SD Card Storage
Image of arduino sd: A project utilizing SD CARD MODULE in a practical application
This circuit is designed to interface an Arduino UNO with a Micro SD Card Module for data storage, powered by two 18650 Li-ion batteries through a USB plug and controlled by a rocker switch. The Arduino communicates with the SD card module via SPI protocol and is also connected to the USB plug for potential data transfer or power supply.
Cirkit Designer LogoOpen Project in Cirkit Designer

Explore Projects Built with SD CARD MODULE

Use Cirkit Designer to design, explore, and prototype these projects online. Some projects support real-time simulation. Click "Open Project" to start designing instantly!
Image of sd card: A project utilizing SD CARD MODULE in a practical application
Arduino UNO SD Card Data Logger
This circuit consists of an Arduino UNO connected to an SD card module. The Arduino provides power and ground to the SD module and interfaces with it using SPI communication through digital pins D10 (CS), D11 (MOSI), D12 (MISO), and D13 (SCK). The setup is intended for reading from or writing to an SD card using the Arduino.
Cirkit Designer LogoOpen Project in Cirkit Designer
Image of LoRa SD: A project utilizing SD CARD MODULE in a practical application
Heltec LoRa V2 with SD Card Data Logging
This circuit connects an SD card module to a Heltec LoRa V2 microcontroller for data storage and retrieval. The SD module is interfaced with the microcontroller via SPI communication, utilizing the CS, SCK, MOSI, and MISO pins. Power is supplied to the SD module from the microcontroller's 5V output, and both modules share a common ground.
Cirkit Designer LogoOpen Project in Cirkit Designer
Image of Esp 32 super mini with MicroSd module: A project utilizing SD CARD MODULE in a practical application
ESP32-C3 and Micro SD Card Module for Data Logging
This circuit features an ESP32-C3 microcontroller interfaced with a Micro SD Card Module. The ESP32-C3 handles SPI communication with the SD card for data storage and retrieval, with specific GPIO pins assigned for MOSI, MISO, SCK, and CS signals.
Cirkit Designer LogoOpen Project in Cirkit Designer
Image of arduino sd: A project utilizing SD CARD MODULE in a practical application
Arduino UNO Battery-Powered Data Logger with Micro SD Card Storage
This circuit is designed to interface an Arduino UNO with a Micro SD Card Module for data storage, powered by two 18650 Li-ion batteries through a USB plug and controlled by a rocker switch. The Arduino communicates with the SD card module via SPI protocol and is also connected to the USB plug for potential data transfer or power supply.
Cirkit Designer LogoOpen Project in Cirkit Designer

Technical Specifications

Key Technical Details

Parameter Value
Operating Voltage 3.3V - 5V
Interface SPI (Serial Peripheral Interface)
Supported Cards SD, SDHC
Storage Capacity Up to 32GB (depending on the card)
Current Consumption 100mA (typical)

Pin Configuration and Descriptions

Pin Name Description
1 GND Ground
2 VCC Power Supply (3.3V - 5V)
3 MISO Master In Slave Out (SPI Data Output)
4 MOSI Master Out Slave In (SPI Data Input)
5 SCK Serial Clock (SPI Clock)
6 CS Chip Select (SPI Enable)

Usage Instructions

How to Use the Component in a Circuit

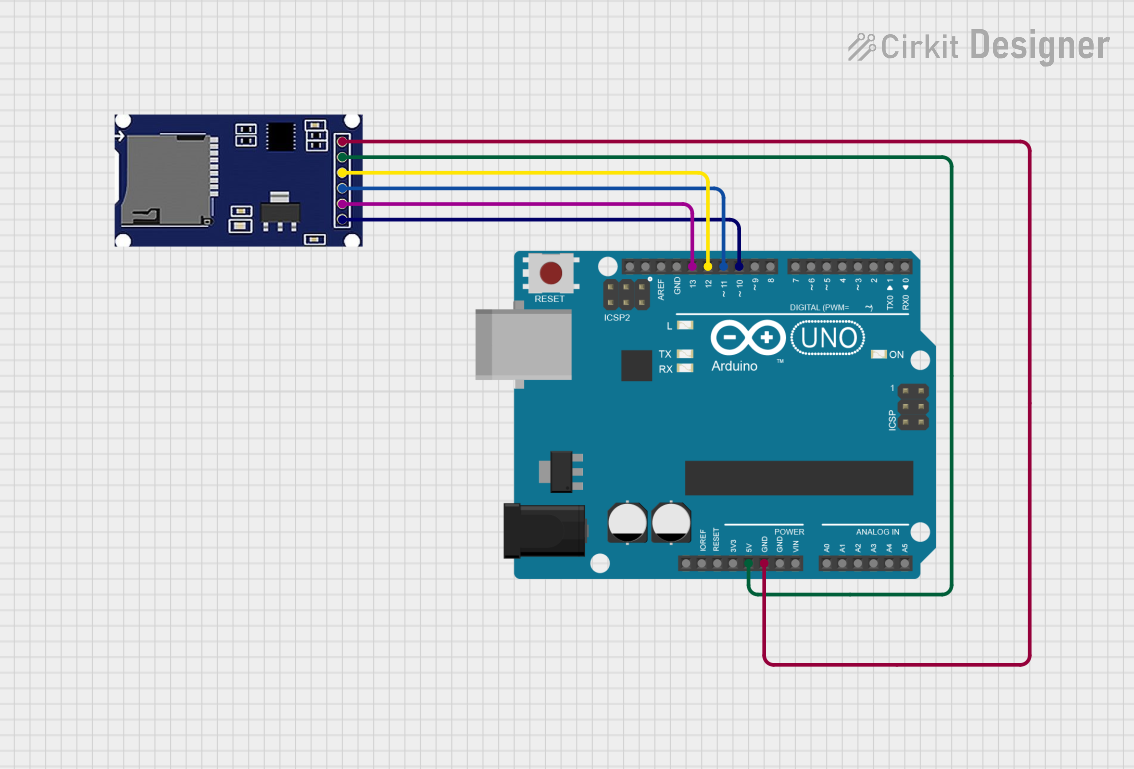
  1. Wiring the SD Card Module to Arduino UNO:

    • Connect the GND pin of the SD Card Module to the GND pin on the Arduino.
    • Connect the VCC pin of the SD Card Module to the 5V pin on the Arduino.
    • Connect the MISO pin of the SD Card Module to the 12 pin on the Arduino.
    • Connect the MOSI pin of the SD Card Module to the 11 pin on the Arduino.
    • Connect the SCK pin of the SD Card Module to the 13 pin on the Arduino.
    • Connect the CS pin of the SD Card Module to the 10 pin on the Arduino.
  2. Arduino Code Example:

#include <SPI.h>
#include <SD.h>

const int chipSelect = 10;

void setup() {
  Serial.begin(9600);
  // Initialize the SD card
  if (!SD.begin(chipSelect)) {
    Serial.println("Initialization failed!");
    return;
  }
  Serial.println("Initialization done.");

  // Open a file for writing
  File dataFile = SD.open("datalog.txt", FILE_WRITE);
  if (dataFile) {
    dataFile.println("Hello, SD card!");
    dataFile.close();
    Serial.println("Data written to file.");
  } else {
    Serial.println("Error opening file.");
  }
}

void loop() {
  // Nothing to do here
}

Important Considerations and Best Practices

  • Power Supply: Ensure the module is powered with a stable voltage between 3.3V and 5V.
  • Card Formatting: Format the SD card to FAT16 or FAT32 before use.
  • File Handling: Always close files after reading or writing to prevent data corruption.
  • SPI Speed: Adjust the SPI speed if you encounter communication issues.

Troubleshooting and FAQs

Common Issues Users Might Face

  1. Initialization Failed:

    • Solution: Check the wiring connections and ensure the SD card is properly inserted. Verify that the SD card is formatted correctly.
  2. Error Opening File:

    • Solution: Ensure the file name is valid and the SD card is not write-protected. Check if the SD card has sufficient free space.
  3. Data Corruption:

    • Solution: Always close files after operations. Avoid removing the SD card while the module is powered.

Solutions and Tips for Troubleshooting

  • Check Connections: Ensure all connections are secure and correctly mapped.
  • Use Quality SD Cards: Use high-quality SD cards from reputable brands to avoid compatibility issues.
  • Monitor Power Supply: Ensure the power supply is stable and within the specified range.

By following this documentation, users can effectively integrate the SD Card Module into their projects, enabling reliable data storage and retrieval. Whether you are a beginner or an experienced user, this guide provides the necessary information to get started and troubleshoot common issues.