How to Use rpi 5 cam 3 ni yowhan: Examples, Pinouts, and Specs
Introduction
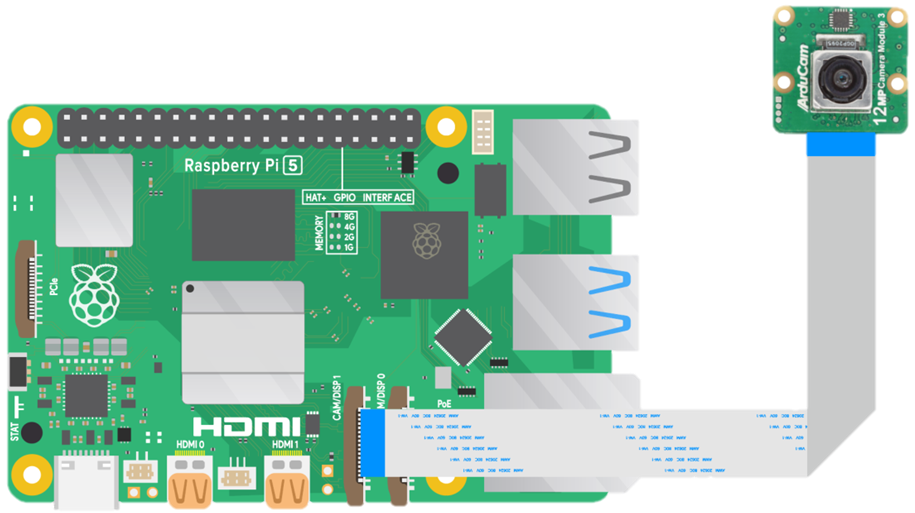
The RPi 5 Camera 3 Ni Yowhan is a high-performance camera module specifically designed for the Raspberry Pi 5. It features advanced imaging capabilities, making it ideal for applications such as robotics, computer vision, multimedia projects, and surveillance systems. With its compact design and optimized compatibility, this camera module is a versatile tool for both hobbyists and professionals.
Common applications include:
- Object detection and tracking in robotics
- High-definition video streaming and recording
- Machine learning and AI-based vision systems
- Time-lapse photography and surveillance
- Multimedia projects requiring high-quality imaging
Explore Projects Built with rpi 5 cam 3 ni yowhan
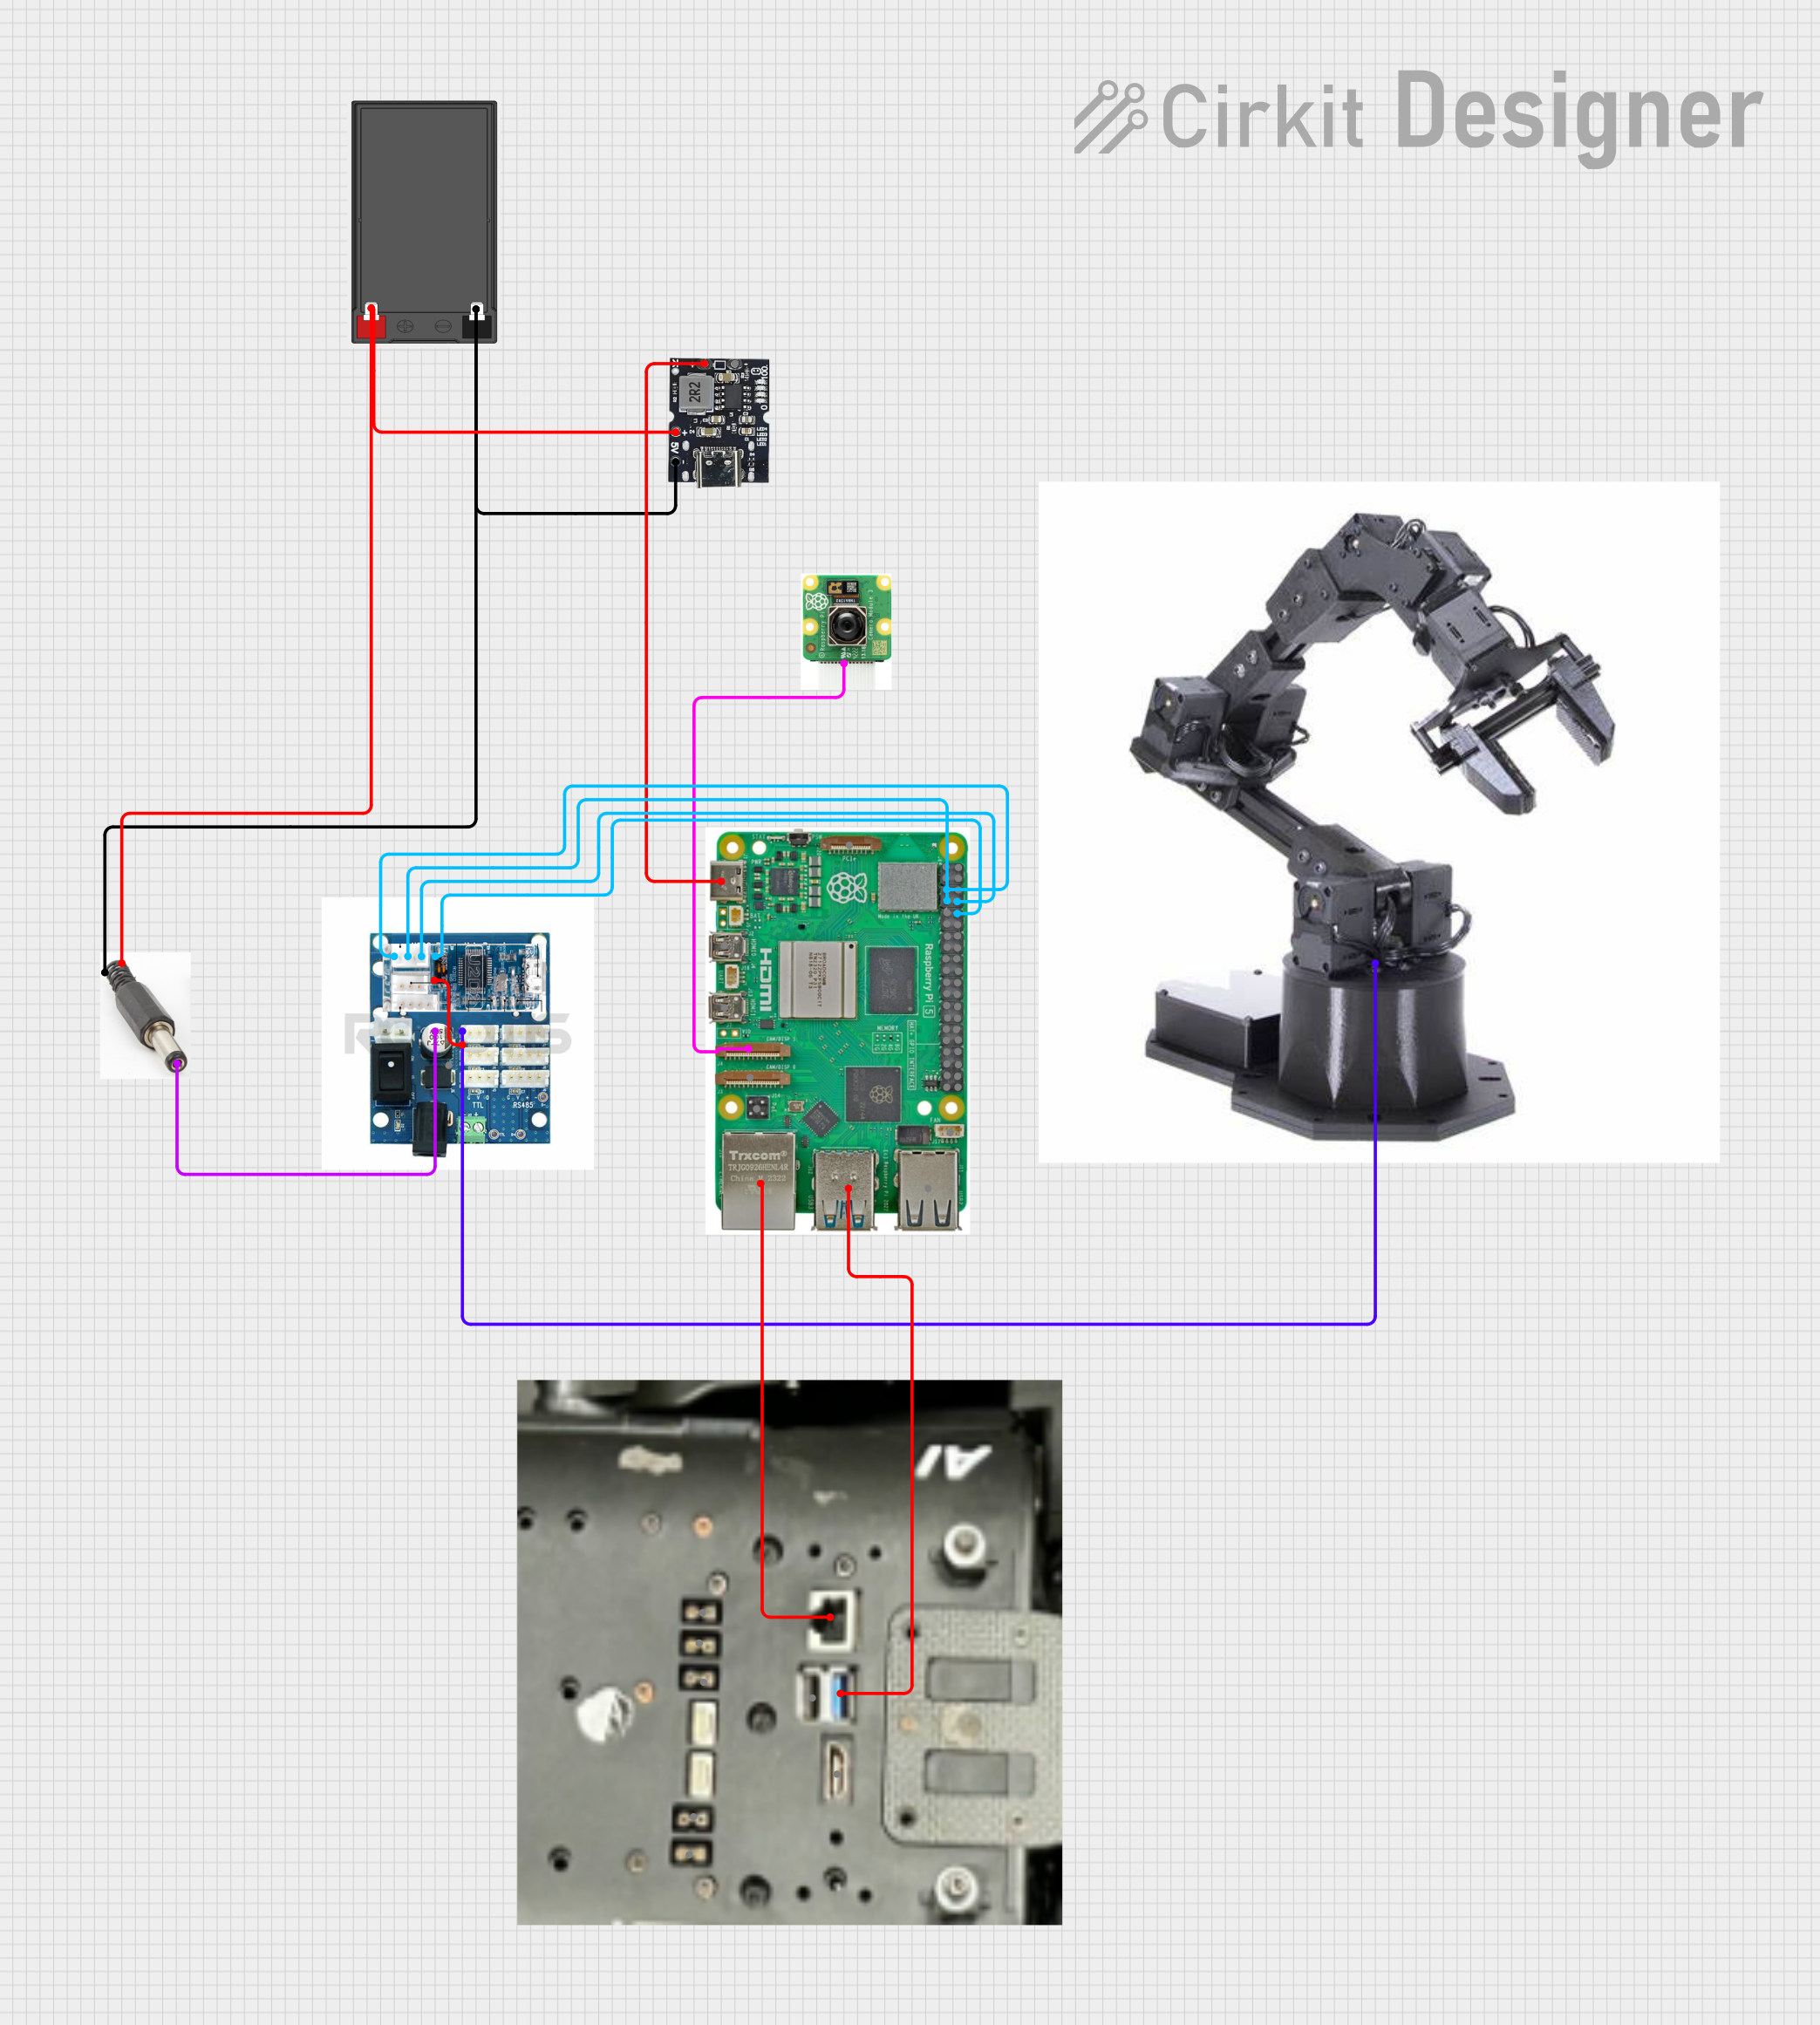
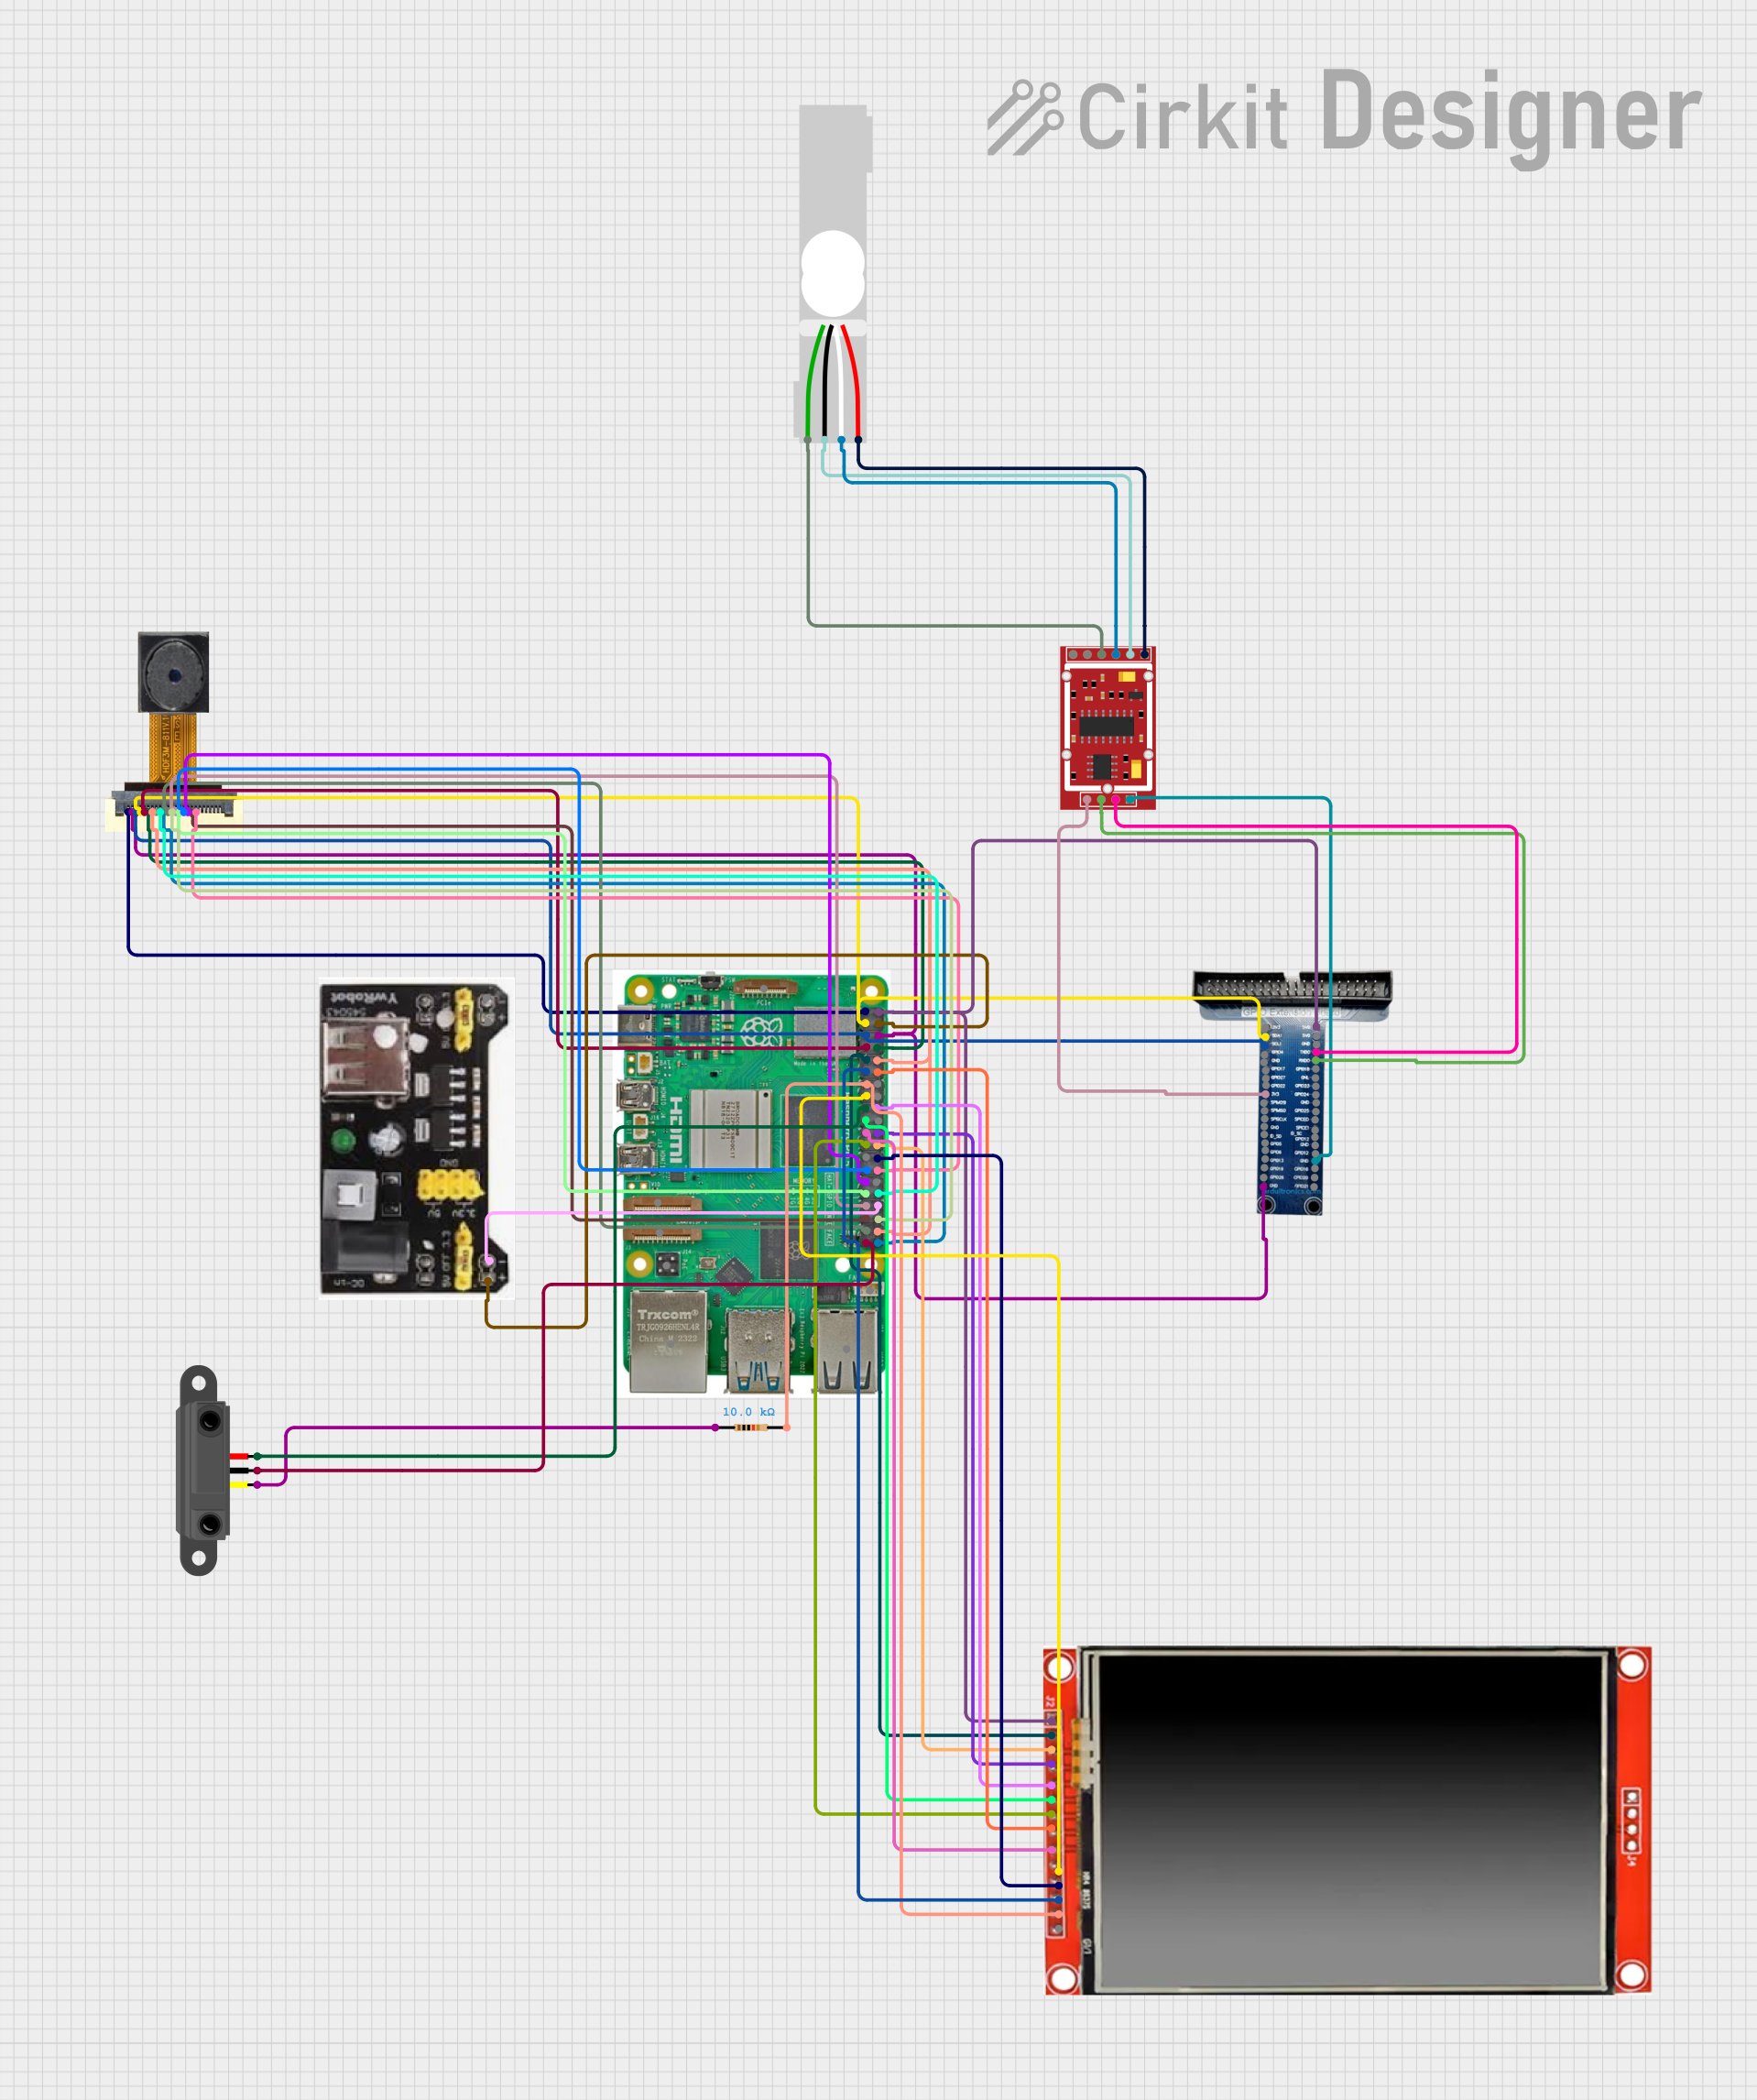
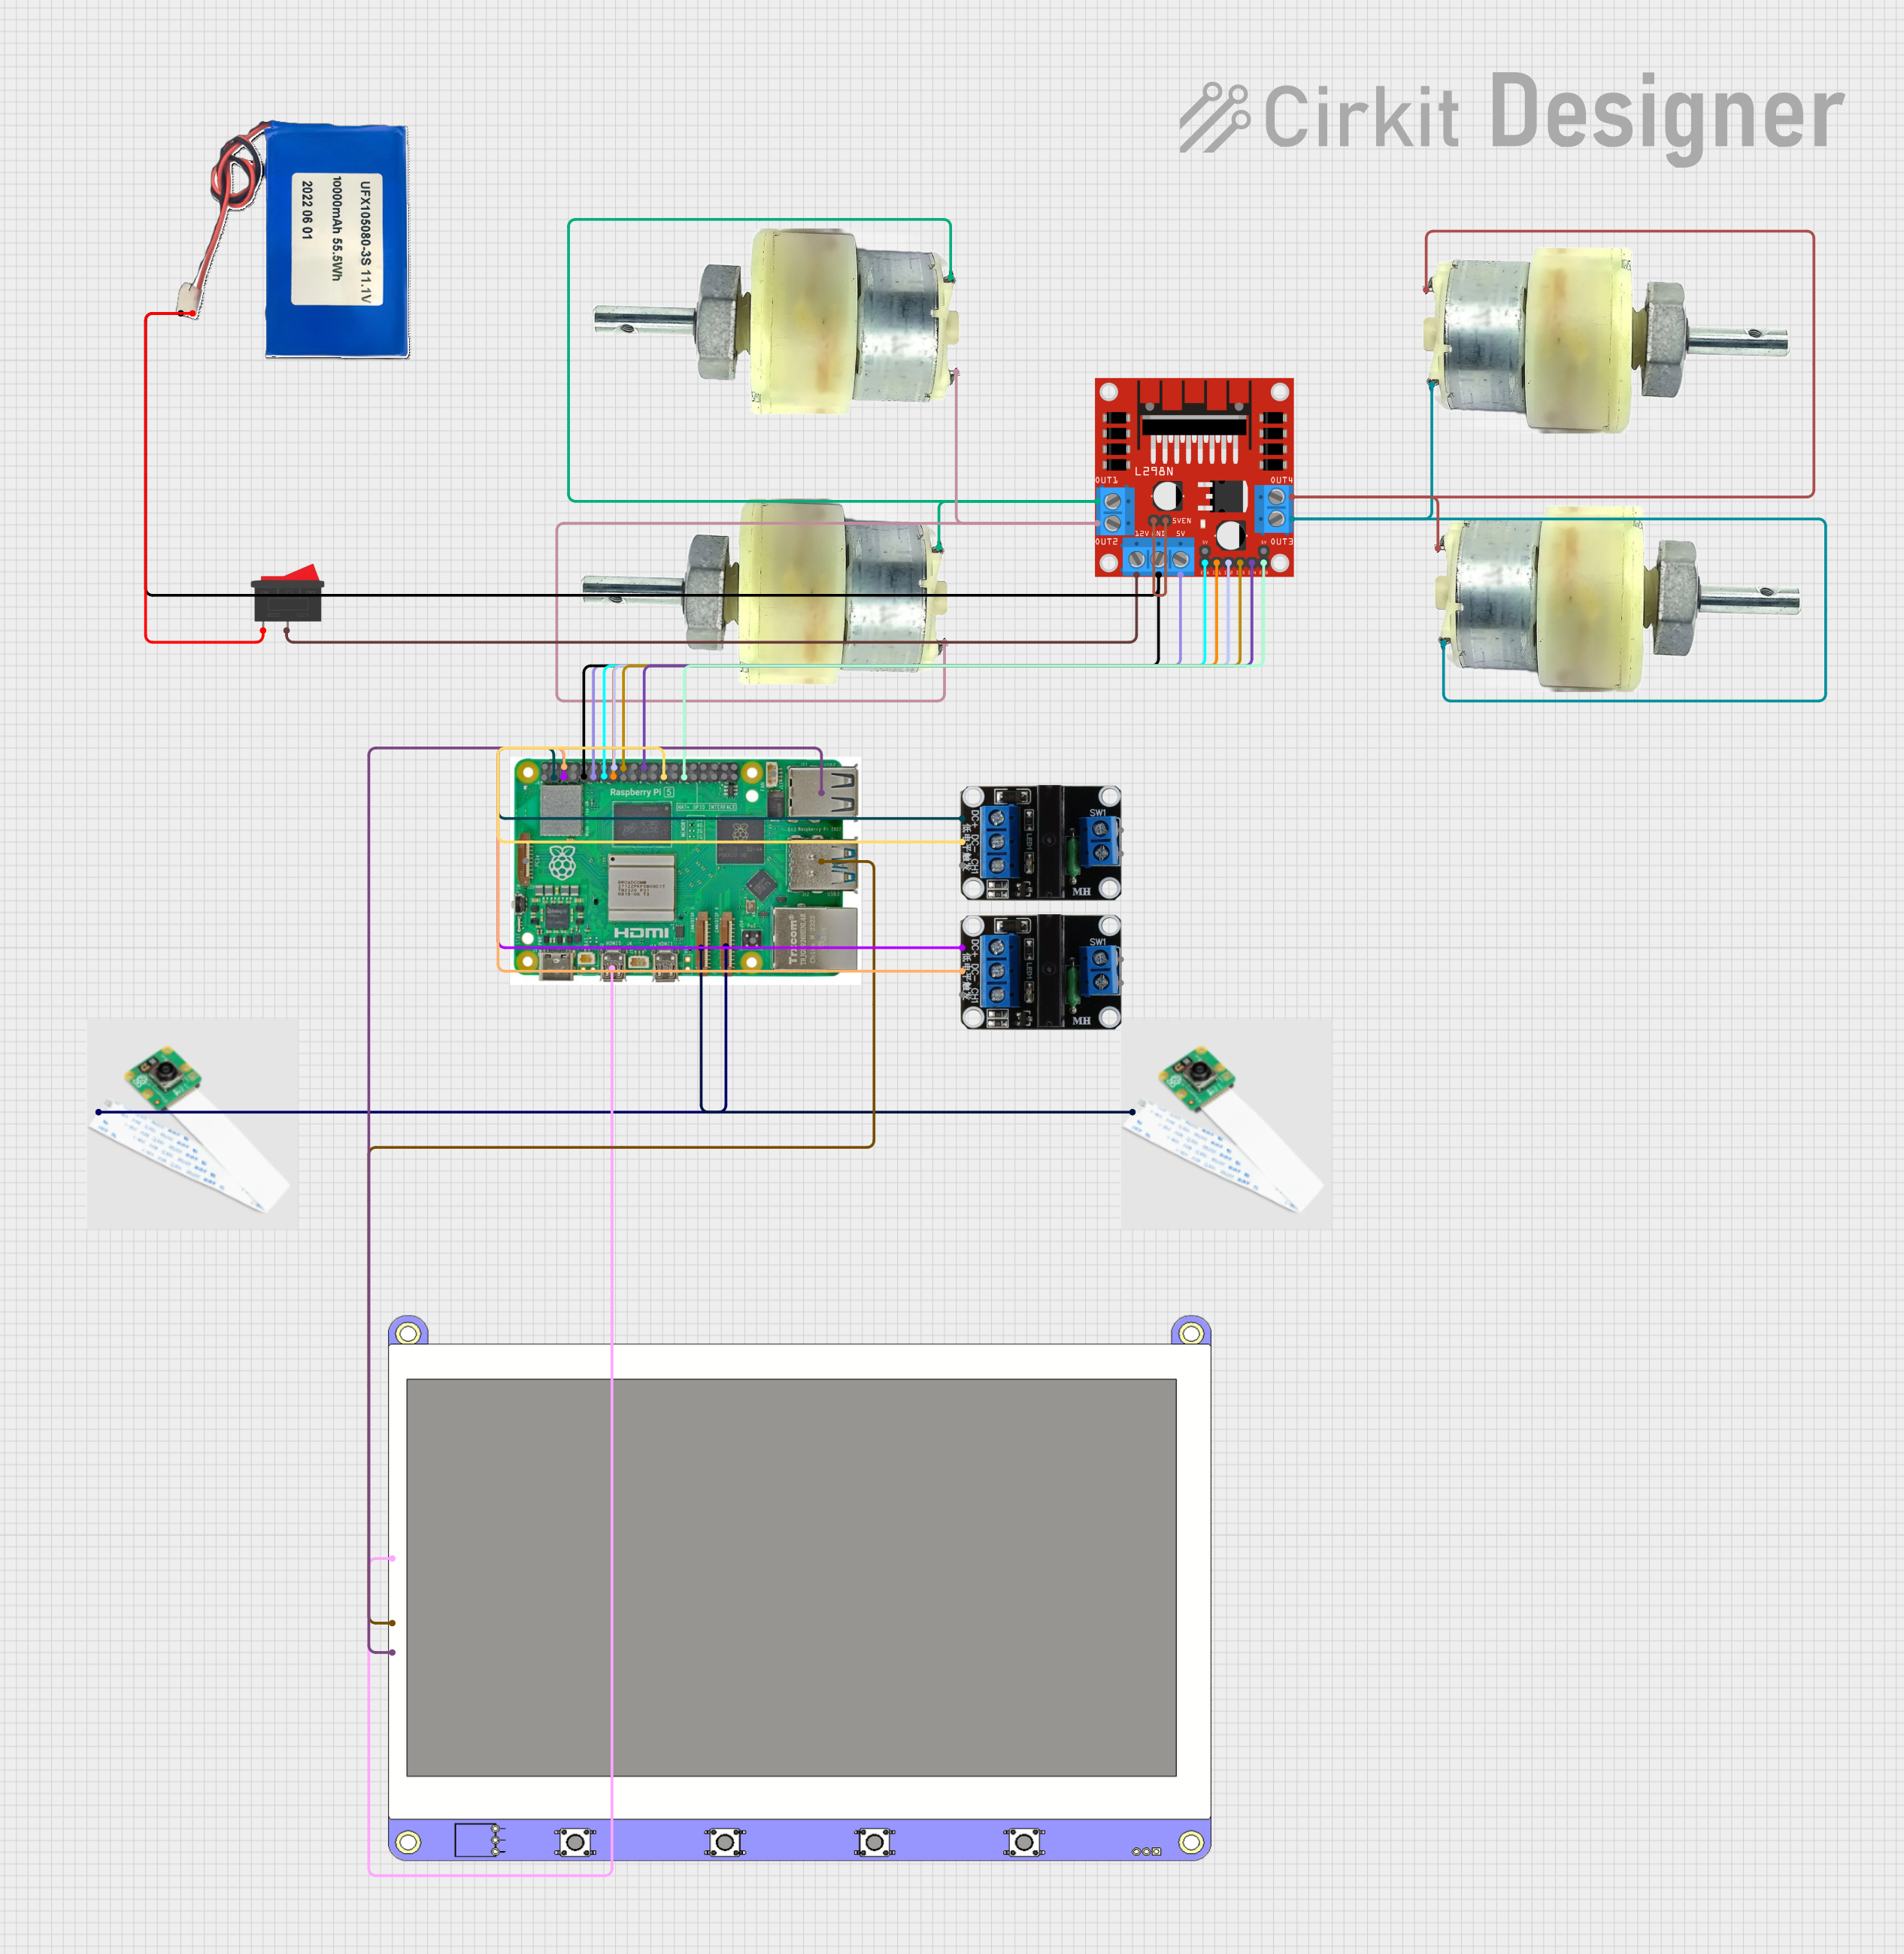

Explore Projects Built with rpi 5 cam 3 ni yowhan
Technical Specifications
The RPi 5 Camera 3 Ni Yowhan offers the following technical features:
Key Specifications
| Parameter | Specification |
|---|---|
| Sensor Type | CMOS |
| Resolution | 12 Megapixels |
| Maximum Frame Rate | 60 fps (at 1080p) |
| Lens Type | Fixed focus |
| Field of View (FoV) | 80° (horizontal) |
| Interface | MIPI CSI-2 |
| Power Supply Voltage | 3.3V (via Raspberry Pi 5 GPIO header) |
| Operating Temperature | -20°C to 70°C |
| Dimensions | 25mm x 24mm x 9mm |
Pin Configuration
The RPi 5 Camera 3 Ni Yowhan connects to the Raspberry Pi 5 via the MIPI CSI-2 interface. Below is the pin configuration for the camera's ribbon cable:
| Pin Number | Signal Name | Description |
|---|---|---|
| 1 | GND | Ground |
| 2 | 3.3V | Power supply |
| 3 | I2C_SCL | I2C Clock for camera configuration |
| 4 | I2C_SDA | I2C Data for camera configuration |
| 5 | CSI_D0+ | Differential data lane 0 (positive) |
| 6 | CSI_D0- | Differential data lane 0 (negative) |
| 7 | CSI_D1+ | Differential data lane 1 (positive) |
| 8 | CSI_D1- | Differential data lane 1 (negative) |
| 9 | CSI_CLK+ | Differential clock (positive) |
| 10 | CSI_CLK- | Differential clock (negative) |
Usage Instructions
Connecting the Camera
- Power off your Raspberry Pi 5 before connecting the camera.
- Locate the MIPI CSI-2 camera connector on the Raspberry Pi 5 board.
- Gently lift the plastic latch on the connector.
- Insert the ribbon cable from the camera module into the connector, ensuring the metal contacts face the correct direction (usually towards the board).
- Secure the ribbon cable by pressing the latch back down.
- Power on the Raspberry Pi 5.
Configuring the Camera
- Ensure your Raspberry Pi 5 is running the latest version of Raspberry Pi OS.
- Open a terminal and enable the camera interface by running:
sudo raspi-config - Navigate to
Interface Options>Cameraand enable it. - Reboot the Raspberry Pi to apply the changes:
sudo reboot
Capturing Images and Videos
You can use the libcamera tools to capture images and videos. For example:
- To capture an image:
libcamera-still -o image.jpg - To record a video:
(Thelibcamera-vid -o video.h264 -t 10000-toption specifies the duration in milliseconds.)
Using with Arduino UNO
While the RPi 5 Camera 3 Ni Yowhan is designed for Raspberry Pi, it is not directly compatible with Arduino boards due to the lack of a CSI interface. However, you can use the Raspberry Pi as a bridge to process camera data and communicate with an Arduino via serial or I2C.
Best Practices
- Avoid touching the camera lens to prevent smudges or scratches.
- Use a compatible Raspberry Pi 5 power supply to ensure stable operation.
- Operate the camera within the specified temperature range to avoid damage.
- For outdoor use, consider using a protective enclosure to shield the camera from dust and moisture.
Troubleshooting and FAQs
Common Issues
Camera not detected by Raspberry Pi:
- Ensure the ribbon cable is securely connected to the CSI port.
- Verify that the camera interface is enabled in
raspi-config. - Check for software updates and install the latest Raspberry Pi OS.
Poor image quality:
- Clean the camera lens with a microfiber cloth.
- Ensure adequate lighting in the environment.
- Verify that the camera is not operating outside its temperature range.
Error when running
libcameracommands:- Ensure the camera is properly connected and powered.
- Reboot the Raspberry Pi and try again.
- Check for conflicting processes using the camera and terminate them.
FAQs
Q: Can I use this camera with older Raspberry Pi models?
A: The RPi 5 Camera 3 Ni Yowhan is optimized for the Raspberry Pi 5 and may not be compatible with older models due to differences in the CSI interface.
Q: What is the maximum resolution supported?
A: The camera supports a maximum resolution of 12 megapixels.
Q: Can I use this camera for night vision?
A: The RPi 5 Camera 3 Ni Yowhan does not include infrared (IR) capabilities. For night vision, consider using an IR-compatible camera module.
Q: How do I extend the ribbon cable for longer distances?
A: Use a high-quality ribbon cable extender to maintain signal integrity. Avoid extending the cable beyond 30cm to prevent data loss.
By following this documentation, you can effectively integrate and utilize the RPi 5 Camera 3 Ni Yowhan in your projects.